Reading EXIF Orientation And Auto-Orienting Images Using GraphicsMagick And Lucee CFML 5.2.9.31
This doesn't come up a lot at work; but, sometimes, a user will upload a photo from their phone. And, while the photo looks "fine" on the phone (and on their computer), it will render as rotated in the browser. This is because the photo was taken with a non-upright camera orientation. The camera stores this orientation setting in the Orientation EXIF (Exchangeable image file format) header of the image file. And so, if I could read the EXIF Orientation and "correct" it using GraphicsMagick and Lucee CFML 5.2.9.31.
It turns out, GraphicsMagick has an -auto-orient operation in the convert command. This will read the orientation from the input image; and then, rotate the image so that it is "correct side up". The resultant image will be stored with an Orientation of 1.
Of course, working with a JPEG image is almost never a lossless operation. As such, we don't necessarily want to run -auto-orient unless we actually have to. Really, it would good to check the input image to see if it contains a non-standard orientation; and then, only in those cases, rotate the image and accept the fact that there may be some degree of data-loss.
To read the EXIF data, we can use GraphicsMagick's identify command. The identiy command reads meta-data about the image and returns it as a String. We can manipulate the format of that String (ie, define which data it contains), by using the -format option.
To read the EXIF Orientation value, we can use:
-format %[EXIF:Orientation]
To explore this auto-orientation workflow, I've created a small GraphicsMagick demo in which I can select a JPG image. Then, using the identify command, I check to see if the image is rotated. And, if it is, I then run the convert command with the -auto-orient option:
<cfscript>
param name="url.image" type="string" default="deer.jpg";
startedAt = getTickCount();
inputFilepath = expandPath( "../images/#url.image#" );
// We can use the IDENTIFY command to read the Orientation header from the image's
// EXIF (Exchangeable image file format) meta-data.
result = gm([
"identify",
// Identify returns a String using a default format. We can use the "-format"
// option to override this response. In this case, we want to return one of the
// EXIF headers.
"-format %[EXIF:Orientation]",
// This is the image we are inspecting.
applyReader( inputFilepath )
]);
// If the Orientation EXIF header is not available in the given photo, the result
// will empty. We're expecting the result to be NUMERIC. As such, we can use val() to
// coalesce undefined values to "0".
// --
// EXIF Orientation readings:
// Taken from : https://sirv.com/help/articles/rotate-photos-to-be-upright/
// --
// 1 : 0 degrees - the correct orientation, no adjustment is required.
// 2 : 0 degrees, mirrored - image has been flipped back-to-front.
// 3 : 180 degrees - image is upside down.
// 4 : 180 degrees, mirrored - image is upside down and flipped back-to-front.
// 5 : 90 degrees - image is on its side.
// 6 : 90 degrees, mirrored - image is on its side and flipped back-to-front.
// 7 : 270 degrees - image is on its far side.
// 8 : 270 degrees, mirrored - image is on its far side and flipped back-to-front.
inputOrientation = val( result.trim() );
// If the image has a non-correct orientation, let's use the CONVERT command to
// auto-orient it as we copy it to the current directory (for the demo). This will
// rotate the image so that it is correct-side-up.
if ( inputOrientation > 1 ) {
result = gm([
"convert",
// This is the image we are inspecting.
applyReader( inputFilepath ),
// Tell Graphicsmagick to use the image's EXIF data to automatically rotate
// the image so that it is correct-side-upright.
"-auto-orient",
// Remove all profile and text-attribute data from the image. This can
// reduce the file-size of the image (which is good for the web).
"-strip",
// CAUTION: Manipulating a JPG image is [almost never] LOSSLESS! When we
// output the JPG, GraphicsMagick is defaulting to a quality of 75. As such,
// auto-orienting may result in some degree of data loss.
// --
// "-quality 75",
// Finally, write the file to the local directory.
expandPath( "./out.jpg" )
]);
// If the image has the correct orientation - or if there is no orientation info -
// let's just copy the file as-is to the current directory (for the demo).
} else {
fileCopy( inputFilepath, "./out.jpg" );
}
duration = ( getTickCount() - startedAt );
// ------------------------------------------------------------------------------- //
// ------------------------------------------------------------------------------- //
/**
* I prefix the given filepath with an explicit reader. We want to be EXPLICIT about
* which input reader GraphicsMagick should use when reading in an image. If we leave
* it up to "automatic detection", a malicious actor could fake the file-type and
* potentially exploit a weakness in a given reader. As such, we want to align the
* reader with the articulated file-type.
*
* READ MORE: http://www.graphicsmagick.org/security.html
*
* @filepath I am the filepath being decorated.
*/
public string function applyReader( required string filepath ) {
switch ( listLast( filepath, "." ).lcase() ) {
case "jpg":
case "jpeg":
var reader = "jpg";
break;
case "gif":
var reader = "gif";
break;
case "png":
var reader = "png";
break;
default:
throw( type = "UnsupportedImageFileExtension" );
break;
}
return( reader & ":""" & filepath & """" );
}
/**
* I execute the given options against the GM (GraphicsMagick) command-line tool. If
* there is an error, the error is dumped-out and the processing is halted. If there
* is no error, the standard-output is returned.
*
* NOTE: Options are flattened using a space (" ").
*
* @options I am the collection of options to apply.
* @timeout I am the timeout to use during the execution.
*/
public string function gm(
required array options,
numeric timeout = 5
) {
execute
name = "gm"
arguments = options.toList( " " )
variable = "local.successResult"
errorVariable = "local.errorResult"
timeout = timeout
;
// If the error variable has been populated, it means the CFExecute tag ran into
// an error - let's dump-it-out and halt processing.
if ( local.keyExists( "errorVariable" ) && errorVariable.len() ) {
dump( errorVariable );
abort;
}
return( successResult ?: "" );
}
</cfscript>
<cfoutput>
<link rel="stylesheet" type="text/css" href="./demo.css">
<h3>
<strong>Orientation:</strong> #inputOrientation#
<cfif ( inputOrientation gt 1 )>
:: Applying "-auto-orient"
</cfif>
</h3>
<p class="images">
<img src="../images/#url.image#" width="315" />
<img src="./out.jpg" width="315" />
</p>
<p>
<strong>File Size:</strong>
#numberFormat( getFileInfo( inputFilepath ).size )#
—>
#numberFormat( getFileInfo( "./out.jpg" ).size )#
</p>
<p>
<a href="#cgi.script_name#?image=deer.jpg">deer</a>,
<a href="#cgi.script_name#?image=beach-small.jpg">beach-small</a>,
<a href="#cgi.script_name#?image=bench.jpg">bench</a>
</p>
<p>
Duration: #numberFormat( duration )# ms
</p>
</cfoutput>
As you can see, I first read the Orientation of the image. And, if that EXIF header value is present, it will be returned as a number. If that number ends up being greater than 1, I rotate the image using -auto-orient as I copy the image into the demo directory.
If I run this ColdFusion code and select a JPG image that is oriented, I get the following output:
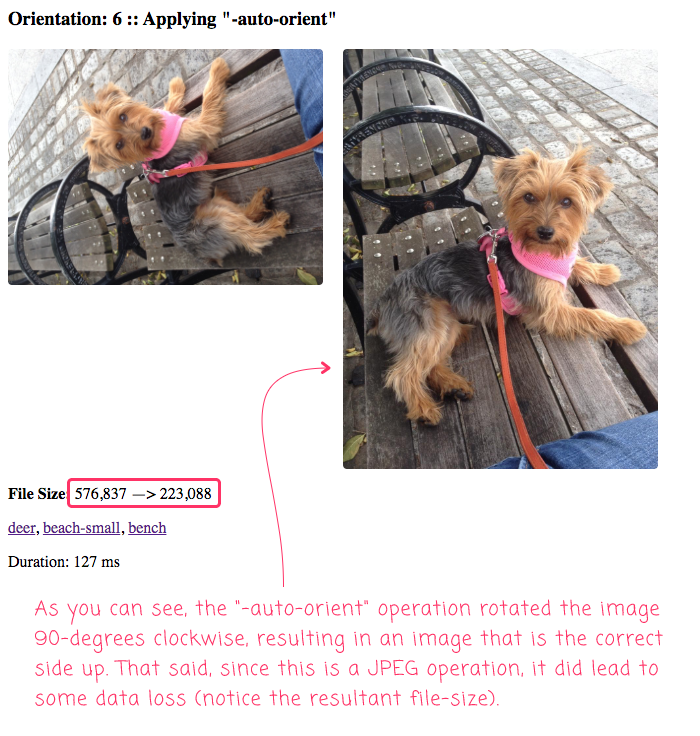
As you can see from the image on the left, this photo of my dog was oriented with a counter-clockwise rotation. This resulted in an Orientation EXIF header of 6. As such, it gets run through the -auto-orient operation, leaving me with an image that is "properly" oriented.
Of course, rotating the JPEG image results in some data loss - notice that the size of the input image was 576Kb while the size of the output image was a mere 223Kb (a 50% reduction in file-size using GraphicsMagick's default -quality setting of 75). That said, when I look at the before-and-after photos with my naked eye, I don't see any loss in visual quality.
When dealing with user-generated images, there's always a fine line with how much you want to apply programmatic manipulation. After all, there has to be some assumption that the user - especially a Designer - made a calculated decision about the size and compression of an image vs. the quality of that image. That said, auto-orienting a photo taken on a phone does feel like a use-case where we can step-in and make some educated decisions on behalf of the user. And, it's nice to know that GraphicsMagick makes this super easy in Lucee CFML.
Want to use code from this post? Check out the license.

Reader Comments
Hi Ben,
Thanks as ever for this writeup. I have recently had to contend with similar issues with users uploading images. If anybody is looking for a CF only version this may be useful to them:
Simply rotate the image by the 'correction' value using
imageRotateand you should be good to go.@Martin,
Good call-out, thank you. We keep running into this at work, across different teams. It feels good to be the one who can swoop in and tell people about EXIF data ... not that I really understand it - I just understand why their photos show up funny.