Creating A Partially-Transparent Overlay Using GraphicsMagick And Lucee CFML 5.2.9.31
Continuing my exploration of GraphicsMagick, one of the actions that I need to perform at work is to create a composite image in which one image is drawn over another image using a partial transparency. Meaning, I need to overlay a source image over a base image such that the base image is partially visible beneath the overlay. Imagine something akin to applying a watermark to an image (I'm not applying watermarks, but the visual is the same). I was able to come up with two solutions using Lucee CFML 5.2.9.31.
In a previous GraphicsMagick exploration, I looked at how to scale an image using the -draw operation. I had hoped that the -draw operation would also allow for some sort of transparency setting; however, I was unable to find such a setting. As such, both of my approaches require creating an intermediary .miff (Magick Image File Format) file; and, making two calls to the GraphicsMagick CLI.
ASIDE: I've started to use the
.mifffile format for intermediary files since Bob Friesenhahn says they are lossless and faster than PNGs.
In my first approach, the intermediary .miff file represents the overlay image in its already-scaled, partially-transparent format. This subsequent -draw command then pastes the prepared overlay on top of the base image without having to perform any other image manipulation work.
<cfscript>

	startedAt = getTickCount();

	inputFilepath = expandPath( "../images/beach-small.jpg" );

	// In the first approach to drawing a partially-transparent image over another, we're
	// going to create an intermediary image that represents the image overlay. This will
	// the SCALED and PARTIALLY-TRANSPARENT image.
	// --
	// NOTE: We're using the MIFF (Magick Image File Format) file-type to represent our
	// intermediary image since it is both lossless and more efficient than a PNG file.
	result = gm([
		"convert",

		applyReader( inputFilepath ),

		// Scale the image down to the dimensions that we want it to have in the final
		// composite / overlay.
		"-resize 300x224",

		// Set the opacity of the image (0% is fully opaque).
		// --
		// NOTE: We're using the "-matte" option to ensure that the image has an active
		// opacity channel. If it doesn't the opacity operation will be ignored.
		"-matte",
		"-operator opacity assign 20%",

		// Write to our temporary, lossless MIFF file.
		expandPath( "./temp.miff" )
	]);

	// Now that we have our temporary file that has been stored with both the desired
	// dimensions and opacity, all we have to do is draw it (overlay it) on top of the
	// destination canvas.
	result = gm([
		"convert",

		// For this demo, we're going to create a "blank" canvas that contains the
		// traditional "checkerboard" background (so that we can see how the opacity of
		// the overlay allows the background to show through). GraphicsMagick provides a
		// built-in pattern image that we can use: CHECKERBOARD.
		// --
		// NOTE: The subsequent "-fill" is adjusting the colors of the checkerboard.
		"-size 500x300 tile:image:checkerboard",
		"-fill ##fdfdfd -opaque ##999999",
		"-fill ##cacaca -opaque ##666666",

		// Overlay the temporary file.
		// --
		// NOTE: By providing 0,0 as the overlay dimensions, we're telling GraphicsMagick
		// to use the natural dimensions of the source image.
		"-draw 'image over 100,37 0,0 #expandPath( "./temp.miff" )#'",

		// And, finally, output our composite image!
		expandPath( "./out.png" )
	]);

	duration = ( getTickCount() - startedAt );

	// ------------------------------------------------------------------------------- //
	// ------------------------------------------------------------------------------- //

	/**
	* I prefix the given filepath with an explicit reader. We want to be EXPLICIT about
	* which input reader GraphicsMagick should use when reading in an image. If we leave
	* it up to "automatic detection", a malicious actor could fake the file-type and
	* potentially exploit a weakness in a given reader. As such, we want to align the
	* reader with the articulated file-type.
	*
	* READ MORE: http://www.graphicsmagick.org/security.html
	*
	* @filepath I am the filepath being decorated.
	*/
	public string function applyReader( required string filepath ) {

		switch ( listLast( filepath, "." ).lcase() ) {
			case "jpg":
			case "jpeg":
				var reader = "jpg";
			break;
			case "gif":
				var reader = "gif";
			break;
			case "png":
				var reader = "png";
			break;
			default:
				throw( type = "UnsupportedImageFileExtension" );
			break;
		}

		return( reader & ":""" & filepath & """" );

	}


	/**
	* I execute the given options against the GM (GraphicsMagick) command-line tool. If
	* there is an error, the error is dumped-out and the processing is halted. If there
	* is no error, the standard-output is returned.
	*
	* NOTE: Options are flattened using a space (" ").
	*
	* @options I am the collection of options to apply.
	* @timeout I am the timeout to use during the execution.
	*/
	public string function gm(
		required array options,
		numeric timeout = 5
		) {

		execute
			name = "gm"
			arguments = options.toList( " " )
			variable = "local.successResult"
			errorVariable = "local.errorResult"
			timeout = timeout
		;

		// If the error variable has been populated, it means the CFExecute tag ran into
		// an error - let's dump-it-out and halt processing.
		if ( local.keyExists( "errorVariable" ) && errorVariable.len() ) {

			dump( errorVariable );
			abort;

		}

		return( successResult ?: "" );

	}

</cfscript>
<cfoutput>

	<p>
		<img
			src="./out.png"
			width="500"
			height="300"
		/>
	</p>

	<p>
		Duration: #numberFormat( duration )# ms
	</p>

</cfoutput>
As you can see, when we're creating the intermediary image, we're using the following operations to setup the transparency of the overlay:
-matte- ensures an active opacity channel.-operator opacity assign 20%- sets the opacity of the image.
This creates a partially-transparent image which can then be pasted directly onto our base image. And, when we run the above ColdFusion code, we get the following output:
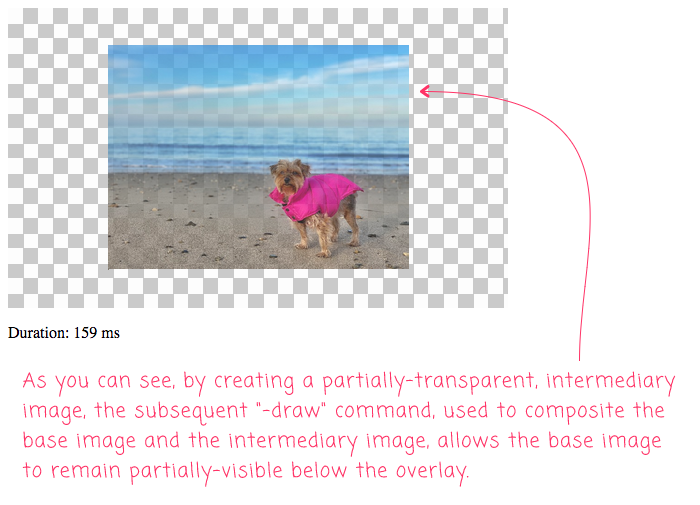
As you can see, the partial-transparency codified in the intermediary image is carried over to the composite in the subsequent -draw command. This allows the base image to remain partially-visible beneath the overlay.
My second approach to creating a partially-transparent overlay comes from Jamil. In his post, Jamil demonstrates how to use the -dissolve operation in the composite command to partially render one image over another. This approach still requires an intermediary image; but, this time, instead of the intermediary image representing the overlay, it will represent the base image:
<cfscript>

	startedAt = getTickCount();

	inputFilepath = expandPath( "../images/beach-small.jpg" );

	// In the second approach to drawing a partially-transparent image over another,
	// we're going to use the COMPOSITE command instead of the CONVERT image. But, we're
	// still going to create an intermediary image. This time, however, the intermediary
	// image will be our background, not our overlay.
	// --
	// NOTE: We're using the MIFF (Magick Image File Format) file-type to represent our
	// intermediary image since it is both lossless and more efficient than a PNG file.
	result = gm([
		"convert",

		// For this demo, we're going to create a "blank" canvas that contains the
		// traditional "checkerboard" background (so that we can see how the opacity of
		// the overlay allows the background to show through). GraphicsMagick provides a
		// built-in pattern image that we can use: CHECKERBOARD.
		// --
		// NOTE: The subsequent "-fill" is adjusting the colors of the checkerboard.
		"-size 500x300 tile:image:checkerboard",
		"-fill ##fdfdfd -opaque ##999999",
		"-fill ##cacaca -opaque ##666666",

		// Write to our temporary, lossless MIFF file.
		expandPath( "./out.miff" )
	]);

	// Now that we have our temporary background image, we're going to COMPOSITE the two
	// images together using "-dissolve".
	result = gm([
		"composite",

		// Scale and position the overlay image (our "change-image").
		"-geometry 300x224+100+37",

		// Set the opacity of the overlay image (our "change-image").
		// --
		// NOTE: In the previous demo in which we "assigned" opacity, 0% represented a
		// fully-opaque pixel. When using "dissolve", 100% represents a fully-opaque
		// pixel in the resultant composite.
		"-dissolve 80%",

		// Overlay the "change-image" (the one that we want to be partially transparent)
		// over our "base-image".
		applyReader( inputFilepath ),

		// Use our temporary MIFF file as the base image (our checkerboard background).
		expandPath( "./out.miff" ),

		// And, finally, output our composite image!
		expandPath( "./out-2.png" )
	]);

	duration = ( getTickCount() - startedAt );

	// ------------------------------------------------------------------------------- //
	// ------------------------------------------------------------------------------- //

	/**
	* I prefix the given filepath with an explicit reader. We want to be EXPLICIT about
	* which input reader GraphicsMagick should use when reading in an image. If we leave
	* it up to "automatic detection", a malicious actor could fake the file-type and
	* potentially exploit a weakness in a given reader. As such, we want to align the
	* reader with the articulated file-type.
	*
	* READ MORE: http://www.graphicsmagick.org/security.html
	*
	* @filepath I am the filepath being decorated.
	*/
	public string function applyReader( required string filepath ) {

		switch ( listLast( filepath, "." ).lcase() ) {
			case "jpg":
			case "jpeg":
				var reader = "jpg";
			break;
			case "gif":
				var reader = "gif";
			break;
			case "png":
				var reader = "png";
			break;
			default:
				throw( type = "UnsupportedImageFileExtension" );
			break;
		}

		return( reader & ":""" & filepath & """" );

	}


	/**
	* I execute the given options against the GM (GraphicsMagick) command-line tool. If
	* there is an error, the error is dumped-out and the processing is halted. If there
	* is no error, the standard-output is returned.
	*
	* NOTE: Options are flattened using a space (" ").
	*
	* @options I am the collection of options to apply.
	* @timeout I am the timeout to use during the execution.
	*/
	public string function gm(
		required array options,
		numeric timeout = 5
		) {

		execute
			name = "gm"
			arguments = options.toList( " " )
			variable = "local.successResult"
			errorVariable = "local.errorResult"
			timeout = timeout
		;

		// If the error variable has been populated, it means the CFExecute tag ran into
		// an error - let's dump-it-out and halt processing.
		if ( local.keyExists( "errorVariable" ) && errorVariable.len() ) {

			dump( errorVariable );
			abort;

		}

		return( successResult ?: "" );

	}

</cfscript>
<cfoutput>

	<p>
		<img
			src="./out-2.png"
			width="500"
			height="300"
		/>
	</p>

	<p>
		Duration: #numberFormat( duration )# ms
	</p>

</cfoutput>
As you can see, instead of using the -draw operation in the convert command, we're using the -dissolve operation in the composite command. In the former approach, we assigned an opacity of 20%. But, with the -dissolve operation, that value needs to be inverted. Instead of setting opacity, you can think of the -dissolve operation as "using a portion" of the source image. So, in this case, we want to "use 80% of the source image" to create that same 20% opacity.
NOTE: I believe that words like "opacity" and "transparency" have a much more technical definition than the way in which I am using them. As such, please take my writing as a demonstration of intent, not necessarily an exercise in the academic application of proper terminology. Honestly, I'm just trying to makes heads-and-tails of what I'm reading about in the GraphicsMagick documentation.
Now, if we run the ColdFusion code for the second approach, we get the following output:

As you can see, when we dissolve 80% of the source image on top of our intermediary base image, we create a partially-transparent overlay that allows some of the base image to remain visible.
At first, I had hoped to be able to generate a partially-transparent overlay / composite using a single GraphicsMagick command in Lucee CFML 5.2.9.31. But, in the end, using an intermediary image is actually kind of nice. It keeps each individual command easy to reason about. Of course, if anyone has a way to condense this down to one command, I'd definitely be interested!
Want to use code from this post? Check out the license.

Reader Comments