
Scaling An Image During A Draw Operation Using GraphicsMagick And Lucee CFML 5.2.9.31
Last month, I posted a demo in which I annotated an image using GraphicsMagick and Lucee CFML. In that demo, I used the -draw command to composite the source image over a blank canvas. The source image was drawn using its natural dimensions; but, the -draw command also provides a way to scale the source image as it is being composited. Since this is something I'll need to do at work (for @2x, @3x, and @print pixel densities), I wanted to take a quick look at how an image can be resized during the -draw operation using GraphicsMagick and Lucee CFML 5.2.9.31.
As part of the convert command, the -draw sub-command takes the form of:
-draw over x,y width,height inputFile
If the width and height are supplied as 0,0, GraphicsMagick uses the natural dimensions of the input file when pasting the image into the current canvas. But, if the width and height are supplied as non-zero values, GraphicsMagick will resize the image as part of the composition.
To explore this convert / -draw functionality, I've created a simple demo in which a selected input image is drawn at several different dimensions on a blank canvas. This is done in a single convert using multiple, successive -draw sub-commands with increasing paste dimensions:
drawWidths = [ 10, 50, 100, 200, 300 ];
These "width" dimensions are mapped onto a series of -draw commands which are then spread into the convert operation:
<cfscript>

	param name="url.image" type="string" default="beach-small.jpg";

	startedAt = getTickCount();

	// CAUTION: For the sake of the demo, I am not validating the input image. However,
	// in a production setting, I would never allow an arbitrary filepath to be provided
	// by the user! Not without some sort of validation.
	inputFilename = url.image;
	inputFilepath = expandPath( "../images/#inputFilename#" );

	// As a first step, we need to figure out how large the input image is so that we can
	// calculate the display-scale of each paste operation. To do that, we can use the
	// Identify utility.
	inputDimensions = getImageDimensions( inputFilepath );
	inputWidth = inputDimensions.width;
	inputHeight = inputDimensions.height;

	// Setup the output filepath for our generated image.
	// --
	// NOTE: The file-extension of this output filename will be used by GraphicsMagick to
	// figure out how to encode the final image.
	outputFilename = "out.jpg";
	outputFilepath = expandPath( "./#outputFilename#" );

	// Define the dimensions of our demo image.
	outputWidth = 650;
	outputHeight = 300;

	// ------------------------------------------------------------------------------- //
	// ------------------------------------------------------------------------------- //

	// Before we execute our Convert command, let's calculate the "-draw" sub-commands
	// for each of the desired scaling sizes. These are the WIDTH dimensions at which we
	// want to paste the input image into the output image:
	drawWidths = [ 10, 50, 100, 200, 300 ];

	// As we draw the input image at different widths, we need to keep a running offset
	// for the X-coordinate of the operation (so that the different draw operations don't
	// overlap each other).
	runningX = 10;

	// Map the widths onto the actual "-draw" sub-commands.
	drawCommands = drawWidths.map(
		( drawWidth ) => {

			var drawScale = ( drawWidth / inputWidth );
			var drawHeight = ( inputHeight * drawScale );
			var drawX = runningX;
			var drawY = 10;

			// Update the running X-coordinate for the next iteration.
			runningX += ( drawWidth + 10 );

			// CAUTION: It is not possible to provide an explicit READER during a draw
			// operation. To avoid potential security issues, the input should be
			// sanitized ahead of time.
			// --
			// Read More: https://sourceforge.net/p/graphicsmagick/discussion/250738/thread/71a6a6a8e8/
			return( "-draw 'image over #drawX#,#drawY# #drawWidth#,#drawHeight# #inputFilepath#'" );

		}
	);

	// ------------------------------------------------------------------------------- //
	// ------------------------------------------------------------------------------- //

	// Now that we know where and at what sizes the input images are going to be pasted
	// into the output image, we can use the Convert utility to compose the various
	// image operations together.
	result = gm([
		"convert",

		// Start with a "blank" canvas with the desired output dimensions.
		"-size #outputWidth#x#outputHeight# xc:##fafafa",

		// Now, let's "spread" the "draw" sub-commands into the current Convert.
		drawCommands.toList( " " ),

		// And, finally, output our composite image!
		"-quality 75",
		outputFilepath
	]);

	duration = ( getTickCount() - startedAt );

	// ------------------------------------------------------------------------------- //
	// ------------------------------------------------------------------------------- //

	/**
	* I prefix the given filepath with an explicit reader. We want to be EXPLICIT about
	* which input reader GraphicsMagick should use when reading in an image. If we leave
	* it up to "automatic detection", a malicious actor could fake the file-type and
	* potentially exploit a weakness in a given reader. As such, we want to align the
	* reader with the articulated file-type.
	*
	* READ MORE: http://www.graphicsmagick.org/security.html
	*
	* @filepath I am the filepath being decorated.
	*/
	public string function applyReader( required string filepath ) {

		switch ( listLast( filepath, "." ).lcase() ) {
			case "jpg":
			case "jpeg":
				var reader = "jpg";
			break;
			case "gif":
				var reader = "gif";
			break;
			case "png":
				var reader = "png";
			break;
			default:
				throw( type = "UnsupportedImageFileExtension" );
			break;
		}

		return( reader & ":""" & filepath & """" );

	}


	/**
	* I return the Width and Height of the image at the given path.
	*
	* @filepath I am the filepath being inspected.
	*/
	public struct function getImageDimensions( required string filepath ) {

		// NOTE: Trailing comma after -format being included on purposes. It delimits
		// multi-page images (like GIFs). While I don't have any GIFs in this demo, I am
		// leaving it in so I don't forget why I have it.
		var result = gm([
			"identify",
			"-format %w,%h,",
			applyReader( filepath )
		]);

		var dimensions = result.listToArray();

		return({
			width: dimensions[ 1 ],
			height: dimensions[ 2 ]
		});

	}


	/**
	* I execute the given options against the GM (GraphicsMagick) command-line tool. If
	* there is an error, the error is dumped-out and the processing is halted. If there
	* is no error, the standard-output is returned.
	*
	* NOTE: Options are flattened using a space (" ").
	*
	* @options I am the collection of options to apply.
	* @timeout I am the timeout to use during the execution.
	*/
	public string function gm(
		required array options,
		numeric timeout = 5
		) {

		execute
			name = "gm"
			arguments = options.toList( " " )
			variable = "local.successResult"
			errorVariable = "local.errorResult"
			timeout = timeout
		;

		// If the error variable has been populated, it means the CFExecute tag ran into
		// an error - let's dump-it-out and halt processing.
		if ( local.keyExists( "errorVariable" ) && errorVariable.len() ) {

			dump( errorVariable );
			abort;

		}

		return( successResult ?: "" );

	}

</cfscript>
<cfoutput>

	<h1>
		Resizing The Image During The DRAW Command
	</h1>

	<p>
		<img
			src="./#outputFilename#"
			width="#outputWidth#"
			height="#outputHeight#"
			style="border: 1px solid ##aaaaaa ; border-radius: 4px ;"
		/>
	</p>

	<!--- List all of the images in the test directory. --->
	<p style="width: 650px ;">
		<cfloop query="#directoryList( path = '../images', listInfo = 'query', sort = 'name asc' )#">

			<a href="#cgi.script_name#?image=#encodeForHtmlAttribute( name )#">
				#encodeForHtml( name )#
			</a>,

		</cfloop>
	</p>

	<p>
		Duration: #numberFormat( duration )# ms
	</p>

</cfoutput>
As you can see, when we select an input image, we use the convert command to generate an output image that contains the input image drawn at five different scales. Now, if we run this ColdFusion code and select an input, we get the following output:
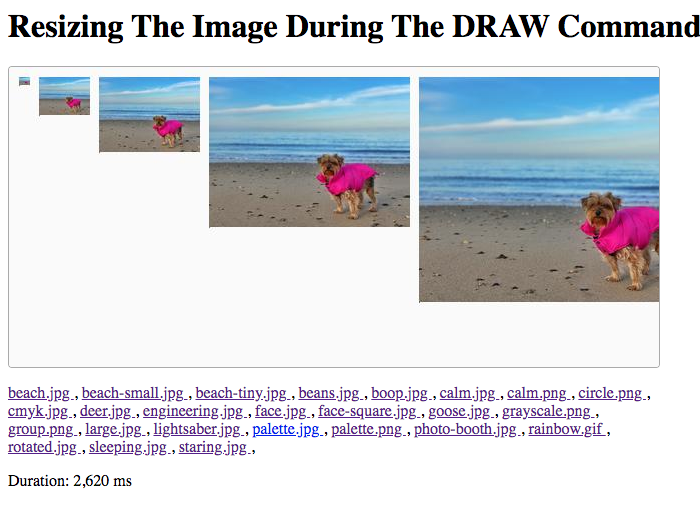
As you can see, by using a single convert command with several -draw operations, we were able to scale the input image as we pasted in onto the canvas.
This was working great with the RGB color-space images. But, when I tried it out with a CMYK image, things got a little crazy:
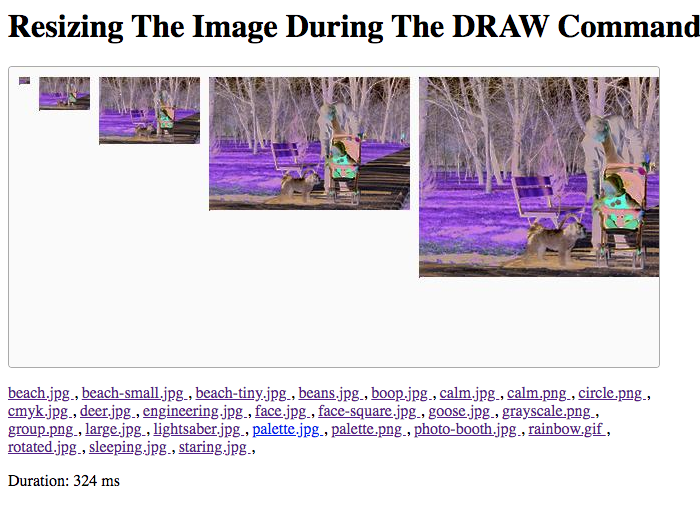
When we use the -draw command with a CMYK colorspace image, it appears to get pasted with some sort of color-inversion. I looked for a way to convert the colorspace as part of the -draw; but, it doesn't appear to be a support approach.
To get this to work with CMYK images, I decided to try another approach in which I generate intermediary images prior to the convert command. So, instead of resizing the image as part of the paste, I'm going to create a scaled intermediary image in the RGB colorspace; and then, I'm going to use the -draw commands to paste the intermediary images using their "natural" dimensions.
This code is basically the same with the exception that I'm generating a .miff (Magic Image File Format) image in the RGB colorspace for each scaled-width dimension. I chose MIFF because it is described as an "efficient lossless" image format; and, I didn't want to lose image quality as a byproduct of saving an intermediary image:
Magick Image File Format (MIFF) is a platform-independent format for storing bitmap images. MIFF was originally invented by John Cristy for ImageMagick, but is also a native format of GraphicsMagick. It is useful as an efficient lossless working file format which assures that all of the image attributes used by ImageMagick and GraphicsMagick are preserved.
For sake of simplicity, I'm not cleaning-up the intermediary files. Obviously, if this were a production context, I'd be doing this kind of work in an scratch directory; and, then deleting the directory when I was done:
<cfscript>

	param name="url.image" type="string" default="beach-small.jpg";

	startedAt = getTickCount();

	// CAUTION: For the sake of the demo, I am not validating the input image. However,
	// in a production setting, I would never allow an arbitrary filepath to be provided
	// by the user! Not without some sort of validation.
	inputFilename = url.image;
	inputFilepath = expandPath( "../images/#inputFilename#" );

	// As a first step, we need to figure out how large the input image is so that we can
	// calculate the display-scale for each intermediary, scaled image. To do that, we
	// can use the Identify utility.
	inputDimensions = getImageDimensions( inputFilepath );
	inputWidth = inputDimensions.width;
	inputHeight = inputDimensions.height;

	// Setup the output filepath for our generated image.
	// --
	// NOTE: The file-extension of this output filename will be used by GraphicsMagick to
	// figure out how to encode the final image.
	outputFilename = "out.jpg";
	outputFilepath = expandPath( "./#outputFilename#" );

	// Define the dimensions of our demo image.
	outputWidth = 650;
	outputHeight = 300;

	// ------------------------------------------------------------------------------- //
	// ------------------------------------------------------------------------------- //

	// Before we execute our Convert command, let's calculate the "-draw" sub-commands
	// for each of the desired scaling sizes. These are the WIDTH dimensions at which we
	// want to paste the input image into the output image:
	drawWidths = [ 10, 50, 100, 200, 300 ];

	// As we draw the input image at different widths, we need to keep a running offset
	// for the X-coordinate of the operation (so that the different draw operations don't
	// overlap each other).
	runningX = 10;

	// Map the widths onto the actual "-draw" sub-commands.
	drawCommands = drawWidths.map(
		( drawWidth ) => {

			var drawX = runningX;
			var drawY = 10;
			// NOTE: For the temporary image, I'm using MIFF - the lossless Magick Image
			// File Format. This way, we don't lose quality from the intermediary image.
			var tempFilepath = expandPath( "./temp-#drawWidth#.miff" );

			// In this approach, rather than pasting an image at a scaled dimension,
			// we're going to create an intermediary image at the desired dimensions.
			// This gives us more control over how the input image is treated (such as
			// changing the colorspace or using a specified resize algorithm).
			gm([
				"convert",
				applyReader( inputFilepath ),
				"-resize #drawWidth#x",
				"-colorspace RGB",
				tempFilepath
			]);

			// Update the running X-coordinate for the next iteration.
			runningX += ( drawWidth + 10 );

			// This time, since we've generated an intermediary, scaled image, we don't
			// have to specify the DIMENSIONS of the paste operation. Instead, we can use
			// "0,0" to tell GraphicsMagick to use the natural dimensions of the
			// temporary image we just generated.
			return( "-draw 'image over #drawX#,#drawY# 0,0 #tempFilepath#'" );

		}
	);

	// ------------------------------------------------------------------------------- //
	// ------------------------------------------------------------------------------- //

	// Now that we know where and at what sizes the input images are going to be pasted
	// into the output image, we can use the Convert utility to compose the various
	// image operations together.
	result = gm([
		"convert",

		// Start with a "blank" canvas with the desired output dimensions.
		"-size #outputWidth#x#outputHeight# xc:##fafafa",

		// Now, let's "spread" the "draw" sub-commands into the current Convert.
		drawCommands.toList( " " ),

		// And, finally, output our composite image!
		"-quality 75",
		outputFilepath
	]);

	duration = ( getTickCount() - startedAt );

	// ------------------------------------------------------------------------------- //
	// ------------------------------------------------------------------------------- //

	/**
	* I prefix the given filepath with an explicit reader. We want to be EXPLICIT about
	* which input reader GraphicsMagick should use when reading in an image. If we leave
	* it up to "automatic detection", a malicious actor could fake the file-type and
	* potentially exploit a weakness in a given reader. As such, we want to align the
	* reader with the articulated file-type.
	*
	* READ MORE: http://www.graphicsmagick.org/security.html
	*
	* @filepath I am the filepath being decorated.
	*/
	public string function applyReader( required string filepath ) {

		switch ( listLast( filepath, "." ).lcase() ) {
			case "jpg":
			case "jpeg":
				var reader = "jpg";
			break;
			case "gif":
				var reader = "gif";
			break;
			case "png":
				var reader = "png";
			break;
			default:
				throw( type = "UnsupportedImageFileExtension" );
			break;
		}

		return( reader & ":""" & filepath & """" );

	}


	/**
	* I return the Width and Height of the image at the given path.
	*
	* @filepath I am the filepath being inspected.
	*/
	public struct function getImageDimensions( required string filepath ) {

		// NOTE: Trailing comma after -format being included on purposes. It delimits
		// multi-page images (like GIFs). While I don't have any GIFs in this demo, I am
		// leaving it in so I don't forget why I have it.
		var result = gm([
			"identify",
			"-format %w,%h,",
			applyReader( filepath )
		]);

		var dimensions = result.listToArray();

		return({
			width: dimensions[ 1 ],
			height: dimensions[ 2 ]
		});

	}


	/**
	* I execute the given options against the GM (GraphicsMagick) command-line tool. If
	* there is an error, the error is dumped-out and the processing is halted. If there
	* is no error, the standard-output is returned.
	*
	* NOTE: Options are flattened using a space (" ").
	*
	* @options I am the collection of options to apply.
	* @timeout I am the timeout to use during the execution.
	*/
	public string function gm(
		required array options,
		numeric timeout = 5
		) {

		execute
			name = "gm"
			arguments = options.toList( " " )
			variable = "local.successResult"
			errorVariable = "local.errorResult"
			timeout = timeout
		;

		// If the error variable has been populated, it means the CFExecute tag ran into
		// an error - let's dump-it-out and halt processing.
		if ( local.keyExists( "errorVariable" ) && errorVariable.len() ) {

			dump( errorVariable );
			abort;

		}

		return( successResult ?: "" );

	}

</cfscript>
<cfoutput>

	<h1>
		Resizing The Image Using An Intermediary File
	</h1>

	<p>
		<img
			src="./#outputFilename#"
			width="#outputWidth#"
			height="#outputHeight#"
			style="border: 1px solid ##aaaaaa ; border-radius: 4px ;"
		/>
	</p>

	<!--- List all of the images in the test directory. --->
	<p style="width: 650px ;">
		<cfloop query="#directoryList( path = '../images', listInfo = 'query', sort = 'name asc' )#">

			<a href="#cgi.script_name#?image=#encodeForHtmlAttribute( name )#">
				#encodeForHtml( name )#
			</a>,

		</cfloop>
	</p>

	<p>
		Duration: #numberFormat( duration )# ms
	</p>

</cfoutput>
By using a series of intermediary images, two things happen:
We can set the
-colorspaceof the intermediary image.We can use
0,0as the-drawdimensions since GraphicsMagick can read the already scaled dimensions right out of the intermediary image.
And, when we run this code against the CMYK input image, we get the following output:

As you can see, the CMYK image now gets composited in the RGB colorspace!
As I was building these two demos, I noticed that the quality of the resultant images were essentially the same in both approaches. This means that whatever algorithm the -draw command is using under the hood to scale the images is comparable to the scaling algorithm that we use in the -resize operation. Of course, by using intermediary images, we doing more file IO; which means, the second approach is going to be a bit slower. But, not by any significant amount.
Anyway, just another fun exploration of using GraphicsMagick in Lucee CFML. I'm relatively new to GraphicsMagick; so, please take what I say here as a conversation starter and not necessarily as "fact". I'm just learning as I go.
Want to use code from this post? Check out the license.

Reader Comments
It's really cool that you're having the exact same issues as me, about a week before I have them... so by the time I come to do a bit of Googling, your solution is already there for me to peruse... Keep it up! ;)
@Gary,
Ha ha ha, it takes team-work to make the dream work :D