Exploring Color Histograms In GraphicsMagick And Lucee CFML 5.2.9.31
Within InVision, one of the interesting features of "Boards" is that, when you upload an image, the app shows you the "top colors" present in the image (which you can then re-add to the Board as a Swatch). I believe we use ColorThief to do this. This feature got me curious about what kind of color extraction features exist in GraphicsMagick. After doing some Googling, I came across the concept of a "histogram", which gives us the distribution of colors within an image. In an effort to recreate some of what ColorThief does, I wanted to look at how I can generate and inspect a histogram using GraphicsMagick and Lucee CFML 5.2.9.31.
When GraphicsMagick generates a histogram of an image, it always does so using the MIFF (Magick Image File Format) file-type. So, by running the GraphicsMagick convert command and writing to a histogram: file:
gm convert ./image.jpg histogram:./image-histogram.miff
... we end up with a .miff file that includes, as a Comment, the distribution of unique colors within the source image. This distribution includes the number of occurrences alongside the RGBA (Red, Green, Blue, Alpha) and HEX values of each color. For example, a portion of the histogram file produced above might look like this:
id=ImageMagick  version=1.0
class=DirectClass  matte=False
columns=256  rows=191  depth=8
page=256x191+0+0
JPEG-Quality=92
JPEG-Colorspace=2
JPEG-Colorspace-Name=RGB
JPEG-Sampling-factors=2x2,1x1,1x1
comment={
         1: (  1,  0,  0)    #010000
         1: (  1,  0,  2)    #010002
         2: (  3,  0,  0)    #030000
         2: (  3,  2,  0)    #030200
         2: (  4,  0,  0)    #040000
         1: (  4,  0,  3)    #040003
         2: (  6,  0,  0)    #060000
         2: (  6,  1,  0)    #060100
         1: (  7,  1,  1)    #070101
         1: (  6,  2,  1)    #060201
         1: (  7,  2,  0)    #070200
         1: (  7,  3,  0)    #070300
( ... truncated ... )
Of course, an image can have millions of unique colors. So, to turn this histogram into something that starts to resemble the ColorThief output, we can use the -colors option to reduce the number of colors present in the histogram.
ASIDE: This is way over my head, but GraphicsMagick has an in-depth page about Color Quantization and how it actually goes about color reduction.
With the colors reduced, we can then extract the Comment portion of the histogram file using the identify command:
gm identify -format %c ./image-histogram.miff
This will return the histogram Comment (%c) in the standard-output, which we can then parse using some string-manipulation and Regular Expression (RegEx) pattern matching.
To explore this idea, I create a ColdFusion demo which allows me to pick from a set of predefined images. Then, for each image, I generate a histogram that has been reduced to 50-colors, and output those 50-colors to the page as little hex-swatches.
To make the demo a little more visually interesting, I generate an intermediary image with the reduced colors rather than going to directly to a histogram. This way, we can see what affect the color reduction has on how the image is inspected.
<cfscript>

	param name="url.image" type="string" default="beach-small.jpg";

	startedAt = getTickCount();

	// CAUTION: For the sake of the demo, I am not validating the input image. However,
	// in a production setting, I would never allow an arbitrary filepath to be provided
	// by the user! Not without some sort of validation.
	inputFilename = url.image;
	inputFilepath = expandPath( "../images/#inputFilename#" );

	// To get the top colors in the image, we need to generate a histogram. But, to make
	// the demo a bit more interesting (and easier for me to learn from), I'm going to
	// generate an intermediary image so that we can see what the input of histogram is.
	// We will then display the intermediary image as well as use it as the input to the
	// histogram.
	gm([
		"convert",

		// This is the image we are inspecting.
		applyReader( inputFilepath ),

		// Fill in the background with white and remove any alpha-channel data. To keep
		// things simple, we want to remove any alpha-channel data.
		"-background ##ffffff",
		"-extent 0x0",
		"+matte",

		// Let's convert images to the RGB colors-space.
		"-colorspace RGB",
		"-depth 8",

		// Scale the image size down so that reducing the colors and generating the
		// histogram is faster (disabling dithering to reduce noise artifacts).
		"+dither",
		"-scale 75x",

		// Now that we have a scaled-down image, let's reduce the color-space to [at
		// most] 50 unique colors.
		"-colors 50",

		// Scale the image up to make the demo more visually interesting - this will show
		// the pixelation caused by the scaling-down of the image.
		// --
		// NOTE: This doesn't change the outcome of the histogram (as long as the new
		// SCALE is a multiple of the RESIZE).
		"-scale 375x",

		expandPath( "./out.png" )
	]);

	// Using the scaled-down and color-reduced image, generate a histogram file.
	gm([
		"convert",
		applyReader( expandPath( "./out.png" ) ),
		"histogram:#expandPath( './histogram.miff' )#"
	]);

	// The resultant MIFF file (what format GraphicsMagick uses to generate a histogram)
	// includes the color-counts in the COMMENT. As such, we can pluck out the comment
	// using the identify command.
	comment = gm([
		"identify",
		"-format %c",
		expandPath( './histogram.miff' )
	]);

	// In the GraphicsMagick histogram, the top / most frequent colors are defined in the
	// Comment (%c) using the following format:
	// --
	// count: ( r, g, b, a ) hex
	// --
	// As such, we can just pattern-match on the first 4-numbers in each line to get the
	// Count, R, G, and B (I have no alpha channels in this demo).
	colors = comment.listToArray( chr( 13 ) & chr( 10 ) )
		.map(
			( line ) => {

				var numbers = line.reMatch( "\d+" );
				var count = val( numbers[ 1 ] );
				var red = val( numbers[ 2 ] );
				var green = val( numbers[ 3 ] );
				var blue = val( numbers[ 4 ] );

				return({
					count: count,
					hex: rgbToHex( red, green, blue )
				});

			}
		)
		// Sort the colors so that the most frequent colors are listed first.
		.sort(
			( a, b ) => {

				// By using simple subtraction:
				// --
				// ( a.count > b.count ) results in negative number.
				// ( a.count < b.count ) results in positive number.
				// ( a.count == b.count ) results in zero.
				return( b.count - a.count );

			}
		)
	;

	duration = ( getTickCount() - startedAt );

	// ------------------------------------------------------------------------------- //
	// ------------------------------------------------------------------------------- //

	/**
	* I prefix the given filepath with an explicit reader. We want to be EXPLICIT about
	* which input reader GraphicsMagick should use when reading in an image. If we leave
	* it up to "automatic detection", a malicious actor could fake the file-type and
	* potentially exploit a weakness in a given reader. As such, we want to align the
	* reader with the articulated file-type.
	*
	* READ MORE: http://www.graphicsmagick.org/security.html
	*
	* @filepath I am the filepath being decorated.
	*/
	public string function applyReader( required string filepath ) {

		switch ( listLast( filepath, "." ).lcase() ) {
			case "gif":
				var reader = "gif";
			break;
			case "jpg":
			case "jpeg":
				var reader = "jpg";
			break;
			case "png":
				var reader = "png";
			break;
			default:
				throw( type = "UnsupportedImageFileExtension" );
			break;
		}

		return( reader & ":""" & filepath & """" );

	}


	/**
	* I execute the given options against the GM (GraphicsMagick) command-line tool. If
	* there is an error, the error is dumped-out and the processing is halted. If there
	* is no error, the standard-output is returned.
	*
	* NOTE: Options are flattened using a space (" ").
	*
	* @options I am the collection of options to apply.
	* @timeout I am the timeout to use during the execution.
	*/
	public string function gm( required array options ) {

		execute
			name = "gm"
			arguments = options.toList( " " )
			variable = "local.successResult"
			errorVariable = "local.errorResult"
			timeout = 5
		;

		// If the error variable has been populated, it means the CFExecute tag ran into
		// an error - let's dump-it-out and halt processing.
		if ( local.keyExists( "errorVariable" ) && errorVariable.len() ) {

			dump( errorVariable );
			abort;

		}

		return( successResult ?: "" );

	}


	/**
	* I convert the given RGB values to a single, 6-character hexadecimal format.
	*
	* @red I am the red channel value.
	* @green I am the green channel value.
	* @blue I am the blue channel value.
	*/
	public string function rgbToHex(
		required numeric red,
		required numeric green,
		required numeric blue
		) {

		return(
			( "0" & formatBaseN( red, 16 ) ).right( 2 ) &
			( "0" & formatBaseN( green, 16 ) ).right( 2 ) &
			( "0" & formatBaseN( blue, 16 ) ).right( 2 )
		);

	}

</cfscript>
<cfoutput>

	<link rel="stylesheet" type="text/css" href="./demo.css">

	<p>
		<strong>Images:</strong>
		<a href="./index.cfm?image=beach-small.jpg">Beach</a> ,
		<a href="./index.cfm?image=goose.jpg">Goose</a> ,
		<a href="./index.cfm?image=face-square.jpg">Face</a> ,
		<a href="./index.cfm?image=deer.jpg">Deer</a> ,
		<a href="./index.cfm?image=sleeping.jpg">Sleeping</a> ,
		<a href="./index.cfm?image=staring.jpg">Staring</a> ,
		<a href="./index.cfm?image=engineering.jpg">Engineering</a> ,
		<a href="./index.cfm?image=circle.png">Circle</a> ,
		<a href="./index.cfm?image=beans.jpg">Beans</a> ,
		<a href="./index.cfm?image=calm.jpg">Calm</a>
	</p>

	<div class="images">
		<img src="../images/#inputFilename#" />
		<img src="./out.png" />
	</div>

	<!--- Output the top / most frequent colors in the source image. --->
	<div class="colors">
		<cfloop index="color" array="#colors#">

			<span
				title="Color: ###color.hex#, Count: #numberFormat( color.count )#"
				style="background-color: ###color.hex# ;">
				<br />
			</span>

		</cfloop>
	</div>

	<p>
		Duration: #numberFormat( duration )# ms
	</p>

</cfoutput>
If I then run this ColdFusion code in the browser and click through to some of the images, we get the following output:
As you can see, when we click through to each image, we see the original image and the reduced-color image side-by-side. As part of this algorithm, the reduced-color image is being scaled-down in order to speed-up the color reduction and histogram generation.
This definitely moves us in the right direction; however, picking the "dominant colors" within an image is not quite the same as picking the "color palette" of an image. For example, if you look at the histogram generated by my photo of Lucy on the beach, you'll see that the hawt pink of her jacket isn't even in the top-20 swatches:
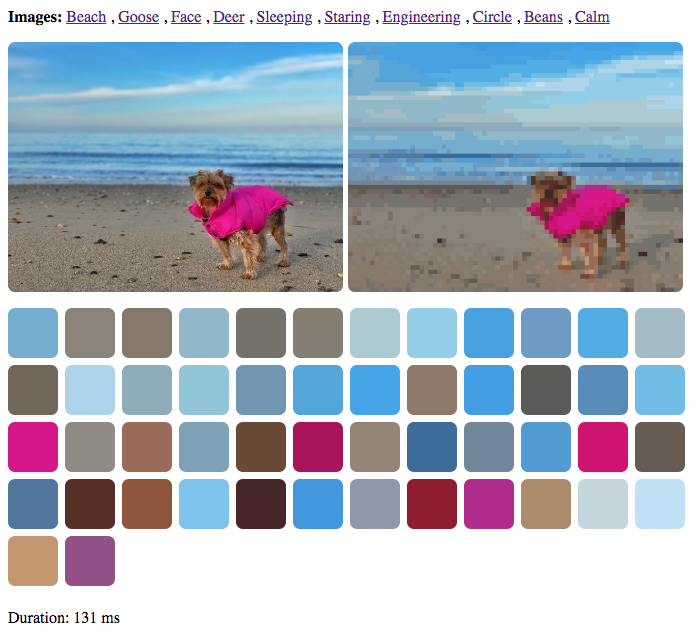
Of course, if a "human" where to generate a color palette based on this image, a pink color would almost certainly be one of the hand-selected swatches. And that's because a human would take "difference" into account in addition to the frequency of color distribution.
I think that we can programmatically generate a color palette from a color histogram. But, I think that's a whole other math-based rabbit-hole which is way beyond the scope of this post (and way beyond my technical understanding of colors and human perception).
That said, this was just another fun exploration of how GraphicsMagick can be used in Lucee CFML. It's kind of mind-boggling how much functionality is packed into this little command-line tool. I only with I understood more than a fraction of what it was doing.
Want to use code from this post? Check out the license.

Reader Comments
This is totally awesome. I am loving those colour palettes.
I can already feel a use coming on for this routine.
In fact, I might create a little Angular/CF App that use this for creating UI Colour Palettes!
I might even brush off my Objective-C books, and create a native iOS App that just extracts the color palette out of a photo. I can make an HTTP call to a CF template that sends back the data. A bit like AJAX. There is probably a way to do this natively, so Angular/CF might be the way to go. How about a Desktop App? I think this is called Angular Electron?
Sometimes the simplest Apps are the best.
Great photos by the way. The iPhone 10, has a really awesome camera. I am on an 8+, at the moment. I had the option to get the 10, but I wanted to keep the round 'Home' button, at the bottom. Crazy, I know...
Interestingly, Angular Electron Apps, use NodeJs, internally.
I am wondering whether I could use the GM/IM directly, because it is a Command Line utility. I might not even need Coldfusion? This would be more appropriate, because the App, could then be used off line.
https://alligator.io/angular/electron/
Ben. I have been inspired to create this small app.
It's only task will be to upload a photo and create a colour palette from it. When a swatch is clicked on, it will provide a read out of:
RGB
HSL
HEX
My check list so far is:
Find out more about:
Looks like we could be rocking:
https://aheckmann.github.io/gm/
@Charles,
Good sir, I am loving the enthusiasm! Glad you're liking this stuff. And, if you're already going to be in Node.js, you may want to checkout the npm module, ColorThief:
https://github.com/lokesh/color-thief
One of our teams uses it internally, and it seems to output a nice selection of colors. I haven't used the
gmpersonally, but another one of our teams uses that as well. I don't know how the two libraries compare.Be sure to share your experience when you get something up and running. I've never actually used Electron myself - but, it's so darn intriguing. I'll have to try it out one of these days.
Ben. I have managed to get the Electron window to open in both Angular & Vanilla TS/JS mode.
Chromium is like Chrome, but more Windows like!
I am having some trouble with IPC, which is the way Electron communicates with JavaScript. It allows us to access the user's file system, which is impossible in a pure Angular/JavaScript app. This will allow the user to choose a file from their hard drive and ask my App to extract a color palette from the image. I guess they won't need to upload the image, because everything is done on the client. I expect a NodeJs server is running inside the App?
Once I have set up communication, I will then attempt to import GraphicsMagick.
Still along way to go, but I will keep you posted...
@Charles,
Yeah, the whole running Node.js thing is confusing to me. I've been told that with Electron you somehow get access to all of the native Node.js functions. But, I don't really know how that works. It sounds awesome though. Sounds like you're making solid progress though!
These links are very useful and have helped me understand what Electron is all about and how I can integrate GraphicsMagick with it:
Now this link is really awesome:
I used this approach [pure TypeScript] and IPC works. With the Angular way, IPC, does not seem to work. IPC is fundamental.
I am now trying to connect with the GM/IM binaries from within Electron. Once I have done this, I can start building the app, properly.
This has been a big learning curve but extremely interesting.
Electron is some kind of magic orb!
It allows you to access NodeJs without running server/client model.
Ben. Here is my repo. Feel free to fork it or just laugh at it:)
Honestly, I don't have a clue what I am doing.
This is my first pure TypeScript Electron project, which requires a good knowledge of:
Neither of which, I have any knowledge of!
Oh yes, and the fact that GraphicsMagick [Win] / ImageMagick [Mac] binaries must be installed into the Electron installer.
So far, I have set up the IPC communication link.
I am having trouble trying to integrate GM/IM and I am having trouble packaging the app via package.json
Anyway, I like a good challenge...
https://bitbucket.org/charlesrobertson/color-palette-vanilla/src/master/