
At InVision, one of the things that we do when generating thumbnails is replacing transparent image backgrounds with a solid color (typically white). We do this because the design of the page that renders thumbnails is almost never designed to expect any image transparency. As such, I wanted to take a quick look at how I would replace (or color-in) a transparent background using GraphicsMagick and Lucee CFML 5.2.9.31.
At first, I tried to accomplish this using the -opaque operation that I used when annotating an image using GraphicsMagick and Lucee CFML. For example, to replace the transparent background with #262626, I tried the following:
-fill #262626 -opaque transparent
This "worked"; but, unfortunately, it ruined the anti-aliasing around borders because it replaced any partially-transparent pixel with the given color, leaving borders looking jagged.
After some Googling, I came across a SuperUser forum post, which suggested I try the -extent operation. According to the GraphicsMagick documentation, the -extent operation:
composite(s) image on background color canvas image
This is exactly what I want: to composite the current image over a new image with a given background color. That would allow the background color to show through any transparent - or partially-transparent - pixels in the source image.
The -extent operation takes a "geometry" which is intended to alter the dimensions of the resultant image. However, if you use 0x0 as the geometry, the -extent operation appears to use the dimensions of the source image. As such, we can use the following command to replace a transparent background with a given color:
-background #262626" -extent 0x0
To see this in action, I created a simple transparent PNG that contains a circle. Then, using GraphicsMagick and Lucee CFML, I replace that transparent background:
<cfscript>

	// For the demo, copy a PNG with a transparent background to the demo directory.
	fileCopy( "../images/circle.png", "./in.png" );

	gm([
		// We're going to use the Convert utility to remove the transparent background.
		"convert",

		// We want to be EXPLICIT about which input reader GraphicsMagick should use.
		// If we leave it up to "automatic detection", a malicious actor could fake
		// file-type and potentially exploit a weakness in a given reader.
		// --
		// READ MORE: http://www.graphicsmagick.org/security.html
		( "png:" & expandPath( "./in.png" ) ),

		// Set the background color to be used during the EXTENT operation.
		"-background ##262626",

		// Use extent to composite the given image over a background of the given color
		// (defined by -background). For non-zero geometry values, the EXTENT command
		// would have resize the generated image; however for zero values, it appears to
		// use the size of the source image.
		"-extent 0x0",

		// Remove any alpha-channel information now that we've filled-in the background.
		"+matte",

		expandPath( "./out.png" )
	]);

	// ------------------------------------------------------------------------------- //
	// ------------------------------------------------------------------------------- //

	/**
	* I execute the given options against the GM (GraphicsMagick) command-line tool. If
	* there is an error, the error is dumped-out and the processing is halted. If there
	* is no error, the standard-output is returned.
	*
	* NOTE: Options are flattened using a space (" ").
	*
	* @options I am the collection of options to apply.
	*/
	public string function gm( required array options ) {

		execute
			name = "gm"
			arguments = options.toList( " " )
			variable = "local.successResult"
			errorVariable = "local.errorResult"
			timeout = 5
		;

		// If the error variable has been populated, it means the CFExecute tag ran into
		// an error - let's dump-it-out and halt processing.
		if ( local.keyExists( "errorVariable" ) && errorVariable.len() ) {

			dump( errorVariable );
			abort;

		}

		return( successResult ?: "" );

	}

</cfscript>

<!---
	Add a background color to the image so we can see where the transparent portions of
	the image exist.
--->
<body style="background-color: #f0f0f0 ;">

	<img src="./in.png" width="300" />
	<img src="./out.png" width="300" />

</body>
And, when we run this ColdFusion code, we get the following output:
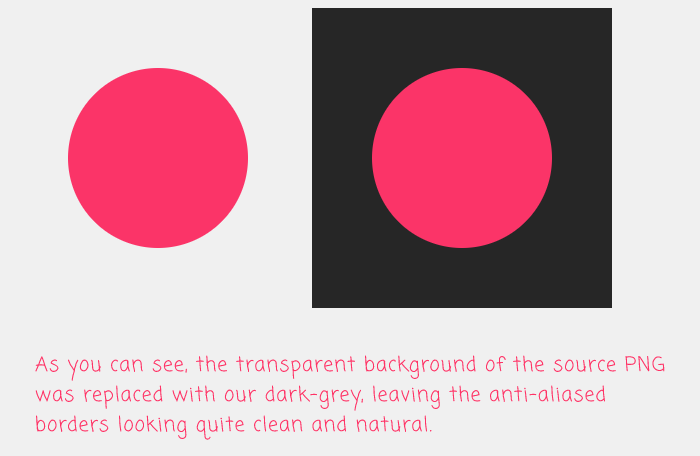
As you can see, the transparent portion of the PNG image was replaced with our #262626 value. But, by using the -extent operation, it allows the anti-aliased border of the circle to remain clean and natural since the compositing of the PNG over the background allows the background color to partially-penetrate the partially-transparent pixels.
Anyway, just another quick exploration of how I might use the GraphicsMagick command-line utility to replace the image manipulation that I'm currently doing with the CFImage tag in ColdFusion.

Reader Comments
This is awesome. I have wondered how to do this for many years. I now have a really good reason to use GM!
@Charles,
Very glad to be able to point out a use-case :D