
Rendering Wrapped Text To A Canvas In JavaScript
Yesterday, I looked at using the Range class to detect line-breaks in a text-node within the DOM (Document Object Model). Normally, you don't need to think about the line breaks that the user is seeing in the browser. However, I have a use-case in which I need to render said text to a <canvas> element. And, since the <canvas> API has no inherent way to render line-wrapped text, all line-wrapping has to be performed progammatically. As such, I wanted to post a fast-follow demo in which I use the line-break detection from yesterday's demo to render wrapped text to a Canvas element in JavaScript.
Run this demo in my JavaScript Demos project on GitHub.
View this code in my JavaScript Demos project on GitHub.
CAUTION: Rendering text to the
<canvas>element is a complicated beast with many edge-cases and cross-browser compatibility issues. This post does not attempt to solve any of those problems. This post is merely a demonstration of yesterday's solution being applied to a specific problem-domain.
With the HTML <canvas> element, you can invoke the .fillText() method on the 2D context to render text. This renders the text as a single line at a specified X,Y coordinate. As such, in order to render multiple lines of text as a cohesive block, we have to loop over the individual lines and render each line at an increasing Y-offset:
LineY = ( initialY + ( lineHeight * lineIndex ) )
Again, there's a lot of edge-case / cross-browser issues with this relatively simple concept - none of which we are going to address in this post. That said, let's look at how we can use the line-break detection to render wrapped text to a Canvas 2D context. In the following demo, I have two side-by-side panels. On the left is a <p> element; and, on the right is a <canvas> element. The call-to-action button extracts the individual lines from the paragraph and then renders them to the canvas, one line at a time.
This uses the extractLinesFromTextNode() from yesterday to extract the text and then calls a new method, renderSampleNodeToCanvas(), to render those lines to the Canvas:
<!doctype html>
<html lang="en">
<head>
<meta charset="utf-8" />
<title>
Rendering Wrapped Text To A Canvas In JavaScript
</title>
<link rel="stylesheet" type="text/css" href="./main.css" />
</head>
<body>
<h1>
Rendering Wrapped Text To A Canvas In JavaScript
</h1>
<div class="panels">
<div class="panels__panel">
<h2>
P—Element
</h2>
<p class="sample">
I'm pretty sure there's a lot more to life than being really, really,
ridiculously good looking. And I plan on finding out what that is. —
Derek Zoolander
</p>
<button class="button">
Render to Canvas
</button>
</div>
<div class="panels__panel">
<h2>
Canvas—Element
</h2>
<canvas class="canvas">
<!-- Sample text will be rendered here as multiple lines of text. -->
</canvas>
</div>
</div>
<script type="text/javascript">
var sample = document.querySelector( ".sample" );
var button = document.querySelector( ".button" );
var canvas = document.querySelector( ".canvas" );
var context = canvas.getContext( "2d" );
// When the user clicks the button, render the text to the canvas.
button.addEventListener( "click", renderSampleNodeToCanvas );
// --------------------------------------------------------------------------- //
// --------------------------------------------------------------------------- //
/**
* I render the text-content of the sample element to the canvas.
*/
function renderSampleNodeToCanvas() {
// The canvas element doesn't encode the concept of line-wrapping for text. As
// such, when we want to render wrapped text to the canvas, we have to perform
// the calculations ourselves; and then, draw each line, in turn, to the
// canvas at the appropriate offset. To do this, we're going to extract the
// rendered lines of text from the source DOM node (using the code from
// yesterday's demo).
var lines = extractLinesFromTextNode( sample.firstChild );
// Let's also extract the run-time styles of the text.
// --
// CAUTION: For this demo, I'm assuming that everything about the font is
// defined in PIXELS (font-size, line-height). This keeps everything as simple
// as possible (and somewhat within my skill-set). Also, Canvas has no sense
// of letter-spacing, so we're assuming the font has a natural letter-spacing.
var styles = getElementTextStyles( sample );
var box = getElementBox( sample );
// Resize the canvas to match text container.
canvas.setAttribute( "width", box.width );
canvas.setAttribute( "height", box.height );
// Set the canvas fill styles to match the source text styles.
context.fillStyle = styles.color;
context.textBaseline = "top";
context.font = ( styles.fontWeight + " " + styles.fontSize + "px " + styles.fontFamily );
// Each line of text has to be rendered individually, with the vertical offset
// being manually set on each rendering. To help center the text within the
// line-height, we're going to add some initial offset to the Y-coordinate.
// --
// CAUTION: This is not a consistent cross-browser solution; but, that goes
// beyond the scope of this post (and my current skill-set).
var offsetY = ( ( styles.lineHeight - styles.fontSize ) / 2 );
lines.forEach(
function iterator( line, i ) {
context.fillText( line, 0, ( ( i * styles.lineHeight ) + offsetY ) );
}
);
}
/**
* I get the bounding box of the given element.
*/
function getElementBox( element ) {
var rawBox = element.getBoundingClientRect();
return({
top: rawBox.y,
left: rawBox.x,
width: rawBox.width,
height: rawBox.height
});
}
/**
* I get the runtime CSS properties for the given element text.
*
* CAUTION: Everything here is assumed to be PIXELS for the demo.
*/
function getElementTextStyles( element ) {
var rawStyles = window.getComputedStyle( element );
return({
color: rawStyles[ "color" ],
fontSize: parseInt( rawStyles[ "font-size" ], 10 ),
fontFamily: rawStyles[ "font-family" ],
fontWeight: rawStyles[ "font-weight" ],
lineHeight: parseInt( rawStyles[ "line-height" ], 10 )
});
}
/**
* I extract the visually rendered lines of text from the given textNode as it
* exists in the document at this very moment. Meaning, it returns the lines of
* text as seen by the user.
*/
function extractLinesFromTextNode( textNode ) {
if ( textNode.nodeType !== 3 ) {
throw( new Error( "Lines can only be extracted from text nodes." ) );
}
// BECAUSE SAFARI: None of the "modern" browsers seem to care about the actual
// layout of the underlying markup. However, Safari seems to create range
// rectangles based on the physical structure of the markup (even when it
// makes no difference in the rendering of the text). As such, let's rewrite
// the text content of the node to REMOVE SUPERFLUOS WHITE-SPACE. This will
// allow Safari's .getClientRects() to work like the other modern browsers.
textNode.textContent = collapseWhiteSpace( textNode.textContent );
// A Range represents a fragment of the document which contains nodes and
// parts of text nodes. One thing that's really cool about a Range is that we
// can access the bounding boxes that contain the contents of the Range. By
// incrementally adding characters - from our text node - into the range, and
// then looking at the Range's client rectangles, we can determine which
// characters belong in which rendered line.
var textContent = textNode.textContent;
var range = document.createRange();
var lines = [];
var lineCharacters = [];
// Iterate over every character in the text node.
for ( var i = 0 ; i < textContent.length ; i++ ) {
// Set the range to span from the beginning of the text node up to and
// including the current character (offset).
range.setStart( textNode, 0 );
range.setEnd( textNode, ( i + 1 ) );
// At this point, the Range's client rectangles will include a rectangle
// for each visually-rendered line of text. Which means, the last
// character in our Range (the current character in our for-loop) will be
// the last character in the last line of text (in our Range). As such, we
// can use the current rectangle count to determine the line of text.
var lineIndex = ( range.getClientRects().length - 1 );
// If this is the first character in this line, create a new buffer for
// this line.
if ( ! lines[ lineIndex ] ) {
lines.push( lineCharacters = [] );
}
// Add this character to the currently pending line of text.
lineCharacters.push( textContent.charAt( i ) );
}
// At this point, we have an array (lines) of arrays (characters). Let's
// collapse the character buffers down into a single text value.
lines = lines.map(
function operator( characters ) {
return( collapseWhiteSpace( characters.join( "" ) ) );
}
);
return( lines );
}
/**
* I normalize the white-space in the given value such that the amount of white-
* space matches the rendered white-space (browsers collapse strings of white-space
* down to single space character, visually, and this is just updating the text to
* match that behavior).
*/
function collapseWhiteSpace( value ) {
return( value.trim().replace( /\s+/g, " " ) );
}
</script>
</body>
</html>
As you can see, we're extracting the lines of text (as the user sees them in the browser), then calling .forEach() on them to render each line, in turn, to the Canvas. And, after each .fillText(), we're simply incrementing the Y-coordinate by the runtime line-height of the text. And, when we run this, we get the following output:
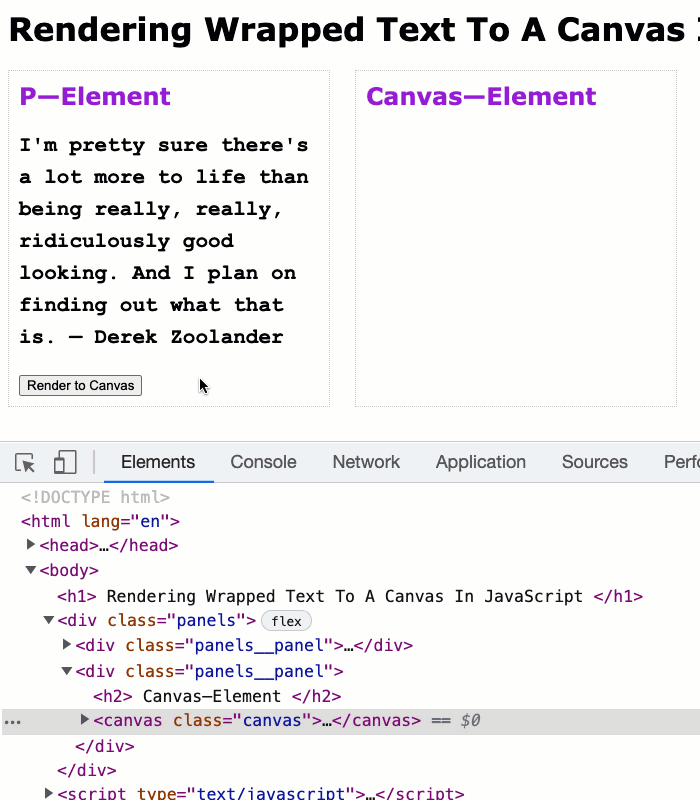
As you can see, we've faithfully applied the runtime line-breaks of the Paragraph tag to the text-rendering on the Canvas element. This looks really good in Chrome; it looks mostly good in Firefox; and, it looks janky in Safari, which pushes the text down a few pixels. That said, this wasn't a post about flawless canvas rendering - this was a demonstration of how detecting runtime line-breaks in a rendered text-node can be helpful.
Want to use code from this post? Check out the license.

Reader Comments