Using ColdFusion Custom Tags To Create An HTML Email DSL In Lucee CFML 5.3.7.47, Part II
Last week, I shared a proof-of-concept (POC) that I had been working in which I used ColdFusion Custom Tags as a DSL for HTML emails. Well, I've been continuing to work on it and I'm actually pretty stoked on where it's going. It's starting to feel like it might actually be something that I can use at InVision for our transactional emails. I've gotten my POC to a point where I feel like creating and overriding styles feels fairly easy (within a given set of constraints). So, I wanted to share this update more broadly.
View this code in my ColdFusion Custom Tag Emails project on GitHub.
As I demonstrated last week, instead of using raw HTML elements in this DSL (Domain Specific Language), you use ColdFusion Custom Tags. So, instead of using:
<p>
... you would use:
<html:p>
... where the html prefix is a token assigned to the ColdFusion custom tag at compile time (using <cfimport>). By using ColdFusion custom tags instead of naked HTML elements, it allows me to work some magic behind the scenes like normalizing margins and line-heights.
But, it also gives me an opportunity to hook into more styling and cascading overrides. Of course, you can still style your DSL elements using inline styles:
<html:p style="color: red ;">
But, you can also use <core:HtmlEntityStyle> to define overrides locally to an element:
<html:p style="font-family: italic ;">

	<core:HtmlEntityTheme entity="p">
		color: cornflowerblue ;
	</core:HtmlEntityTheme>

	This paragraph will use a local overrides, and should show up as
	some sweet, sweet cornflowerblue AND be italic.
</html:p>
To see this in action, let's look a more robust example - the follow ColdFusion DSL will attempt to apply style overrides using various techniques and containers:
<!--- Import custom tag libraries. --->
<cfimport prefix="core" taglib="./core/" />
<cfimport prefix="html" taglib="./core/html/" />

<!--- // ------------------------------------------------------------------------- // --->
<!--- // ------------------------------------------------------------------------- // --->

<core:Email
	subject="Let's see how we can customize email content!"
	teaser="It's actually kind of neat!">
	<core:Body>

		<!---
			By default, all the "html:" elements will inherit the core entity themes that
			have been defined in the core:Email and core:Body. However, we can create
			local overrides at any level of the ColdFusion Custom Tag DOM using the
			HtmlEntityTheme tags. This tag can target both entity types and class-names
			(though the entity type is required). Custom styles are applied to the PARENT
			context of the HtmlEntityTheme, and any children.
		--->

		<html:h1 margins="none xlarge">
			Customizing email content is fun!
		</html:h1>

		<html:p>
			The above title and is paragraph tag will use the base styles.
		</html:p>

		<html:p>
			<!--- Override the color of this specific paragraph. --->
			<core:HtmlEntityTheme entity="p">
				color: cornflowerblue ;
			</core:HtmlEntityTheme>

			However, this paragraph will use a local overrides, and should show up as
			some sweet, sweet cornflowerblue.
		</html:p>

		<html:p>
			Of course, the HtmlEntityTheme tag in the previous paragraph won't affect the
			text in this paragraph since it has a different parent.
		</html:p>

		<html:div margins="none normal" class="callout">
			<!---
				Override both the parent DIV as well as several of the local entities.
				Notice that you can target multiple elements in a single override.
				--
				NOTE: background-color should normally be done with a table TD or it
				won't show up in all email clients (cough, Outlook, Lotus Notes). But,
				this is just a fun demo.
			--->
			<core:HtmlEntityTheme entity="div" class="callout">
				background-color: #f0f0f0 ;
				padding: 20px ;
			</core:HtmlEntityTheme>
			<core:HtmlEntityTheme entity="p, li">
				color: darkmagenta ;
			</core:HtmlEntityTheme>
			<core:HtmlEntityTheme entity="em, mark, strong">
				color: crimson ;
			</core:HtmlEntityTheme>

			<html:p>
				Notice that I was able to target <html:em>both</html:em>
				<html:strong>P</html:strong> and <html:strong>LI</html:strong>
				tags in a <html:mark>single override</html:mark>.
			</html:p>

			<html:ol margins="none">
				<html:li>This should be sweet, sweet magenta!</html:li>
				<html:li>So cool!</html:li>
				<html:li>Can't stop, can't stop the beat!</html:li>
			</html:ol>
		</html:div>

		<html:div>
			<html:p>
				Of course, none of the overrides above should have messed with content
				that is <html:strong>in</html:strong> <html:em>in</html:em>
				<html:mark>paragraph</html:mark>.
			</html:p>
		</html:div>

		<!---
			We can also cascade Entity Themes, Style blocks, and Inline styles. This
			starts to get more complicated, and should normally be wrapped up in some
			sort of encapsulation.
		--->
		<core:HtmlEntityTheme entity="p" class="cascade">
			color: deeppink ;
		</core:HtmlEntityTheme>
		<core:Styles variable="middleStyles">
			font-size: 30px ;
			line-height: 38px ;
		</core:Styles>
		<core:Styles variable="inlineCascadeStyle" entityStyle="#middleStyles#">
			font-style: italic ;
			text-decoration: line-through ;
		</core:Styles>

		<html:p class="cascade" style="#inlineCascadeStyle#">
			This will have a cascade of styles!
		</html:p>

	</core:Body>
</core:Email>
And, when we run this ColdFusion code, we get the following output:
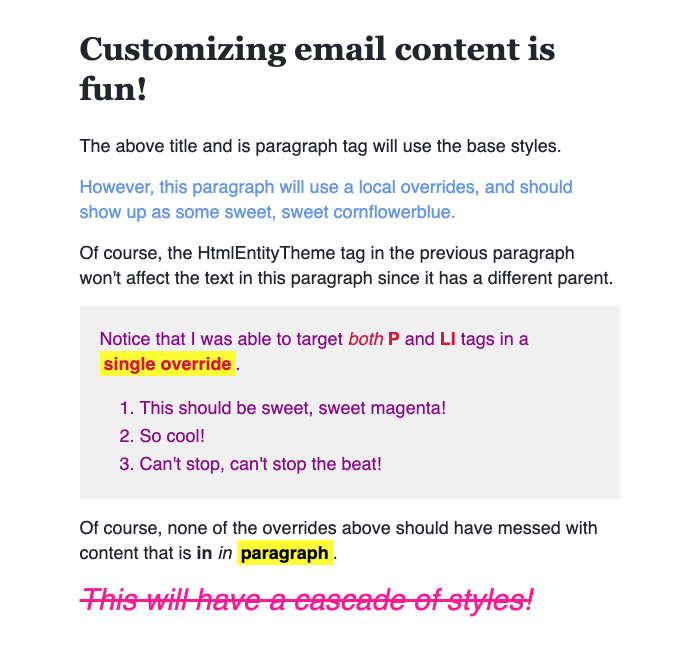
As you can see, all of our styling was applied locally to the given parent element; and, none of it leaked out into other elements. How cool is that?!
Of course, the whole point of this experiment is to make writing HTML emails easier; and, including all this inline styling makes it look harder. Ultimately, you don't to have to include styles all over the place. Instead, you can encapsulate all the custom style definitions inside of other ColdFusion custom tags.
In the example, we had a gray-callout box that had it's own style. Well, if we used a Custom Tag for that box instead of an <html:div>, we could tuck all that styling away behind a clean abstraction. In this following Gray.cfm custom tag, we're going to define both the local style overrides as well as some responsive styles for the box itself (shrinking the padding on smaller devices):
<!--- Import custom tag libraries. --->
<cfimport prefix="core" taglib="../../core/" />
<cfimport prefix="html" taglib="../../core/html/" />

<!--- Define custom tag attributes. --->
<cfparam name="attributes.class" type="string" default="" />
<cfparam name="attributes.margins" type="string" default="none normal" />
<cfparam name="attributes.style" type="string" default="" />

<!--- // ------------------------------------------------------------------------- // --->
<!--- // ------------------------------------------------------------------------- // --->

<cfswitch expression="#thistag.executionMode#">
	<cfcase value="start">
		<cfoutput>

			<!---
				Entity theming has to happen in the START execution mode so that it can
				be applied to the child elements of the tag.
			--->
			<core:HtmlEntityTheme entity="h3">
				text-align: center ;
			</core:HtmlEntityTheme>
			<core:HtmlEntityTheme entity="p">
				font-size: 13px ;
				line-height: 18px ;
			</core:HtmlEntityTheme>
			<core:HtmlEntityTheme entity="p" class="special">
				color: deeppink ;
			</core:HtmlEntityTheme>

		</cfoutput>
	</cfcase>
	<cfcase value="end">
		<cfoutput>

			<cfset theme = getBaseTagData( "cf_email" ).theme />

			<core:Styles
				variable="inlineStyle"
				entityStyle="#attributes.style#">
				background-color: ##f0f0f0 ;
				padding: 20px 30px 20px 30px ;
			</core:Styles>
			<core:HeaderStyles>
				@media only screen and ( max-width: #theme.width#px ) {
					.standard-gray-callout__content {
						padding: 10px 10px 10px 10px !important ;
					}
				}
			</core:HeaderStyles>

			<core:BlockMargins margins="#attributes.margins#">

				<html:table width="100%" class="standard-gray-callout">
				<html:tr>
					<html:td bgcolor="##f0f0f0" class="#trim( 'standard-gray-callout__content #attributes.class#' )#" style="#inlineStyle#">

						#thistag.generatedContent#

					</html:td>
				</html:tr>
				</html:table>

			</core:BlockMargins>

			<!--- Reset the generated content since we're overriding the output. --->
			<cfset thistag.generatedContent = "" />

		</cfoutput>
	</cfcase>
</cfswitch>
As you can see, the start execution mode of the tag defines the style overrides using the same mechanics that we saw previously. This makes those styles available to the child-content of the tag. Then, the end execution mode wraps the child-content in a responsively-styled gray box.
Now, we can use this Gray.cfm in our emails to hide all the complexity and keep our content nice and clean:
<!--- Import custom tag libraries. --->
<cfimport prefix="core" taglib="./core/" />
<cfimport prefix="html" taglib="./core/html/" />
<cfimport prefix="customized" taglib="./customized/callouts/" />

<!--- // ------------------------------------------------------------------------- // --->
<!--- // ------------------------------------------------------------------------- // --->

<core:Email
	subject="Let's see how we can customize email content!"
	teaser="It's actually kind of neat!">
	<core:Body>

		<html:h1 margins="none xlarge">
			Customizing email content is fun!
		</html:h1>

		<html:p>
			The above title and is paragraph tag will use the base styles.
		</html:p>

		<customized:Gray margins="none">
			<!---
				The Gray callout is a customized ColdFusion Custom Tag widget that the
				developer would author. The Gray callout would take care of defining the
				overrides for the HTML entities within this box using the same mechanics
				we saw with the other examples.
			--->
			<html:h3 margins="none normal">
				This title will be centered
			</html:h3>

			<html:p>
				This will smaller.
			</html:p>

			<html:p margins="none" class="special">
				This will smaller <html:em>and</html:em> hotpink!
			</html:p>
		</customized:Gray>

		<html:p>
			And, none of the Gray-callout styles will leak out to this paragraph.
		</html:p>

	</core:Body>
</core:Email>
Notice that we have no inline styles now - we just use <customized:Gray> as a new elements in our DSL (Domain Specific Language). And, when we run this ColdFusion code, we get the following output:
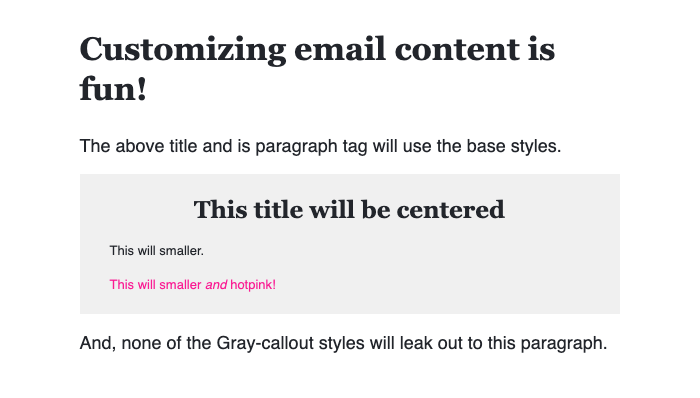
As you can see, the style overrides defined inside our Gray.cfm custom tag are applied to the child-content within the main Email markup. Sweet!
Taking this concept and extending it, you can take the <core:Body> that ships with the basic DSL and replace it with a customized Body tag that defines new base styles for your application. For example, here's the Body tag that I created for my main demo (not show in this blog post) - notice that defines a totally custom font and resets the font-family for all HTML entities:
<!--- Import custom tag libraries. --->
<cfimport prefix="core" taglib="../core/" />
<cfimport prefix="html" taglib="../core/html/" />
<cfimport prefix="customized" taglib="./" />

<!--- // ------------------------------------------------------------------------- // --->
<!--- // ------------------------------------------------------------------------- // --->

<cfswitch expression="#thistag.executionMode#">
	<cfcase value="start">
		<cfoutput>

			<cfset theme = getBaseTagData( "cf_email" ).theme />
			<cfset theme.importUrls.append( "https://fonts.googleapis.com/css?family=Poppins:100,200,300,500|Roboto:100,200,300,400,500,600,700" ) />

			<!--- Update the base fonts for the custom font-family import. --->
			<core:HtmlEntityTheme entity="h1, h2, h3, h4, h5, th">
				font-family: Poppins, BlinkMacSystemFont, helvetica, arial, sans-serif ;
				font-weight: 500 ; <!--- Highest that Poppins goes. --->
			</core:HtmlEntityTheme>
			<core:HtmlEntityTheme entity="blockquote, img, li, p, td">
				font-family: Roboto, BlinkMacSystemFont, helvetica, arial, sans-serif ;
			</core:HtmlEntityTheme>
			<!---
				Since MSO / Outlook clients won't load remote fonts, we have to define a
				solid fallback font family and weight.
			--->
			<core:HeaderContent>
				<core:IfMso>
					<style type="text/css">
						h1, h2, h3, h4, h5, th {
							font-family: helvetica, arial, sans-serif !important ;
							font-weight: 800 !important ;
						}
						blockquote, body, img, li, p, td {
							font-family: helvetica, arial, sans-serif !important ;
						}
					</style>
				</core:IfMso>
			</core:HeaderContent>

		</cfoutput>
	</cfcase>
	<cfcase value="end">
		<cfoutput>

			<cfset tableClass = "c-#createUniqueId()#" />
			<cfset contentClass = "c-#createUniqueId()#" />
			<cfset gutterClass = "c-#createUniqueId()#" />

			<core:Styles variable="tableStyle">
				border: 1px solid ##ebecee ;
				border-width: 0px 1px 1px 1px ;
			</core:Styles>
			<core:Styles variable="topBorderStyle">
				font-size: 1px ;
				height: 2px ;
				line-height: 2px ;
			</core:Styles>
			<core:Styles variable="contentStyle">
				padding: 45px 0px 30px 0px ;
			</core:Styles>
			<core:Styles variable="footerStyle">
				border-top: 1px solid ##ebecee ;
				color: ##6c7689 ;
				font-size: 12px ;
				font-weight: 400 ;
				line-height: 17px ;
				padding: 20px 0px 20px 0px ;
			</core:Styles>
			<core:Styles variable="footerLinkStyle">
				color: ##276ee5 ;
			</core:Styles>
			<core:HeaderStyles>
				@media only screen and ( max-width: 650px ) {

					.#tableClass# {
						border-width: 0px 0px 0px 0px !important ;
						width: 100% !important ;
					}

					.#gutterClass# {
						width: 20px !important ;
					}

					.#contentClass# {
						padding: 20px 0px 20px 0px !important ;
					}

				}
			</core:HeaderStyles>

			<html:table width="#theme.width#" align="center" class="#tableClass#" style="#tableStyle#">
			<html:tr>
				<!--- NOTE: "bgcolor" is needed for Lotus Notes. --->
				<html:td colspan="3" bgcolor="##ff3366" style="#topBorderStyle#">
					<br />
				</html:td>
			</html:tr>
			<html:tr>
				<html:td width="60" class="#gutterClass#">
					<!--- Left margin. ---><br />
				</html:td>
				<html:td class="#contentClass#" style="#contentStyle#">

					#thistag.generatedContent#

				</html:td>
				<html:td width="60" class="#gutterClass#">
					<!--- Right margin. ---><br />
				</html:td>
			</html:tr>
			<html:tr>
				<html:td colspan="3" align="center" bgcolor="##f8f8fa" style="#footerStyle#">

					Questions?
					<html:a href="https://www.bennadel.com" decoration="false" style="#footerLinkStyle#">I'm here to help.</html:a>

				</html:td>
			</html:tr>
			</html:table>

			<customized:Footer />

			<!--- Reset the generated content since we're overriding the output. --->
			<cfset thistag.generatedContent = "" />

		</cfoutput>
	</cfcase>
</cfswitch>
Now, I can use this customized body instead:
<!--- Import custom tag libraries. --->
<cfimport prefix="core" taglib="./core/" />
<cfimport prefix="customized" taglib="./customized/" />

<!--- // ------------------------------------------------------------------------- // --->
<!--- // ------------------------------------------------------------------------- // --->

<core:Email
	subject="Customizing emails is fun!"
	teaser="... when you use a ColdFusion custom tag DSL">
	<customized:Body>

	<!---
		By using the <customized:Body> element, my whole email gets the custom
		Roboto and Poppins font-family. And, will fallback to safe-fonts for
		Outlook which won't load external fonts.
	--->

	<customized:Body>
</core:Email>>
I haven't built any "widgets" into the core. But, I would definitely like to add some of the stuff that MJML has, such as some sort of responsive layout functionality. That said, I think that this latest round of updates really brings this proof-of-concept into a usable beta version. I'm really loving the use of ColdFusion custom tags to abstract away all of the complexities of writing rich, HTML emails.
Want to use code from this post? Check out the license.

Reader Comments
@All,
This morning, I added two new tags to help target content for Desktop vs. Mobile devices:
<core:IfDesktopView> ... desktop content ... </core:IfDesktopView><core:IfMobileView> ... mobile content ... </core:IfMobileView>www.bennadel.com/blog/3981-using-coldfusion-custom-tags-to-create-an-html-email-dsl-in-lucee-cfml-5-3-7-47-part-iii.htm
It's not as elegant as some of the other solutions that people offer for truly responsive content. But, my brain is not so good as responsive designs, especially as designs get more complex. As such, brute-force showing X for Desktop and Y for Mobile just works best for my skill-set.