
Quick File Share Using Netlify Functions And Amazon S3 In Angular 7.2.10
Netlify is an "Application Delivery Network". Essentially, it's a static site platform built on top of a Content Delivery Network (CDN) that can be augmented with URL redirects, proxying, Identify features, form submissions, and AWS Lambda Functions. I've only recently begun to play with Netlify as the deployment platform for Big Sexy Poems. But, that only used the Continuous Integration (CI) and CDN aspects. I'm intrigued by the idea of packaging and running AWS Lambda functions through Netlify. As such, as a fun exploration, I wanted to see if I could create a "quick file share" Angular application that would allow users to upload temporary files directly from the browser to Amazon S3 using pre-signed URLs that are securely generated in a Netlify Function.
CAUTION: What follows is not intended to be a demonstration of "best practices". This is merely me hacking together something that worked!
Run this demo in my Netlify Quick Share project on Netlify.
View this code in my Netlify Quick Share project on GitHub.
Using AWS pre-signed URLs, we can grant people temporary access to read and write designated objects in a private Amazon S3 bucket. Of course, pre-signed URLs have to be securely generated using a secret key. And, we don't want to make that secret key public; so, instead, we're going to expose the key in a Netlify deployment context such that our Netlify function can generate pre-signed URLs privately without having to make the secret key public:
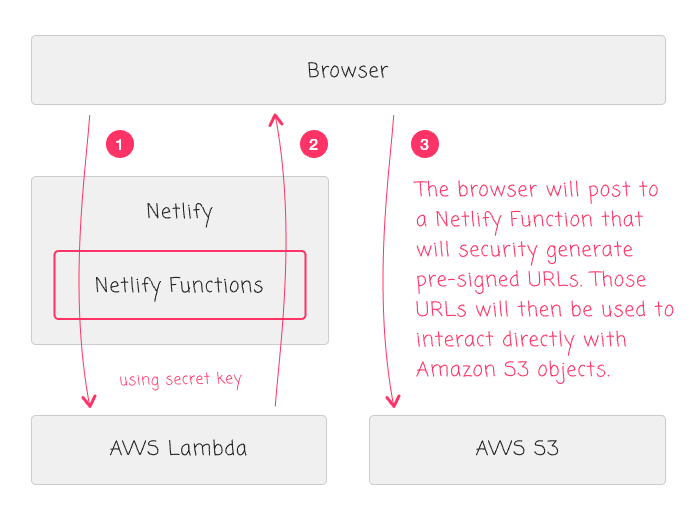
In this workflow, we're going to use the following steps:
A user selects a file to upload.
The browser invokes the Netlify Function (via AJAX) in order to generate the pre-signed URLs.
The Netlify Function will return a "PUT" URL for the upload and a "GET" URL for the share.
The browser will use the PUT URL to upload the selected file directly to a private Amazon S3 bucket.
The browser will then append the GET URL to the Angular View where the user can copy it and share it with others.
Getting this to work required a lot of trial and error over several days and the help from a number of excellent blog posts. The Netlify documentation on Functions is solid; but, my real breakthrough is thanks to Alex MacArthur's post on Building a Netlify Function. Alex's blog post really helped me understand how to:
Use the "dotenv" npm module to provide ENV variables locally within my Netlify Function.
Manage the CORS (Cross-Origin Resource Sharing) workflow when running the Netlify Function locally.
Provide ENV variables to my client-side Angular application using Webpack and the DefinePlugin.
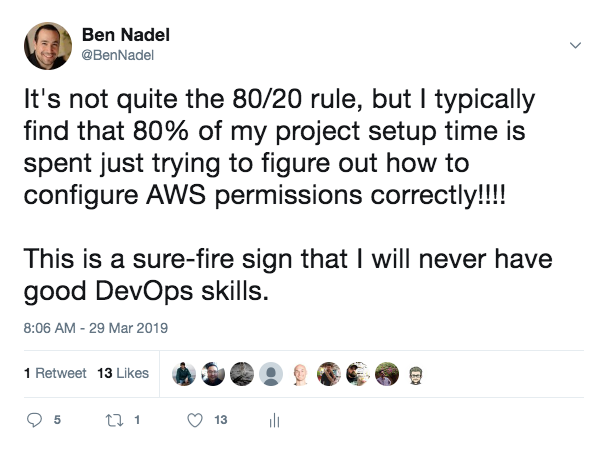
I would also like to give a shout-out to the ObjectiveFS post on how to Grant S3 Bucket access using an IAM Policy. Managing AWS permissions is something that I find absolutely befuddling! In fact, I jokingly referred to AWS permissions as my 80/20 rule for project configuration in so much as I spend 80% of my project setup time just trying to figure out how to setup the correct permissions:
That said, let me show you what I was able to do. I'm not going to cover the application setup in too much detail as I won't be able to do it as much justice as the aforementioned blog posts. However, I'll touch on the high-level steps and let you proceed to the external resources as needed.
First, I went into my AWS Console and created a new S3 bucket for this demo: "netlify-angular-upload-demo". I wanted to create a new, demo-specific bucket for several reasons:
I could attach life-cycle management to the bucket such that I could automatically expire objects shortly after they were uploaded.
I could attach special permissions to the bucket.
I could easily disable the permissions or delete the bucket without messing up any of my other AWS workflows.
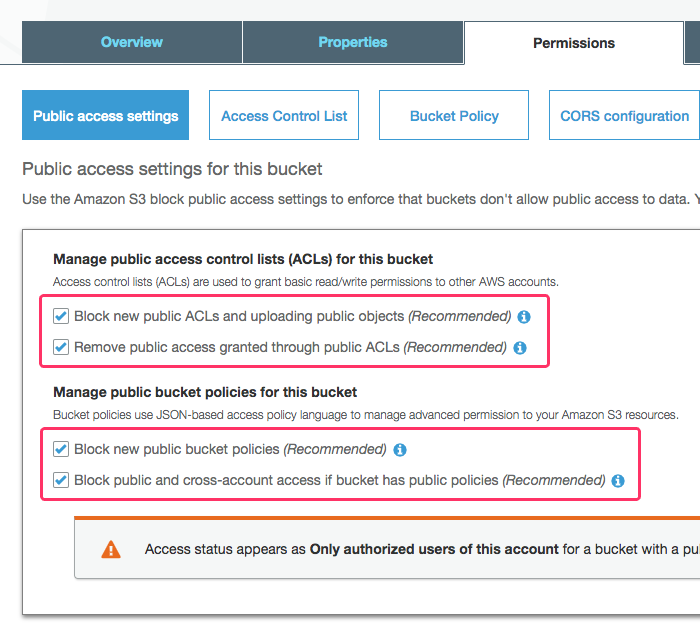
When creating the "netlify-angular-upload-demo" bucket, the first thing I had to do was define a public access policy. To be honest, I don't exactly understand what these settings entail; but, I don't want any aspect of this S3 bucket to be "public". As such, I checked all the options that blocked public access:
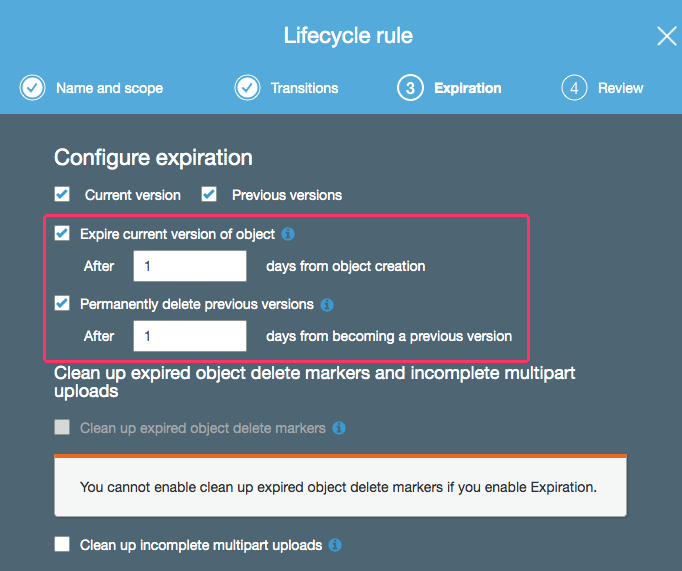
Then, I went into the life-cycle rules and configure the bucket to automatically delete S3 Objects after 1-day. The goal of this demo is to create a "Quick Share" feature - not a storage feature. As such, I don't want objects to stick around indefinitely. By adding this "Time to Live" (TTL), I don't need to create any kind of clean-up process - the S3 bucket will clean up after itself:
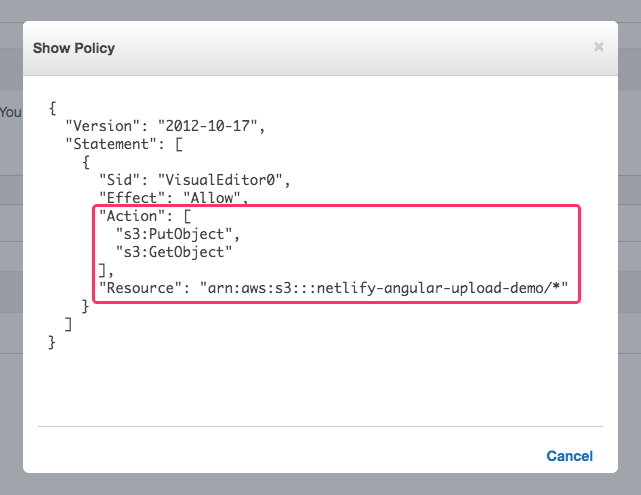
Once I had my private Amazon S3 bucket in place, I had to grant permissions to an AWS Access Key such that I could generate pre-signed URLs for PUT and GET operations. This is where I really start to get lost in the AWS rabbit hole. So, for this step, I just followed the advice from the aforementioned ObjectiveFS blog post. First, I went into the AWS IAM section and used the Console UI to create an IAM Policy that would grant PUT and GET operations on objects in my demo S3 bucket:
Then, I created a loginless IAM User for the demo; created a Group for the demo; added the S3 policy to the group; and, added the IAM user to the group (thereby associating it with the S3 policy):
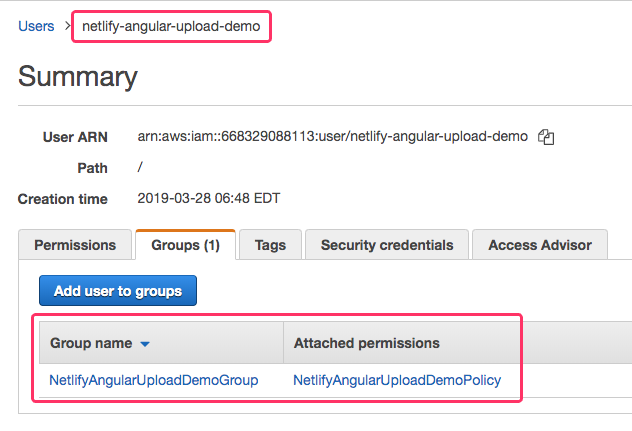
In retrospect, I could probably have skipped the Group creation and just attached the S3 policy directly to the IAM user. But, like I said, AWS permissions befuddle me and I was just following the steps outlined in the other post.
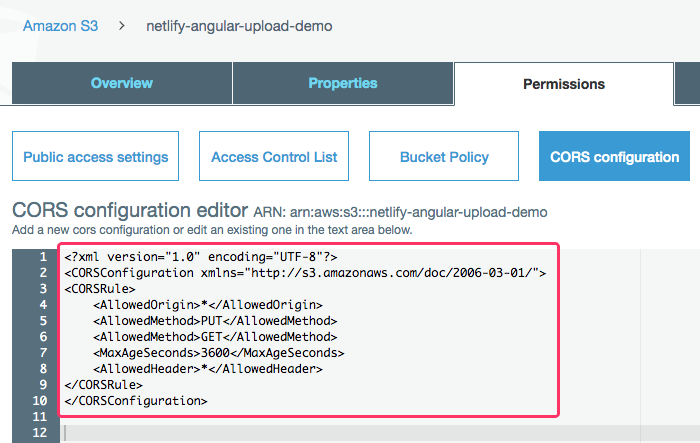
The last step in configuring my Amazon S3 bucket was to enable a CORS (Cross-Origin Resource Sharing) policy so that the browser's security sandbox would let the user make AJAX calls directly to the "amazonaws.com" domain from my Netlify domain. To keep things simple, I'm allowing access from any ORIGIN ("*") for PUT and GET HTTP method calls:
At this point, I now have an AWS Access Key and an AWS Secret Key that I can use to start generating pre-signed URLs that will grant PUT and GET access on my private S3 bucket objects. We can now look at the actual code for this Netlify Functions demo.
Since we never ever ever ever ever want to store our AWS keys in our source code, I'm going to use the dotenv npm package to inject non-persisted environment variables into our Netlify Function. The dotenv package works by loading key-value pairs into Node's "process.env" namespace, making sure not to override any existing keys with colliding names:
// Using the dotenv package allows us to have local-versions of our ENV variables in a
// .env file while still using different build-time ENV variables in production.
require( "dotenv" ).config();
Locally, this actively pulls values in from a non-persisted ".env" file. But, in production - on Netlify - where we have ENV variables defined in our deployment context, the above line becomes a no-op (No Operation) since it won't override the ENV values provided by Netlify's build pipeline.
Now, while we never want to persist our ".env" file, we do want to make it usable. This usually entails persisting some sort of "template" for the ".env" file so that developers know how to create the correct ".env" file after they've pulled-down the repository. As such, I created a ".env.template" file with empty values:
AWS_S3_ACCESS_KEY=""
AWS_S3_BUCKET=""
AWS_S3_SECRET_KEY=""
NETLIFY_ACCESS_CONTROL_ALLOW_ORIGIN="*"
NETLIFY_FUNCTIONS_ROOT=""
I then saved a copy of ".env.template" as ".env" and filled-in my actual AWS access keys.
At this point, I was now able to start authoring the Netlify Function to generate my pre-signed URLs. In production, on AWS Lambda, the AWS SDK (Software Developer's Kit) for Node.js is automatically installed. As such, we don't need to define it as a dependency in our package.json file. However, in our local development environment, the SDK is not implicitly available. As such, we need to install the "aws-sdk" module as a "Dev Dependency".
Once the "aws-sdk" and "dotenv" packages were place, I was able to use the "netlify-lambda" CLI (Command-Line Interface) tool to build and serve the Netlify Function locally. When doing this, the Netlify Functions are made available over port "9000". However, my local development environment serves my browser files over port "63737". This means that in order for my browser to make use of the local Netlify Function, it has to make an AJAX (Asynchronous JavaScript and JSON) call across origins.
To enable CORS locally, we have to build a CORS workflow inside the Netlify Function. In production, this isn't necessary since the Netlify Functions are proxied under a folder on the Netlify site, puting the browser code and the Netlify Function code on the same Origin. Of course, to get this working locally, I have to include it in Netlify Function code (which will become a No-Op in production).
With all that said, let's look at the code for my Netlify Function. It expects an HTTP POST with a JSON body to contain "clientFilename" and "mimeType" keys. These keys will then be used to generate a return a "putUrl" for the file-upload and a "getUrl" for the file share:
CAUTION: This code "works"; but, doesn't have any real error handling or proper error reporting. This was just an exploration - take it only as a learning experience.
// Using the dotenv package allows us to have local-versions of our ENV variables in a
// .env file while still using different build-time ENV variables in production.
require( "dotenv" ).config();

// ----------------------------------------------------------------------------------- //
// ----------------------------------------------------------------------------------- //

// Require core node modules.
var AWS = require( "aws-sdk" );
var Buffer = require( "buffer" ).Buffer;
var cuid = require( "cuid" );

// ----------------------------------------------------------------------------------- //
// ----------------------------------------------------------------------------------- //

var s3 = new AWS.S3({
	accessKeyId: process.env.AWS_S3_ACCESS_KEY,
	secretAccessKey: process.env.AWS_S3_SECRET_KEY,
	region: "us-east-1"
});

// I am the Netlify Function handler.
exports.handler = function( event, context, callback ) {

	// NOTE: In production (on Netlify), we shouldn't need to deal with CORS headers
	// since the Functions folder is a sub-folder of the Netlify site (same origin).
	// However, in local development, the "netlify-lambda" script serves the Functions
	// from a different port. As such, we need to have the CORS headers locally. In
	// order to keep things simple, we're just going to include them in both places.
	var headers = {
		"Access-Control-Allow-Origin" : process.env.NETLIFY_ACCESS_CONTROL_ALLOW_ORIGIN,
		"Access-Control-Allow-Headers": "Content-Type"
	};

	// In the case of a CORS preflight check, just return early.
	if ( event.httpMethod === "OPTIONS" ) {

		callback(
			null,
			{
				statusCode: 200,
				headers: headers,
				body: JSON.stringify( "OK" )
			}
		);
		return;

	}

	try {

		var body = parseBody( event.body, event.isBase64Encoded );

		var resourceKey = `uploads/${ cuid() }/${ body.clientFilename }`;

		// The PUT operation will only be valid for the next 2-minutes.
		var putParams = {
			Bucket: process.env.AWS_S3_BUCKET,
			Key: resourceKey,
			Expires: ( 2 * 60 ),
			ContentType: body.mimeType
		};

		// The GET operation will only be valid for the next 60-minutes.
		// --
		// NOTE: Even though the full GET operation is only valid for a week, we can
		// tell the browser to cache the response for longer using the cache-control
		// header (which we are defining via the ResponseCacheControl override).
		var getParams = {
			Bucket: process.env.AWS_S3_BUCKET,
			Key: resourceKey,
			Expires: ( 60 * 60 ),
			ResponseCacheControl: "max-age=604800"
		};

		var putUrl = s3.getSignedUrl( "putObject", putParams );
		var getUrl = s3.getSignedUrl( "getObject", getParams );

		var response = {
			statusCode: 200,
			headers: headers,
			body: JSON.stringify({
				putUrl: putUrl,
				getUrl: getUrl
			})
		};

	} catch ( error ) {

		console.error( error );

		var response = {
			statusCode: 400,
			headers: headers,
			body: JSON.stringify({
				message: "Request could not be processed."
			})
		};

	}

	callback( null, response );

}

// ----------------------------------------------------------------------------------- //
// ----------------------------------------------------------------------------------- //

// I returns the parsed body payload.
// --
// CAUTION: Throws error if body cannot be parsed as JSON.
function parseBody( body, isBase64Encoded ) {

	var normalizedBody = isBase64Encoded
		? fromBase64( body )
		: body
	;

	return( JSON.parse( normalizedBody ) );

}


// I decode the given base64-encoded value into a utf-8 string.
function fromBase64( encodedValue ) {

	return( Buffer.from( encodedValue, "base64" ).toString( "utf8" ) );

}
As you can see, this Netlify Function is using the "aws-sdk" S3 class to generate a pre-signed URL for "getObject" and "putObject" operations on the provided file's clientFilename. Since we expect the PUT operation to be used immediately, I am giving it an expiration of 2-minutes. The GET operation, on the other hand, receives an expiration of 60-minutes, giving the generated URL some time to be shared with other people.
NOTE: While the GET pre-signed URL is only available for 60-minutes, the object won't be automatically deleted from the S3 bucket for 24-hours. 1-Day is the smalled TTL that can be applied to an S3 bucket.
ASIDE: By default, the S3 SDK is supposed to assume "us-east-1" as the AWS region unless otherwise defined. In my code, I found that I had to explicitly define the region when instantiating my S3 Client because the S3 Client was occasionally generating URLs for the "us-west-2" region. This was leading to "PermanentRedirect" errors, "The bucket you are attempting to access must be addressed using the specified endpoint. Please send all future requests to this endpoint." I have no idea why this was happening. I can only assume it has to do with how the Netlify Function is deployed to AWS Lambda under the hood.
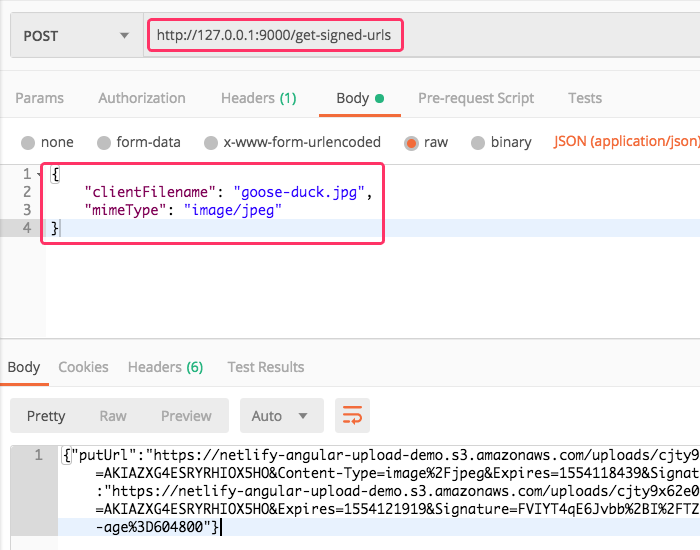
Before writing any Angular code, I was able to test my Netlify Function locally with the Postman application. This allowed me to divide-and-conquer the engineering of this demo, conquering one step at a time:
Once I knew that the Netlify Function was working locally (via Postman), I started to write the Angular 7.2.10 code that would consume it. The Angular application doesn't need to know anything about the AWS Keys; but, it does need know where the Netlify Function is located. In the local development environment, the Function is served via the "netlify-lambda" CLI. In production, it's proxied as a sub-folder of the Netlify site. To cope with this divergent location, we're going to use the "dotenv" module to define the Netlify Function location as an ENV variable.
Locally, we'll use the following in the ".env" file:
NETLIFY_FUNCTIONS_ROOT="http://127.0.0.1:9000/"
In order to make this ENV variable available to Angular, I'm going to use the Webpack plugin, DefinePlugin. This plugin performs a direct-text replacement in our Angular code at compile time. This means that locally, when the Angular code is compiling, it will interpolate our "dotenv" value; and, in production, it will interpolate our Build Context ENV value.
I won't show the whole Webpack config (you can see that in the GitHub project); but, here is the portion of "webpack.config.js" that uses the "dotenv" module and configures the DefinePlugin:
// Using the dotenv package allows us to have local-versions of our ENV variables in a
// .env file while still using different build-time ENV variables in production.
require( "dotenv" ).config();

// ----------------------------------------------------------------------------------- //
// ----------------------------------------------------------------------------------- //

// Load the core node modules.
var AngularCompilerPlugin = require( "@ngtools/webpack" ).AngularCompilerPlugin;
var CleanWebpackPlugin = require( "clean-webpack-plugin" );
var HtmlWebpackPlugin = require( "html-webpack-plugin" );
var path = require( "path" );
var webpack = require( "webpack" );

// ----------------------------------------------------------------------------------- //
// ----------------------------------------------------------------------------------- //

// We are exporting a Function instead of a configuration object so that we can
// dynamically define the configuration object based on the execution mode.
module.exports = ( env, argv ) => {
	// .... truncated
	return({
		// .... truncated
		plugins: [
			// I provide build-time values as global constants in the runtime so that
			// they can be consumed by the Angular application.
			// --
			// NOTE: This plug-in does a direct-text replacement in the source code. As
			// such, all string values must be explicitly quoted / stringified.
			new webpack.DefinePlugin({
				"process.env.NETLIFY_FUNCTIONS_ROOT": JSON.stringify( process.env.NETLIFY_FUNCTIONS_ROOT )
			}),
			// .... truncated
		],
		// .... truncated
	});

};
What this is going to do is make "process.env.NETLIFY_FUNCTIONS_ROOT" available in the Angular code. To consume it, I've created a SignedUrlService. This service uses the HttpClient to make an AJAX call to this "process.env.NETLIFY_FUNCTIONS_ROOT" location:
// Import the core angular services.
import { HttpClient } from "@angular/common/http";
import { Injectable } from "@angular/core";

// ----------------------------------------------------------------------------------- //
// ----------------------------------------------------------------------------------- //

export interface SignedUrlsResponse {
	putUrl: string;
	getUrl: string;
}

// NOTE: The Netlify Functions (Lambda) root is provided as an environmental variable
// which is then made available in the Angular code via the DefinePlugin() for Webpack.
var NETLIFY_FUNCTIONS_ROOT = ( process.env.NETLIFY_FUNCTIONS_ROOT as "string" );

@Injectable({
	providedIn: "root"
})
export class SignedUrlService {

	private httpClient: HttpClient;

	// I initialize the signed-url service.
	constructor( httpClient: HttpClient ) {

		this.httpClient = httpClient;

	}

	// ---
	// PUBLIC METHODS.
	// ---

	// I get the GET and PUT urls for a file with the given name and type.
	public async getSignedUrls(
		clientFilename: string,
		mimeType: string
		) : Promise<SignedUrlsResponse> {

		var response = await this.httpClient
			.post<SignedUrlsResponse>(
				`${ NETLIFY_FUNCTIONS_ROOT }get-signed-urls`,
				{
					clientFilename: clientFilename,
					mimeType: mimeType
				}
			)
			.toPromise()
		;

		return( response );

	}

}
As you can see, this SignedUrlService exposes one method, .getSignedUrls(), which takes the "clientFilename" and "mimeType" arguments and POSTs them to the Netlify Function that we are running locally.
This SignedUrlService is then consumed by my UploadService, which accepts a File object (from an Input[type="file"] field), generates the PUT and GET URLs using the .getSignedUrls() method, and then uploads the file to Amazon S3 using the resultant "putUrl".
CAUTION: This XHR-based upload is based heavily on the Mozilla doc on "Using files from Web applications". It is a proof-of-concept and is not intended to be a robust file handler. It simply "works".
// Import the core angular services.
import { Injectable } from "@angular/core";

// Import the application components and services.
import { SignedUrlService } from "./signed-url.service";

// ----------------------------------------------------------------------------------- //
// ----------------------------------------------------------------------------------- //

export interface UploadResponse {
	name: string;
	size: number;
	type: string;
	url: string;
}

@Injectable({
	providedIn: "root"
})
export class UploadService {

	private signedUrlService: SignedUrlService;

	// I initialize the upload service.
	constructor( signedUrlService: SignedUrlService ) {

		this.signedUrlService = signedUrlService;

	}

	// ---
	// PUBLIC METHODS.
	// ---

	// I upload the given File object and return a promise with the result.
	public async uploadFile( file: File ) : Promise<UploadResponse> {

		var urls = await this.signedUrlService.getSignedUrls( file.name, file.type );

		var putUrl = urls.putUrl;
		var getUrl = urls.getUrl;

		await this.sendFile( file, putUrl );

		return({
			name: file.name,
			size: file.size,
			type: file.type,
			url: getUrl
		});

	}

	// ---
	// PRIVATE METHODS.
	// ---

	// I send the given File to the given URL. Returns a promise.
	private sendFile(
		file: File,
		url: string
		) : Promise<void> {

		// CAUTION: For the purposes of this demo, I am using a simple upload algorithm.
		var promise = new Promise<void>(
			( resolve, reject ) => {

				var xhr = new XMLHttpRequest();

				xhr.upload.onload = ( event: ProgressEvent ) => {

					resolve();

				};

				xhr.upload.onerror = ( event: ProgressEvent ) => {

					reject();

				};
				xhr.upload.onabort = xhr.upload.onerror;
				xhr.upload.ontimeout = xhr.upload.onerror;

				xhr.open( "PUT", url );
				xhr.setRequestHeader( "Content-Type", file.type );
				xhr.send( file );

			}
		);

		return( promise );

	}

}
Once the UploadService uploads the file directly to S3, it then returns a response that includes the "getUrl" for sharing. This service and its response is then consumed by the root App Component, which drives the user experience of this demo.
In the following Angular component code, the user selects a file to upload. On (change) of the Input, the File object is passed to the UploadSerivce, which processes it and returns the upload result. The resultant GET url is then appended to the user interface (UI) where the user can copy-paste it.
// Import the core angular services.
import { Component } from "@angular/core";

// Import the application components and services.
import { UploadResponse } from "./upload.service";
import { UploadService } from "./upload.service";

// ----------------------------------------------------------------------------------- //
// ----------------------------------------------------------------------------------- //

@Component({
	selector: "my-app",
	styleUrls: [ "./app.component.less" ],
	template:
	`
		<label for="fileInput" class="upload">
			<span class="upload__label">
				Click to Select File
			</span>

			<input
				#fileInput
				id="fileInput"
				type="file"
				class="upload__input"
				(change)="uploadFiles( fileInput.files ) ; fileInput.value = null;"
			/>
		</label>

		<h2>
			Uploads
		</h2>

		<ul *ngIf="uploads.length">
			<li *ngFor="let upload of uploads">
				<a [href]="upload.url" target="_blank">{{ upload.name }}</a>
			</li>
		</ul>

		<p *ngIf="( ! uploads.length )">
			<em>No files have been uploaded yet.</em>
		</p>
	`
})
export class AppComponent {

	public uploads: UploadResponse[];

	private uploadService: UploadService;

	// I initialize the app component.
	constructor( uploadService: UploadService ) {

		this.uploadService = uploadService;

		this.uploads = [];

	}

	// ---
	// PUBLIC METHODS.
	// ---

	// I initiate an upload request for each of the given files.
	public async uploadFiles( files: any ) : Promise<void> {

		for ( var file of files ) {

			try {

				var response = await this.uploadService.uploadFile( file );

				this.uploads.push( response );

			} catch ( error ) {

				console.group( "Upload Failed" );
				console.warn( "There was an issue uploading the file." );
				console.log( "File:", file.name );
				console.error( error );
				console.groupEnd();

			}

		}

	}

}
If we serve this Angular application locally, using the local version of the Netlify Function, we can select an JPEG to be uploaded and shared:
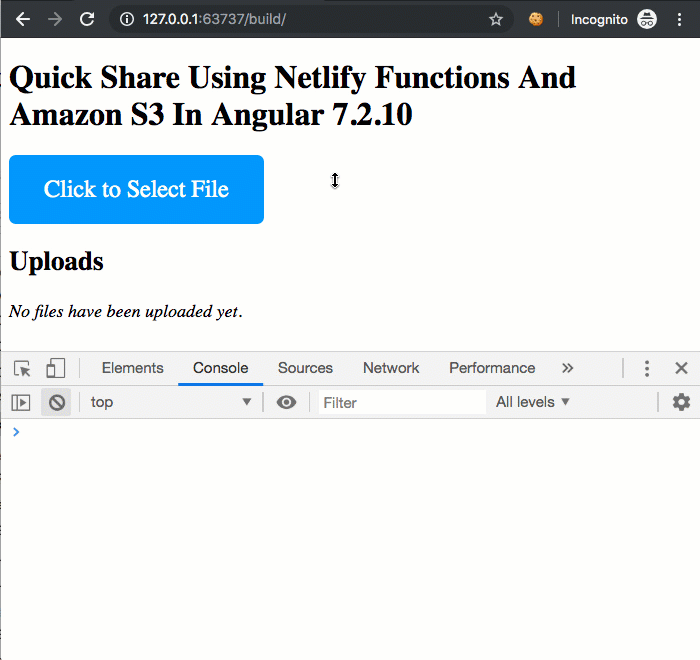
As you can see in the console logging, the browser makes a request to the local Netlify Function and then makes a pre-flight OPTIONS request to S3 followed by a PUT of the Image directly to S3. The resultant file-share is then rendered to the Angular View where the user can use the link to share the file with other people (for up to 60-minutes at which point the pre-signed URL will expire).
This is pretty awesome!
At this point, I knew that the Angular application was properly consuming the local version of the Netlify Function. Now, I had to deploy it to Netlify and ensure that all of the ENV variables were configured for production usage. This can be done in the "Build & Deploy" Continuous Deployment settings:
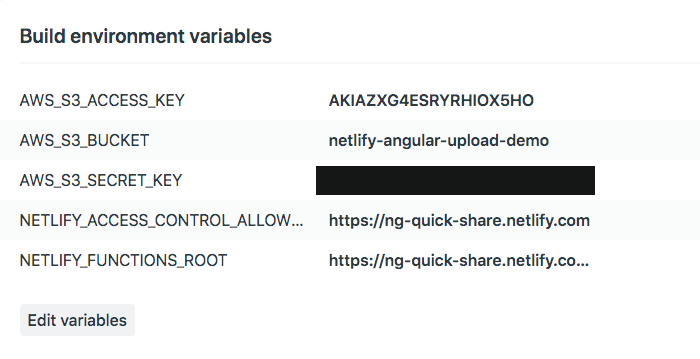
This makes the above values available as ENV variables during my build process. And, since the "dotenv" npm package won't override any existing ENV values, we know that these configured values will take precedence over any attempt to load the ".env" file in the build context.
Locally, I'm just manually building the Angular code and the Netlify Function code "npm run" scripts. But, in order to pull this all together in the production deployment, I'm defining a "netlify.toml" file. This configuration file tells Netlify where and how to build both the Angular code and the AWS Lambda functions from the source:
CAUTION: I don't know how or if the "settings.ID" value is used; I just manually filled-in a value.
[Settings]
	ID = "quick-share-bennadel"

[build]

	# Directory to change to before starting a build.
	# This is where we will look for package.json/.nvmrc/etc.
	base = "./"

	# Directory (relative to root of your repo) that contains the deploy-ready
	# HTML files and assets generated by the build. If a base directory has
	# been specified, include it in the publish directory path.
	publish = "./build/"

	# Default build command.
	command = "npm run build:prod"

	# Directory with the lambda functions to deploy to AWS (after build).
	functions = "./functions/"
And, that's all there is to it. Now, when I push my "master" branch on GitHug, Netlify automatically sees the changes and deploys the Angular code and the Function code to https://ng-quick-share.netlify.com. You can try to run this demo for yourself; but, I will disable it very shortly as it costs money to transfer files to Amazon S3.
This is the first time that I've ever used an AWS Lambda function. I love how (relatively) easy Netlify makes this. It does all the Function compiling, packaging, and deploying for you - all you have to do is provide the Node.js handler and invoke it from your Angular application. Netlify is truly an awesome service!
Want to use code from this post? Check out the license.

Reader Comments
Hi Ben. This is a great post.
Just a couple of things. Firstly, I have never seen 'async/await' used with Angular's HttpClient module? I usually just return the HttpClient request, which I believe is an observable. Then I subscribe to the function call. Something like this:
service
component
What are the advantages of using 'async/await'?
Secondly, I see you are using a Vanilla XHR object to upload your data. Is there a reason why you haven't used 'HttpClient' with PUT? Does AWS require us to use XHR?
@Charles,
As far as
asyncandawait, I can only use it because I am calling.toPromise()on the HTTP response stream. So, I'm converting the RxJS observable to a Promise. I thought it would simplify the workflow.As far as using the
HttpClientservice to perform a file upload -- WAT!? -- I had no idea that was possible :D But, a quick look at the documentation seems to indicate that it is totally supported. That's awesome. I would much rather use theHttpClientthan try to roll my own file handler.Yo, thank you so much for pointing that out! I'll see if I can convert the current service to use it. Woot!
Hey. No worries. Yes. I was kind of wondering what was going on here? I usually send my binary file data in the body, but maybe AWS, has a special requirement?
@Charles,
OH CHICKENS!!! You beautiful person! I just tried it and it worked!. The code is hella simple now :D The
.uploadFile()essentially becomes this:You just rocked my world, good sir. Hats off to you.
And committed to production :D
https://github.com/bennadel/netlify-quick-share/commit/d47e7ae0f5caa4ea897014f1f3ce1861a3a53468
Great. The bit that I had a bit of trouble with, was Content Type, so it was good to see:
Content-Type: file.type
This is the key, otherwise the upload fails!
@Charles,
Good sir, I wrote a quick follow-up post in an effort to burn this info into my head; and, to share with any others that happened to have the same incomplete mental model about the
HttpClient:www.bennadel.com/blog/3593-uploading-files-with-httpclient-in-angular-7-2-11.htm
Gave you a shout-out :D
Cheers Ben. I feel honoured...