Using The Anchor Tag href And download Attributes To Force A File Download
The other day, I happend across an article titled, "5 HTML5 Features you need to know" by Adnane Belmadiaf. In that article Adnane mentions the "download" attribute of the HTML Anchor tag. I'd never heard of this feature before; but, apparently, the "download" attribute tells the browser to download the HREF location using the given filename instead of navigating the browser directly to the HREF location. This doesn't necessarily surface any new functionality from the user's perspective; but, it can create a nicer user experience (UX).
Run this demo in my JavaScript Demos project on GitHub.
There's not really too much to this "download" attribute. You simply provide a filename as the attribute value. And then, when the user clicks on the anchor link, they will download the HREF location and save the resultant payload using the provided filename:
<a href="./generate-zip?id=4" download="assets.zip">Download</a>
In this case, the server-generated ZIP file will be saved to the user's computer as "assets.zip".
The "download" attribute has very good support, working in all the modern browsers (with the not-surprising exceptions of IE 11 and Mobile Safari). But, this feature can really be viewed as a "progressive enhancement" since, without it, the user would simply navigate to the given HREF location where the server could generate a response value and set the appropriate Content-Disposition for download behavior and filename. So really, the "download" attribute just gives you more control over how the user experiences this existing workflow.
NOTE: According to the Mozilla Developer Network (MDN), if the Content-Disposition header provides a different filename than one outlined in the "download" attribute, the Content-Disposition will take precedence.
The notable exception to this "progressive enhancement" perspective is when the HREF attribute points to a Data URI. While you used to be able to navigate a user to a Data URI, the Chrome browser is starting to block this form of navigation because of security concerns. However, it won't block a Data URI HREF if it is used in conjunction with a "download" attribute (allowing the user to download the Data URI content).
This Chrome exception for Data URIs got me thinking about fun ways in which I could experiment with the "download" attribute. And, having recently watched the Jimmy Fallon and Justin Timberlake "hashtag" skit (again), I thought it would be exciting to create an HTML Canvas-based "HashTag Meme" generator in which the user can download the canvas data using the "download" attribute. Not only would this let me play with the "download" feature, it would also give me a chance to play with Canvas, which I've never really done before.
In the following demo, the user can enter phrases into a textarea, one phrase per line. Those phrases are then turned into camel-case hash-tags that get rendered onto the canvas below a scene-still of the Jimmy Fallon skit. So, for example, if the user entered:
friday deployments
yolo
daily grind
let's burn this beast to the ground
... the following content would be rendered onto the Canvas:
#FridayDeployments #Yolo #DailyGrind #LetsBurnThisBeastToTheGround
Then, once the Canvas is updated, the user can click the "Download Image" link, which will download the Cavnas raster image using a Data URI and a "download" attribute.
Since this post is about the HTML Anchor "download" attribute and not about the Canvas element, I'm not going to give any more explanation about what this demo is doing. I've tried to supply plenty of comments; but, for the most part, this was just a fun way to look at the "download" attribute:
<!doctype html>
<html>
<head>
	<meta charset="utf-8" />

	<title>
		Using The Anchor Tag href And download Attributes To Force A File Download
	</title>

	<link rel="stylesheet" type="text/css" href="https://fonts.googleapis.com/css?family=Open+Sans:400,600|Patrick+Hand+SC" />
	<link rel="stylesheet" type="text/css" href="./styles.css" />
</head>
<body>

	<h1>
		Using The Anchor Tag href And download Attributes To Force A File Download
	</h1>

	<form class="form">

		<div class="form__meme meme">
			<canvas width="700" height="465" class="meme__canvas">
				<img
					src="./hashtag_hero_700.png"
					alt="Based on the Jimmy Fallon skit: https://www.youtube.com/watch?v=57dzaMaouXA"
					class="meme__img"
				/>
			</canvas>
		</div>

		<div class="form__field">
			<label class="form__label">Add Tags (One per line):</label>
			<textarea class="form__input"></textarea>
			<a class="form__download">Download Image</a>
		</div>

	</form>

	<span class="font-loader">
		This is here to force the font to load.
	</span>


	<script type="text/javascript">

		// We can't use the canvas until both the Image and the Font load.
		window.addEventListener( "load", init );

		function init() {

			var img = document.querySelector( ".meme__img" );
			var input = document.querySelector( ".form__input" );
			var button = document.querySelector( ".form__download" );
			var canvas = document.querySelector( ".meme__canvas" );
			var context = canvas.getContext(
				"2d",
				{
					alpha: false
				}
			);

			// We only need to write the image to the canvas when the canvas is resized
			// (which implicitly clears it). As such, we'll keep track of the canvas size
			// and only write the image when necessary.
			var previousCanvasHeight = 0;

			// Rather than dealing with converting the natural dimensions of the image,
			// I'm just hard-coding them so we can easily draw the scaled image.
			var imageWidth = 700;
			var imageHeight = 465;

			// I define the padding that will surround the tags within the figure.
			var tagPadding = {
				top: 40,
				right: 40,
				bottom: 40,
				left: 40
			};

			var initialTags = [
				"homemade",
				"oatmeal raisin",
				"show me the cookie",
				"getin my cookie on",
				"i'm the real cookie monster",
				"nom nom nom nom nom nom nom nom"
			];

			input.value = initialTags.join( "\n" );
			input.addEventListener( "input", handleInput );
			button.addEventListener( "click", saveImageOnButtonClick );

			applyInputToCanvas();

			// ---
			// PRIVATE METHODS.
			// ---

			// I apply the current value of the textarea input to the canvas.
			function applyInputToCanvas() {

				renderTags( splitIntoTags( input.value ) );

			}


			// I handle changes to the textarea, turning them into updates to the canvas.
			function handleInput( event ) {

				applyInputToCanvas();

			}


			// I determine if the current browser Firefox. While we generally want to
			// avoid vendor detection, there is a bug in the way Firefox prints text into
			// a canvas, and we need to account for that.
			function isFirefox() {

				return( window.navigator.userAgent.toLowerCase().indexOf( "firefox" ) >= 0 );

			}


			// I render the given tags in the canvas, resizing it as necessary.
			function renderTags( tags ) {

				var contextFont = "42px 'Patrick Hand SC'";
				var lineHeight = 38;
				var lineSpacing = 20;

				// There seem to be cross-browser discrepancies and bugs in how text is
				// positioned on a canvas. As such, I am setting the baseline and a
				// "nudging" value here as a variable so that I can tweak them based on
				// the current browser context.
				// --
				// Read More: https://bugzilla.mozilla.org/show_bug.cgi?id=737852
				var textBaseline = "middle";
				var textNudge = isFirefox()
					? 22
					: 18 // All the other things.
				;

				// When rendering text on the canvas, the default behavior is just to
				// write it all on one line - canvas has no concept of line-wrapping.
				// But, it does give us the ability to measure the WIDTH of the rendered
				// text. As such, we'll build up each line until it exceeds the available
				// width; then, we'll move text to the next line, and continue building
				// up the content.
				context.font = contextFont;
				var textMaxWidth = ( imageWidth - tagPadding.left - tagPadding.right );
				var lines = [];
				var line = "";

				for ( var i = 0 ; i < tags.length ; i++ ) {

					var tag = tags[ i ];
					var pendingText = line
						? ( line + " " + tag )
						: tag
					;

					// Let's look at how much space WOULD BE taken up by the given text.
					var pendingTextWidth = context.measureText( pendingText ).width;

					// If the line with the new tag is too long, we'll persist the
					// pending line content and then start a new pending line with the
					// given tag.
					if ( pendingTextWidth > textMaxWidth ) {

						// If there's already a pending line, then let's persist the
						// pending line and start a new line with current tag.
						if ( line ) {

							lines.push( line );
							line = tag;

						// If there's no pending line, then it means this tag is actually
						// too large for any single line. In that case, just persist it
						// as a line and we'll let it render outside the canvas bounds.
						} else {

							lines.push( pendingText );
							line = "";

						}

					// If the line with the new tag fits within the bounds of a single
					// line, keep it and let's move onto the next tag.
					} else {

						line = pendingText;

					}

				}

				// If we have any pending line content left, persist it as a new line.
				if ( line ) {

					lines.push( line );

				}

				var lineCount = lines.length;
				var spacingCount = ( lineCount - 1 );

				// Calculate the dimensions of the figure given the tag content.
				var figureWidth = imageWidth;
				var figureHeight = (
					tagPadding.top +
					tagPadding.bottom +
					( lineCount * lineHeight ) +
					( spacingCount * lineSpacing )
				);

				// Calculate the dimensions of the canvas with the new tag content.
				var canvasWidth = imageWidth;
				var canvasHeight = ( imageHeight + figureHeight );

				// Since the figure area is the only "dynamic" portion of the canvas, we
				// only need to draw the image when the canvas resizes (which implicitly
				// clears the canvas). And, since we know the HEIGHT is the only dynamic
				// portion of the dimensions, that's what we'll check.
				if ( canvasHeight !== previousCanvasHeight ) {

					canvas.width = canvasWidth;
					canvas.style.width = ( canvasWidth + "px" );
					canvas.height = canvasHeight;
					canvas.style.height = ( canvasHeight + "px" );
					context.drawImage( img, 0, 0, imageWidth, imageHeight );

				}

				// Clear the figure area.
				context.fillStyle = "#1F1F1F";
				context.fillRect( 0, imageHeight, figureWidth, figureHeight );

				// Setup tag text and fill styles.
				context.font = contextFont;
				context.fillStyle = "#FFFFFF";
				context.textAlign = "center";
				context.textBaseline = textBaseline;

				// Draw lines of tags to canvas.
				for ( var i = 0 ; i < lines.length ; i++ ) {

					var lineY = ( ( imageHeight + tagPadding.top ) + ( i * lineHeight ) + ( i * lineSpacing ) );
					var textY = ( lineY + textNudge );

					context.fillText( lines[ i ], ( figureWidth / 2 ), textY );

					// This will show the line delimiters for debugging purposes.
					if ( false ) {

						context.fillRect( 0, lineY, canvasWidth, 1 );
						context.fillRect( 0, ( lineY + lineHeight ), canvasWidth, 1 );

					}

				}

			}


			// I set the click-action of the button to be a request to save the content
			// of the canvas as an exported PNG file. This will allow the user to save
			// the canvas on-demand.
			function saveImageOnButtonClick( event ) {

				var filename = ( "hashtag-meme-" + Date.now() + ".png" );

				// Check to see if the "download" property is defined; while it is
				// available in the modern browsers, it doesn't have historical support
				// in Internet Explorer.
				if ( typeof( button.download ) === "string" ) {

					button.href = canvas.toDataURL();
					button.download = filename;

				// Try to fallback to IE-specific methods.
				// --
				// Credit: https://stackoverflow.com/questions/22665111/download-img-throught-hyperlink-a-in-ie11-using-javascript/22682521
				} else if ( navigator.msSaveBlob ) {

					navigator.msSaveBlob( canvas.msToBlob(), filename );

				} else {

					alert( "Downloading is not available for security reasons." );

				}

			}


			// I split the given multi-line value into a set of multi-word tags.
			function splitIntoTags( value ) {

				// Each tag can be a multi-word, space-delimited phrase, one per line.
				var tags = trim( value )
					.split( /\r\n?|\n/g )
					.map(
						function ( line ) {

							// Clean each line up, removing invalid characters.
							line = line.toLowerCase()
								.replace( /[#-]/g, " " )
								.replace( /[^\w\d ]+/g, "" )
							;

							if ( ! ( line = trim( line ) ) ) {

								return( "" );

							}

							// Now, split the line up into tokens, and join them back
							// together using camel-case (ex, "GoodMorningMyFriend").
							var tag = line
								.split( /\s+/g )
								.map(
									function ( token ) {

										var head = token.slice( 0, 1 );
										var tail = token.slice( 1 );

										return( head.toUpperCase() + tail );

									}
								)
								.join( "" )
							;

							return( "#" + tag );

						}
					)
					.filter(
						function ( tag ) {

							return( !! tag );

						}
					)
				;

				return( tags );

			}


			// I remove the leading and trailing white-space from the given value.
			function trim( value ) {

				return( value.replace( /^\s+|\s+$/g, "" ) );

			}

		}

	</script>

</html>
As you can see, the "click" handler for the Download Image button grabs the Canvas Data URI and pushes it into the button's HREF attribute. The "download" attribute then saves the resultant PNG to the user's computer.
By default, the HashTag meme generator starts with the following phrases:
homemade
oatmeal raisin
show me the cookie
getin my cookie on
i'm the real cookie monster
nom nom nom nom nom nom nom nom
So, if we run this page and then click the Download Image button without making any changes, we get the following image download:
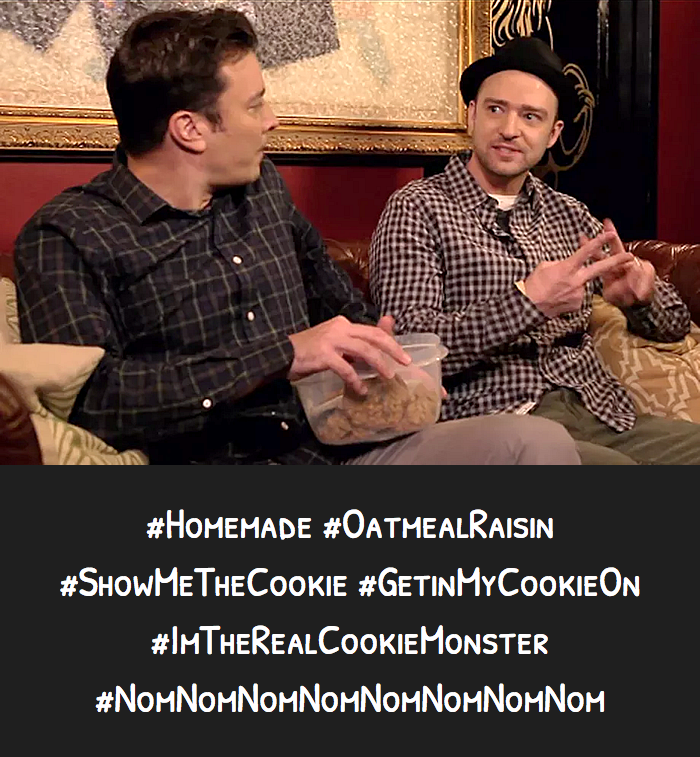
Fun stuff! The "download" attribute seems like an nice way to provide a better user experience around file generation. And, in the case of Data URIs - perhaps the best way to provide any user experience at all.
Want to use code from this post? Check out the license.

Reader Comments
Lifesaving article! I was looking for a way to download a file with a different name than the original, it can be achieved by with "href" and "download". Thanks a lot! (from Costa Rica)
@Jose,
Awesome, glad this was helpful! Happy New Year :D
Im trying to donwload the dataUrl but I think it is too big. My download button wont do anything and I think that happens because the dataUrl is quite large. My code works fine when my data is not so big. Are there any alternatives?
That download attribute is just what I needed in my life today. Thank you for the great article!
@Ross,
My pleasure :D Glad it was helpful. I love this little feature.
@Ross,
Hmmm, interesting. I do know that there are URL limitations; but I've not run into them personally (mostly cause I just do a lot of R&D stuff).
Try taking a look at one of my later blog posts that uses a similar approach but uses an in-memory Blob instead of a Data URI:
www.bennadel.com/blog/3472-downloading-text-using-blobs-url-createobjecturl-and-the-anchor-download-attribute-in-javascript.htm
Since this creates a tiny URL that only references a
blog://style URL, you should be able to get around the length-limitation.Hi Ben,
Just a curiosity ... (side discussion) I have an Angular SPA that gets profile data on a user including their digital certs. The JSON data payload includes both formatted and base64 for each cert. The user is allowed to download the cert, which I'm supplying via href="data:application/octet-stream;charset=utf-8,{{$ctrl.data.usercertificate_base64[$index]}}"
My issue is that it's getting downloaded as a single line of data verses the standard multi line content normally seen w/ base64. The data in the JSON array is already encoded (has \r\n), but that seems to be getting striped away. It even shows up in the console inspector w/ multiple lines.
I don't think I need a blob as the data is never more than 1500 chars. I am also using the download attribute to present a name of the file to be saved as the data stream is not a proper name. ;)
Any ideas how I can fix the download to include the "new line" characters, and get a multi line output file?
Cheers!
@Eric,
That's really strange. I actually have another post that uses the
downloadattribute with plain-text files and it is able to maintain the line-breaks within the text:www.bennadel.com/blog/3456-exploring-plain-text-data-uris-and-the-anchor-download-attribute-in-javascript.htm
I am not sure why your line-breaks would be getting stripped-out, especially if they appear to be there in the console-logging. Perhaps you have to URL-encode the base64 value? To be honest, I'm not so great with all the data-type conversions, so I am just shooting in the dark here.
Hi Ben
Struggling to get download attribute to work well enough, even in chrome latest if the url is not the same origin the console will show an error :
Not allowed to load local resource: filesystem:https://cdn.glitch.com/a1f09fab-ed22-4ce4-9419-366a7feb4c27%2Fhl-109.jpg/
Which basically meas not allowed to load resources from a difference source.
Which begs the question, how do you download large files without storing them in memory.. If you download a file to memory only the browsers network tab shows the progress, but the default download method doesn't kick in until it reaches 100%, so from a UX perspective the user doesn't see anything happening.
R.
@Ben,
We, I mean my colleague, found the solution for our issue. As a reminder we are responding w/ a JSON payload that includes both the formatted and base64 for a digital cert. We needed to allow the end users to "download" / save the base64 (already locally available in the payload) for use to encrypt emails. Here's the solution (we gave them a button named "Download"). These attributes were used in an anchor tag.
The key code here is the use of application/x-pem-file, especially the x-pem-file reference. All the examples on the net reference octet-stream, which did not work as desired. charset seems to be optional as it works w/ or w/out.
Obviously $user_certificate_base64 & $userName would be diff based on your code, and are only examples here.
HTH your readers.
@All,
Over the weekend, I found an awesome library called
html2canvas. It allows you to take an arbitrary DOM node and generate a screenshot of it onto acanvaselement:www.bennadel.com/blog/3771-generating-meme-images-in-the-browser-using-html2canvas-in-angular-9-0-1.htm
This is sooooo much easier that my approach. I can't believe this is even possible :D What a wonderful time to be alive!