
Hello World With Webpack And TypeScript 2.3.4 In React 15.6.1
It's no secret that I love Angular. But, many of my teammates have a preference for React. As such, I try to keep up with React as best I can so that when I read their code, I'm not completely lost; plus, it's nice to switch up my context from time to time in an attempt to gain a broader perspective. Now, since I've been using TypeScript to build out my Angular code, I thought it would be a fun experiment to see if I could get React running with TypeScript as well. It was a bit of bumpy ride getting used to all the new Type annotations; but, I finally got something working.
Run this demo in my JavaScript Demos project on GitHub.
View this code in my JavaScript Demos project on GitHub.
First, I don't think I would have gotten this working without Basarat Ali Syed's chapter on using JSX in TypeScript. If you've used TypeScript, there's no doubt you've come across Basarat's book - it's often one of the first Google results I get when I search for TypeScript answers. Quite an outstanding resource!
That said, I started this journey by taking my Angular / TypeScript / Webpack approach and just refactoring it to use React instead of Angular. Since this will be part of my JavaScript Demos Project on GitHub, I created a separate "vendor" folder that will contain my common assets like TypeScript, Webpack, React, and Lodash libraries:
/vendor/reactjs/15.6.1-webpack-tsc/package.json
{
	"name": "15.6.1-webpack-tsc",
	"version": "15.6.1-webpack-tsc",
	"dependencies": {
		"@types/lodash": "4.14.66",
		"@types/react": "15.0.30",
		"@types/react-dom": "15.5.0",
		"core-js": "2.4.1",
		"html-webpack-plugin": "2.28.0",
		"lodash": "4.17.4",
		"react": "15.6.1",
		"react-dom": "15.6.1",
		"ts-loader": "2.1.0",
		"typescript": "2.3.4",
		"webpack": "2.6.1"
	}
}
The tricky thing about having all of my vendor files in a common location is that neither TypeScript nor Webpack know where to find things automatically. As such, each of the transpilers and packagers need to be told to explicitly look in the vendor folder when trying to resolve module expressions.
For example, my TypeScript configuration file needs to know the baseUrl for module and type resolution:
{
	"compilerOptions": {
		"baseUrl": "../../vendor/reactjs/15.6.1-webpack-tsc/node_modules/",
		"emitDecoratorMetadata": true,
		"experimentalDecorators": true,
		"jsx" : "react",
		"lib": [
			"DOM",
			"ES6"
		],
		"module": "commonjs",
		"moduleResolution": "node",
		"noImplicitAny": true,
		"paths": {
			"lodash": [
				"@types/lodash"
			],
			"react": [
				"@types/react"
			],
			"react-dom": [
				"@types/react-dom"
			]
		},
		"pretty": true,
		"removeComments": false,
		"sourceMap": true,
		"suppressImplicitAnyIndexErrors": true,
		"target": "es5"
	}
}
The most frustrating thing here is that I have to explicitly tell TypeScript where to find each @types declaration. Normally, TypeScript would just automatically locate all @types that were present in the node_modules folder. But, since there is no local node_modules folder in my demo, it can't find anything automatically.
My demo-local package.json file needs to know where to locate the .bin directory for npm run script execution:
{
	"scripts": {
		"build": "../../vendor/reactjs/15.6.1-webpack-tsc/node_modules/.bin/webpack",
		"watch": "../../vendor/reactjs/15.6.1-webpack-tsc/node_modules/.bin/webpack --watch"
	}
}
And, finally, my Webpack configuration file needs to know how to resolve modules and loaders:
// Load the core node modules.
var HtmlWebpackPlugin = require( "../../vendor/reactjs/15.6.1-webpack-tsc/node_modules/html-webpack-plugin" );
var path = require( "path" );
var webpack = require( "../../vendor/reactjs/15.6.1-webpack-tsc/node_modules/webpack" );

module.exports = {
	// I am going to generate 3 separate JavaScript files (that the HtmlWebpackPlugin
	// will automatically inject into my HTML template). Creating three files helps me
	// isolate the parts of the code that change often (my code) from the parts of the
	// code that change infrequently (the vendor code).
	entry: {
		polyfill: "./app/main.polyfill.ts",
		vendor: "./app/main.vendor.ts",
		main: "./app/main.tsx"
	},
	// In normal development, I might use "[name].[chunkhash].js"; however, since this
	// is just getting committed to GitHub, I don't want to create a new hash-based file
	// for every file-save event. Instead, I can use the "hash" option in the
	// HtmlWebpackPlugin to help with cache-busting per build.
	output: {
		filename: "[name].js",
		path: path.join( __dirname, "build" )
	},
	resolve: {
		// NOTE: The .ts extension needs to come before the .tsx extension, otherwise,
		// the code seems to struggle to import .ts modules.
		extensions: [ ".ts", ".tsx", ".js" ],
		// Tell Webpack to use my shared vendor folder when resolving modules that it
		// finds in "import" statements.
		modules: [
			"../../vendor/reactjs/15.6.1-webpack-tsc/node_modules/"
		]
	},
	resolveLoader: {
		// Tell Webpack to use my shared vendor folder when resolving loaders that it
		// finds in this config (ex, "ts-loader") (or in inline references, I suppose).
		modules: [
			"../../vendor/reactjs/15.6.1-webpack-tsc/node_modules/"
		]
	},
	module: {
		rules: [
			{
				test: /\.(ts|tsx)$/,
				loaders: [
					// I compile the TypeScript content into ES5 JavaScript. In addition
					// to transpiling the code, it is also running type-checks based on
					// the tsconfig.json file.
					"ts-loader"
				]
			}
		]
	},
	plugins: [
		// I move common references in the Entry files down into the lowest-common entry
		// file in this list.
		// --
		// CAUTION: The order of these chunk names has to be in the REVERSE order of the
		// order in which you intent to include them in the Browser. I believe, but am not
		// sure, that this is because common dependencies are moved to the next file down
		// in this list. So, if "main" and "vendor" have things in common, they will be
		// moved down to "vendor". Were the order reversed, with "vendor" above "main",
		// then common dependencies would be moved down to "main" (which is what we want
		// to avoid).
		new webpack.optimize.CommonsChunkPlugin({
			names: [
				"main",
				"vendor",
				"polyfill",
				// Extract the Webpack bootstrap logic into its own file by providing a
				// name that wasn't listed in the "entry" file list.
				// --
				// NOTE: I don't really need this for my kind of GitHub based development;
				// but, this seems to be a common pattern as it moves frequently changing
				// code out of the "vendor" file.
				"manifest"
			]
		}),
		// I generate the main "index" file and inject Script tags for the files emitted
		// by the compilation process.
		new HtmlWebpackPlugin({
			// Notice that we are saving the index UP ONE DIRECTORY, so that it is output
			// in the root of the demo.
			filename: "../index.htm",
			template: "./app/main.htm",

			// This will append a unique query-string hash (for cache busting) to the
			// injected files after each build. All files get the same hash, which makes
			// this DIFFERENT from using the "chunkhash" in the "output" config.
			hash: true
		}),
		// I compact the JavaScript content.
		new webpack.optimize.UglifyJsPlugin({
			keep_fnames: true
		})
	]
};
The Webpack config for my React exploration is basically the same as the one I use for Angular. The only significant difference is that I am adding the .tsx file extension and removing the Angular template loader.
Once I had something compiling, I went about playing with React in TypeScript. The concept was simple - create a list of contacts. But, trying to figure out how the Type system interacted with React was a bit of a hurdle. You actually don't need to add nearly as many type annotations as I did - many of the types can be inferred based on the Class Generics and the @types declaration files provided for React and ReactDOM. But, I like to over-annotate my TypeScript code in order to prove to myself that I understand the type system.
With React, each Component is based on a Generic class that is parameterized with a State and Props interface:
interface Props { }

interface State { }

class MyComponent extends React.Component<Props, State> {
	/* .... */
}
These interfaces take care of all of the validation for what can be passed into a component (its Props) and what kind of state it can store (its State). This means no more dealing with those messy "propTypes" validation objects - just let the TypeScript compiler handle that for you. The State interface even allows the compiler to infer what kind of return value should be allowed in a setState() callback-based invocation (though I provide a return type - Partial<State> - since, as I said, I like to over-annotate the code).
For the return type of the render() function, I just looked in the declaration files to see what was allowed. It looks like render() can return a JSX.Element type, which, according to the TypeScript documentation, is the type returned from any JSX expression:
By default the result of a JSX expression is typed as any. You can customize the type by specifying the JSX.Element interface. However, it is not possible to retrieve type information about the element, attributes or children of the JSX from this interface. It is a black box.
public render() : JSX.Element {
	/* .... */
}
The other type annotation that tripped me up was the event-binding stuff. Normally, I'm used to using native Event objects; but, React uses event-delegation by way of Synthetic events. As such, event-handlers, in a React application receive parameterized synthetic events exposed on the React namespace:
public handleEvent( event: React.FormEvent<HTMLFormElement> ) : void {
	/* ... */
}
As you can see, the synthetic event is parameterized by its "target". In this case, the synthetic FormEvent is annotated to be triggered from a native HTMLFormElement.
This certainly doesn't cover all of the React-specific type annotations; but, this was sufficient for me to build a working demo React, TypeScript, and Webpack. The rest of the code just uses normal TypeScript annotations like you would in any TypeScript-based application.
That said, let's look at what I was able to come up with. It's a very simple contact list that allows new contacts to be added and old contacts to be deleted. Let's start at the entry point into the application - the main.tsx bootstrapping file:
// Import the core React modules.
import React = require( "react" );
import ReactDOM = require( "react-dom" );

// Import the application modules.
import { AppComponent } from "./app.component";

// To bootstrap the application, all we're going to do is render the root component
// on the main page.
ReactDOM.render( <AppComponent />, document.getElementById( "root" ) );
Here, we're telling React to render the AppComponent in the #root node of the parent HTML document. This is fairly straightforward; but, remember from the Webpack configuration that this entry point is just one of the files that we want to bundle. In order to facilitate browser caching, we want to try to isolate the code that changes frequently from the code that changes infrequently. As such, we also want to provide a polyfill file:
// Import these libraries for their side-effects.
import "core-js/client/shim.min.js";
... and a vendor file:
// Import these libraries for their side-effects.
// --
// CAUTION: As you add more "import" statements to your application code, you will have
// to come back to this file and add those imports here as well (otherwise that imported
// content may get bundled with your main application bundle, not your vendor bundle.
import "lodash";
import "react";
import "react-dom";
Now - thanks to the Webpack CommonsChunkPlugin module - any shared vendor modules will be factored out into a separate bundle.
With the foundational file work setup, we can now look at the AppComponent being rendered as the root of the React application:
// Import the core React modules.
import React = require( "react" );
import _ = require( "lodash" );

// Import the application modules.
import { AddContactFormComponent } from "./add-contact-form.component";
import { Contact } from "./interfaces";
import { ContactComponent } from "./contact.component";
import { ContactListComponent } from "./contact-list.component";

interface Props {}

interface State {
	contacts: Contact[];
}

export class AppComponent extends React.Component<Props, State> {

	// I initialize the app component.
	constructor() {

		super();

		this.state = {
			contacts: [
				{ id: 1, name: "Kim" },
				{ id: 2, name: "Sarah" },
				{ id: 3, name: "Joanna" },
				{ id: 4, name: "Libby" }
			]
		};

	}


	// ---
	// PUBLIC METHODS.
	// ---


	// I render the component.
	public render() : JSX.Element {

		return(
			<div>
				<h2>
					You Have { this.state.contacts.length || "No" } Contacts
				</h2>

				<ContactListComponent
					contacts={ this.state.contacts }
					onDelete={ this.handleDelete }>
				</ContactListComponent>

				<AddContactFormComponent onSubmit={ this.handleAdd } />
			</div>
		);

	}


	// ---
	// PRIVATE METHODS.
	// ---


	// I get the next available ID from the given collection of contacts.
	private getNextID( contacts: Contact[] ) : number {

		if ( contacts.length ) {

			return( _.maxBy( contacts, "id" ).id + 1 );

		} else {

			return( 1 );

		}

	}


	// I handle name emitted from the form component, adding a new contact.
	// --
	// CAUTION: Using an instance-property to define the function so that we don't lose
	// the "this" context when the method reference is passed into the React element.
	private handleAdd = ( name: string ) : void => {

		// NOTE: Since the next state is based on the previous state, we need to use the
		// callback-style invocation so that we can handle asynchronous state updates.
		this.setState(
			( state: State, props: Props ) : Partial<State> => {

				return({
					contacts: [
						...state.contacts,
						{
							id: this.getNextID( state.contacts ),
							name: name
						}
					]
				});

			}
		);

	}


	// I handle the delete event emitted from the contact list, removing a contact.
	// --
	// CAUTION: Using an instance-property to define the function so that we don't lose
	// the "this" context when the method reference is passed into the React element.
	private handleDelete = ( contact: Contact ) : void => {

		// NOTE: Since the next state is based on the previous state, we need to use the
		// callback-style invocation so that we can handle asynchronous state updates.
		this.setState(
			( state: State, props: Props ) : Partial<State> => {

				return({
					contacts: _.without( state.contacts, contact )
				});

			}
		);

	}

}
The root component manages the state of the application - the contacts list - but, more or less, defers rendering to the ContactListComponent and the AddContactFormComponent, using a one-way data flow. This means that the root component passes state down into the components and reacts to events being emitted by the components.
NOTE: You'll notice that my demo doesn't use Immutable.js. And, yet, somehow, the world hasn't ended </snarky-comment>
The root component, however, is not the only component that has state. The AddContactFormComponent also maintains state for its embedded Form data:
// Import the core React modules.
import React = require( "react" );

export interface OnSubmit {
	( name: string ) : void;
}

interface Props {
	onSubmit: OnSubmit;
}

interface State {
	name: string;
}

export class AddContactFormComponent extends React.Component<Props, State> {

	private input: HTMLInputElement;


	// I initialize the add contact form component.
	constructor( props: Props ) {

		super( props );

		this.state = {
			name: ""
		};

		this.input = null;

	}


	// ---
	// PUBLIC METHODS.
	// ---


	// I get called once the component has been mounted on the DOM (and the Element
	// references have been made available).
	public componentDidMount() : void {

		this.input.focus();

	}


	// I render the component.
	public render() : JSX.Element {

		return(
			<div className="add-contact">

				<h3 className="add-contact__title">
					Add New Contact
				</h3>

				<form onSubmit={ this.handleSubmit } className="add-contact__form">

					<input
						type="text"
						ref={ this.handleInputRef }
						value={ this.state.name }
						onChange={ this.handleValue }
						placeholder="Jane Doe..."
						className="add-contact__input">
					</input>

					<button
						type="submit"
						className="add-contact__button"
						disabled={ ! this.state.name }>
						Add Contact
					</button>

				</form>

			</div>
		);

	}


	// ---
	// PRIVATE METHODS.
	// ---


	// I handle the delete click.
	// --
	// CAUTION: Using an instance-property to define the function so that we don't lose
	// the "this" context when the method reference is passed into the React element.
	private handleSubmit = ( event: React.FormEvent<HTMLFormElement> ) : void => {

		// Stop the native form submission behavior.
		event.preventDefault();

		if ( this.state.name ) {

			this.props.onSubmit( this.state.name );
			this.setState({
				name: ""
			});

		}

	}


	// I handle the exposure of the input element on the DOM.
	// --
	// CAUTION: Using an instance-property to define the function so that we don't lose
	// the "this" context when the method reference is passed into the React element.
	private handleInputRef = ( element: HTMLInputElement ) : void => {

		this.input = element;

	}


	// I handle the one-way data flow change to the form input.
	private handleValue = ( event: React.FormEvent<HTMLInputElement> ) : void => {

		// CAUTION: I need to cast the React.FormEvent<HTMLInputElement> event type to
		// be an ANY since the native EventTarget interface doesn't appear to support
		// "value" (on target) at this time. So, by casting to ANY, I am essentially
		// side-stepping type-safety in order to access the input value.
		this.setState({
			name: ( event as any ).target.value
		})

	}

}
Internally, the AddContactFormComponent uses one-way data flow using "controlled components" (ie, the Input element). But, it also maintains its own state in regard to the pending input value. Once the value has been entered and submitted, the AddContactFormComponent emits the value so that the parent context can integrate it with the existing contact list.
Having been working with Angular for so long, I had forgotten how much the React ecosystem drives you to "hyper" decompose your UI (user interface) into micro components. In Angular, what could easily function as a single UI component generally has to become several components in its React counterpart. This is because React doesn't have any mechanism (that I know of) for binding list data. As such, when you render a list that needs to react to events, you often have to break that list down into list-items, each of which receives some sort of "item" prop that it can subsequently work with and emit events on.
There's nothing wrong with decomposing a UI to this level (and it can often be good to differentiate so-called Layout components from the Widget components). But, I just appreciate that you have more choice in Angular - it can all be one UI component that gracefully binds iteration values to event-handlers; or, it can be broken up more akin to a ReactJS application.
CAUTION: Don't use .bind() to try and to bind iteration values to component event handlers. It will cause shenanigans.
That said, let's look at the ContactListComponent that uses this kind of UI decomposition:
// Import the core React modules.
// --
// CAUTION: DO NOT REMOVE - Even though this doesn't appear to be referenced, it will be
// referenced in the transpiled code (which creates React.createElement() expressions).
import React = require( "react" );

// Import the application modules.
import { Contact } from "./interfaces";
import { ContactListItemComponent } from "./contact-list-item.component";
import { OnDelete } from "./contact-list-item.component";

// Since the calling context may need to know the callback interface, let's re-export the
// OnDelete interface (it's not truly needed for this demo, but I think this may make
// sense as a general rule).
export { OnDelete };

interface Props {
	contacts: Contact[];
	onDelete: OnDelete;
}

// NOTE: We are using a Function instead of a Class here because this is a stateless
// component that doesn't need to expose any additional methods. As such, we can provide
// what is essential just the render() method. The props are still type-checked against
// the Props {} interface.
export function ContactListComponent( props: Props ) : JSX.Element {

	var contactListItemNodes = props.contacts.map(
		( contact: Contact ) : JSX.Element => {

			return(
				<ContactListItemComponent
					key={ contact.id }
					contact={ contact }
					onDelete={ props.onDelete }>
				</ContactListItemComponent>
			);

		}
	);

	return(
		<div className="contact-list">
			{ contactListItemNodes }
		</div>
	);

}
As you can see, the ContactListComponent really just turns around and renders a collection of ContactListItemComponent's. This decomposition allows individual Contact entities to be managed in a separate context, which facilitates event binding and management. But, it also means that the props have to be passed down an additional layer; and, the OnDelete interface (for the onDelete callback) needs to be surfaced in case the calling context wants to reference it.
In retrospect, I probably should have just included both the ContactListComponent and the ContactListItemComponent in the same module. I don't see any real value-add in spreading these two components across two different files. It serves no real purpose, hurts readability, and requires this additional layer of import / export propagation.
ASIDE: I wonder if one can use BEM (Block Element Modifier) notation to drive file organization. Hmmm - let me think on that.
That said, here's the ContactListItemComponent:
// Import the core React modules.
import React = require( "react" );

// Import the application modules.
import { Contact } from "./interfaces";

export interface OnDelete {
	( contact: Contact ) : void;
}

interface Props {
	contact: Contact;
	onDelete: OnDelete;
}

interface State {}

export class ContactListItemComponent extends React.Component<Props, State> {

	// ---
	// PUBLIC METHODS.
	// ---


	// I render the component.
	public render() : JSX.Element {

		return(
			<div title={ `Contact ID ${ this.props.contact.id }` } className="contact-list__item">
				<div className="contact-list__name">
					{ this.props.contact.name }
				</div>

				<div className="contact-list__actions">
					<a onClick={ this.handleClick } className="contact-list__action">Delete</a>
				</div>
			</div>
		);

	}


	// ---
	// PRIVATE METHODS.
	// ---


	// I handle the delete click.
	// --
	// CAUTION: Using an instance-property to define the function so that we don't lose
	// the "this" context when the method reference is passed into the React element.
	private handleClick = ( event: React.MouseEvent<HTMLAnchorElement> ) : void => {

		this.props.onDelete( this.props.contact );

	}

}
As you can see, by decomposing the UI into individual React components, each ContactListItemComponent is associated with a single Contact entity. As such, when the onClick() callback is invoked, it is immediately clear which Contact the event is targeting. This allows the onDelete() prop to be invoked with confidence.
And that's basically all the code. If we compile this with Webpack:
npm run watch
... and the open it up in the browser, we get the following output:
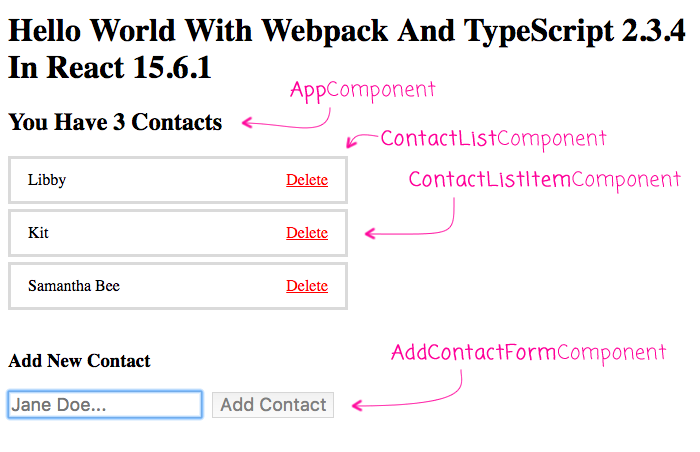
NOTE: I'm just putting the CSS in the index.htm page; I've not gotten to the Styled Components portion of my mental model.
I'm fairly new to ReactJS. All in all, I probably have no more than a month of React R&D; so, I am sure there are other ways to approach this same problem. Mostly, I was just trying to get React working with TypeScript and Webpack (so that I could more research). As such, please take this post with that perspective. But, if you do have some feedback on the React code itself, I'm always excited to learn how to do things moar better.
Want to use code from this post? Check out the license.

Reader Comments
@All,
After doing this experiment, I didn't like how the contact-list components were broken up into different modules. I thought about using the BEM (Block Element Modifier) mindset as a means to bring logic to the module structure of the React.js application:
www.bennadel.com/blog/3294-using-bem-class-names-to-guide-module-structure-in-reactjs-15-6-1.htm
Great article!
As someone that has spent too much time with webpack, I have to say this would be easier for someone just starting out with React and Typescript:
npm install -g create-react-app
create-react-app myapp --scripts-version=react-scripts-ts
Done.
Then if you absolutely must know how everything is being done:
npm run eject
@J.P.,
I have to get better about looking at the CLIs for various libraries. I'm the same way with Angular - it has a CLI and I think I've used it only once. The hesitation I usually have is that I'm concerned that the CLI won't work with some of my specific needs (like having a shared "vendor" folder for many of the apps across my github project). But, it could very be that the CLI can do exactly that - though, it might require even more finagling to get it to bend to my needs.