
More Child-Element Animations Using ngAnimate In AngularJS
Over the weekend, I looked at how we can animate static child nodes using the ngAnimate module in AngularJS. To me, this is such an awesome feature of AngularJS (and CSS, really) that I wanted to give it a little bit more love. In this follow-up post, I don't want to introduce anything new, necessarily; I just want to showcase a more complex, multi-faceted animation for transitioning views in an AngularJS application.
Run this demo in my JavaScript Demos project on GitHub.
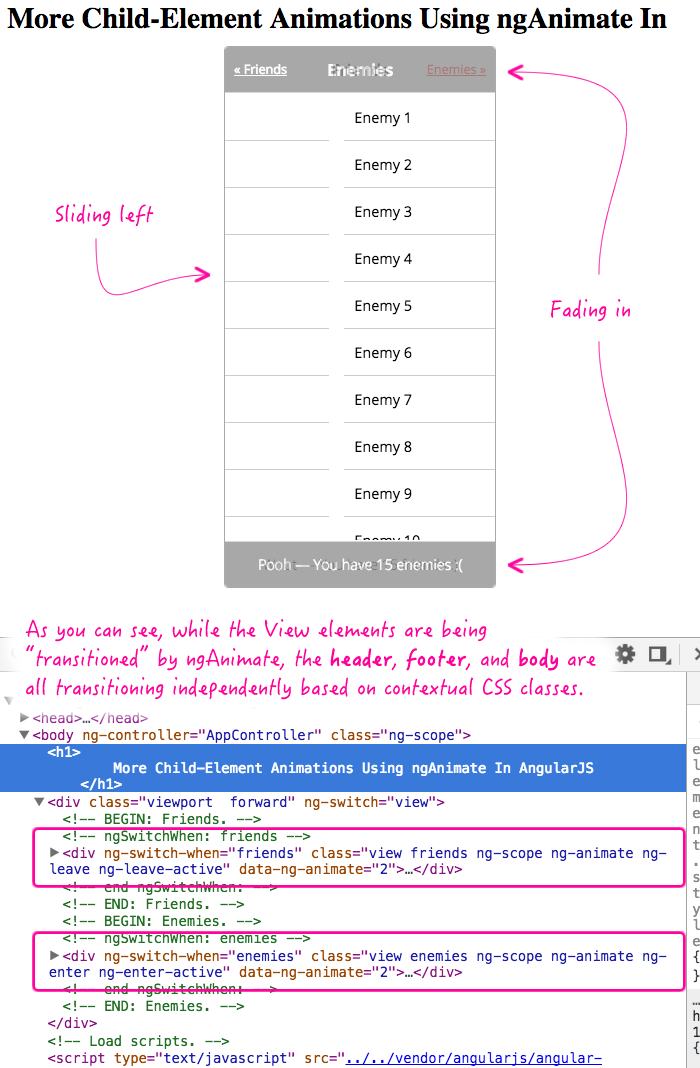
If you have an iPhone, you might notice that fixed headers and footers (inside various apps) sometimes have animations that are different from the main content area. Sometimes the body slides while the fixed header and footer fade. Or, sometimes, there are elements of the fixed header that fade while other elements of the fixed header slide. It can get complicated and the rules around the transitions may not be obvious at first (at least not to me). But, I thought that this kind of interaction would be a fun thing to try an demonstrate using the ngAnimate module in AngularJS.
For this demo, I'm not going to get as complicated as an iPhone application. I do have a fixed header, a fixed footer, and a body area; but, my transitions will be more straightforward. For this demo, the body will always slide left or right and the fixed header and footer will always fade in an out.
The key take-away here, however, is the fact that ngAnimate isn't working directly on the fixed header, the fixed footer, or the body. Instead, the ngAnimate module is transitioning the View while these child elements are piggy-backing on the contextual CSS classes added by the ngAnimate life-cycle.
In addition to piggy-backing on the ngAnimate classes, this demo also uses a conditional CSS class to manage the animation. The body slides left and right with each transition; but, the direction of the slide is based on a conditional class - orientation - that is dynamically added to the viewport when the view is about to change. The beauty of this is that these [relatively] complex animations are completely driven by CSS, which keeps our Controllers and Views [relatively] simple.
Ok, let's look at some code. In the following demo, I can toggle between two different lists: friends and enemies. As you toggle between each list, I will transition the fixed header, the fixed footer, and the body:
<!doctype html>
<html ng-app="Demo">
<head>
<meta charset="utf-8" />
<title>
More Child-Element Animations Using ngAnimate In AngularJS
</title>
<link rel="stylesheet" type="text/css" href="https://fonts.googleapis.com/css?family=Open+Sans:300,400,600"></link>
<link rel="stylesheet" type="text/css" href="./demo.css"></link>
</head>
<body ng-controller="AppController">
<h1>
More Child-Element Animations Using ngAnimate In AngularJS
</h1>
<div
class="viewport {{ orientation }}"
ng-switch="view">
<!-- BEGIN: Friends. -->
<div ng-switch-when="friends" class="view friends">
<div class="fixed-header">
<div class="title">
Friends
</div>
<a ng-click="showEnemies( 'forward' )" class="right">Enemies</a>
</div>
<div class="fixed-body">
<div ng-repeat="friend in friends track by friend.id">
{{ friend.name }}
</div>
</div>
<div class="fixed-footer">
Woot — You have {{ friends.length }} friends :)
</div>
</div>
<!-- END: Friends. -->
<!-- BEGIN: Enemies. -->
<div ng-switch-when="enemies" class="view enemies">
<div class="fixed-header">
<div class="title">
Enemies
</div>
<a ng-click="showFriends( 'backward' )" class="left">Friends</a>
</div>
<div class="fixed-body">
<div ng-repeat="enemy in enemies track by enemy.id">
{{ enemy.name }}
</div>
</div>
<div class="fixed-footer">
Pooh — You have {{ enemies.length }} enemies :(
</div>
</div>
<!-- END: Enemies. -->
</div>
<!-- Load scripts. -->
<script type="text/javascript" src="../../vendor/angularjs/angular-1.4.3.js"></script>
<script type="text/javascript" src="../../vendor/angularjs/angular-animate-1.4.3.js"></script>
<script type="text/javascript">
// Create an application module for our demo.
angular.module( "Demo", [ "ngAnimate" ] );
// --------------------------------------------------------------------------- //
// --------------------------------------------------------------------------- //
// I control the root of the application.
angular.module( "Demo" ).controller(
"AppController",
function AppController( $scope ) {
// I hold the friends for the friends view.
$scope.friends = [ 1, 2, 3, 4, 5, 6, 7, 8, 9, 10, 11, 12, 13, 14, 15 ].map(
function operator( id ) {
return({
id: id,
name: ( "Friend " + id )
});
}
);
// I hold the enemies for the enemies view.
$scope.enemies = [ 1, 2, 3, 4, 5, 6, 7, 8, 9, 10, 11, 12, 13, 14, 15 ].map(
function operator( id ) {
return({
id: id,
name: ( "Enemy " + id )
});
}
);
// I determine which view is being rendered.
$scope.view = "friends";
// I determine the orientation we will use when transitioning from one
// view to the next.
$scope.orientation = null;
// ---
// PUBLIC METHODS.
// ---
// I show the enemies list.
$scope.showEnemies = function( orientation ) {
$scope.view = "enemies";
$scope.orientation = ( orientation || "forward" );
};
// I show the friends list.
$scope.showFriends = function( orientation ) {
$scope.view = "friends";
$scope.orientation = ( orientation || "forward" );
};
}
);
</script>
</body>
</html>
As you can see, the Controller and View are fairly simple. And, there's basically nothing here about how the transitions will work. Sure, the Controller does have a concept of "orientation" for the transition; but, other than that, the implementation is all contained within the CSS.
To keep things as simple as possible, I'll show you the Less CSS file that I used, rather than the CSS file that was generated. This file is complicated; but, at least the nesting in the Less file cuts down on the visual noise and exhibits some kind of hierarchy that should make it easier to understand.
The first half of this file is just the general styling - the transition information is at the bottom. When you look in this, keep in mind that "div.view" is the element that is being directly animated by ngAnimate. The rest of the elements are piggy-backing on the contextual state of the view:
// Structural and visual definitions (transitions are down below).

// Storing the width of the view helps define the animations.
@width: 300px ;

div.viewport {
	border: 2px solid #AAAAAA ;
	border-radius: 5px 5px 5px 5px ;
	font-family: "Open Sans", sans-serif ;
	font-size: 16px ;
	height: 600px ;
	left: 50% ;
	margin: -301px 0px 0px -151px ;
	overflow: hidden ;
	position: fixed ;
	top: 50% ;
	width: @width ;
}

div.view {
	height: 600px ;
	left: 0px ;
	position: absolute ;
	top: 0px ;
	width: @width ;

	div.fixed-header {
		background-color: #FAFAFA ;
		border-bottom: 1px solid #CCCCCC ;
		border-radius: 5px 5px 0px 0px ;
		height: 50px ;
		left: 0px ;
		position: absolute ;
		right: 0px ;
		top: 0px ;

		div.title {
			line-height: 52px ;
			font-size: 18px ;
			font-weight: 600 ;
			text-align: center ;
		}

		a {
			bottom: 0px ;
			color: red ;
			cursor: pointer ;
			font-size: 14px ;
			line-height: 52px ;
			padding: 0px 10px 0px 10px ;
			position: absolute ;
			text-decoration: underline ;
			top: 0px ;

			&.right {
				right: 0px ;

				&:after {
					content: "\0020\00BB" ;
				}
			}

			&.left {
				left: 0px ;

				&:before {
					content: "\00AB\0020" ;
				}
			}
		}
	} // END: div.fixed-header.

	div.fixed-body {
		bottom: 52px ;
		left: 0px ;
		overflow: auto ;
		position: absolute ;
		right: 0px ;
		top: 52px ;

		div {
			border-bottom: 1px solid #CCCCCC ;
			padding: 15px 12px 15px 12px ;
		}
	} // END: div.fixed-body.

	div.fixed-footer {
		background-color: #FAFAFA ;
		border-radius: 0px 0px 5px 5px ;
		border-top: 1px solid #CCCCCC ;
		bottom: 0px ;
		font-weight: 300 ;
		height: 50px ;
		left: 0px ;
		line-height: 52px ;
		position: absolute ;
		text-align: center ;
		right: 0px ;
	} // END: div.fixed-footer.

	// div.view -- variations.

	&.enemies {
		div.fixed-header {
			background-color: #666666 ;
			color: #FFFFFF ;

			a {
				color: #FFFFFF ;
			}
		}

		div.fixed-footer {
			background-color: #666666 ;
			color: #FFFFFF ;
		}
	}
}

// ----------------------------------------------------------------------------------- //
// ----------------------------------------------------------------------------------- //
// Transition information.
// ----------------------------------------------------------------------------------- //
// ----------------------------------------------------------------------------------- //

div.viewport {
	div.view {
		&.ng-enter,
		&.ng-leave {
			// We need to have a transition on the dynamic element so that we get an
			// ngAnimate to use an animation. But, once we have that working, we can
			// then inherit this duration within the nested elements.
			transition-duration: 300ms ;

			div.fixed-header,
			div.fixed-body,
			div.fixed-footer {
				overflow: hidden ;
				transition-delay: inherit ;
				transition-duration: inherit ;
				transition-timing-function: ease ;
			}
		}

		// This allows the enter elements to show up over the leave elements. It makes
		// the opacity-based transitions work a bit better.
		&.ng-enter {
			z-index: 2 ;
		}

		// Fixed header and footer transitions.

		&.ng-enter,
		&.ng-leave {
			div.fixed-header,
			div.fixed-footer {
				transition-property: opacity ;
			}
		}

		&.ng-enter {
			div.fixed-header,
			div.fixed-footer {
				opacity: 0.0 ;
			}
		}

		&.ng-enter-active {
			div.fixed-header,
			div.fixed-footer {
				opacity: 1.0 ;
			}
		}

		&.ng-leave {
			div.fixed-header,
			div.fixed-footer {
				opacity: 1.0 ;
			}
		}

		&.ng-leave-active {
			div.fixed-header,
			div.fixed-footer {
				opacity: 0.0 ;
			}
		}
	}

	// div.viewport -- variations.

	// Fixed body transitions. Since the body transitions are based on the
	// parent viewport class, they have to be defined in the "variations"
	// section of the viewport.

	&.foward,
	&.backward {
		div.view {
			&.ng-enter,
			&.ng-leave {
				div.fixed-body {
					transition-property: left, right ;
				}
			}
		}
	}

	// Sliding from right-to-left.
	&.forward {
		div.view {
			&.ng-enter {
				div.fixed-body {
					left: @width ;
					right: -@width ;
				}
			}

			&.ng-enter-active {
				div.fixed-body {
					left: 0px ;
					right: 0px ;
				}
			}

			&.ng-leave {
				div.fixed-body {
					left: 0px ;
					right: 0px ;
				}
			}

			&.ng-leave-active {
				div.fixed-body {
					left: -@width ;
					right: @width ;
				}
			}
		}
	}

	// Sliding from left-to-right.
	&.backward {
		div.view {
			&.ng-enter {
				div.fixed-body {
					left: -@width ;
					right: @width ;
				}
			}

			&.ng-enter-active {
				div.fixed-body {
					left: 0px ;
					right: 0px ;
				}
			}

			&.ng-leave {
				div.fixed-body {
					left: 0px ;
					right: 0px ;
				}
			}

			&.ng-leave-active {
				div.fixed-body {
					left: @width ;
					right: -@width ;
				}
			}
		}
	}
} // END: div.viewport.
As you can see, while neither the fixed header, the fixed footer, nor the body are directly animated by the ngAnimate module, they are all indirectly animated through contextual classes. And, when I run this app and transition from one view to the other, we can see each child element transitioning independently:
Once you have CSS classes that you can hook into it, you can imagine that your animations can start to get as complex as you want them. And, the most magical thing about this being entirely CSS-driven is that if your browser doesn't support animations, the entire app gracefully degrades. Heck, you can even conditionally enable or disable animations based on conditional View classes. ngAnimate is just awesome pants!
Want to use code from this post? Check out the license.

Reader Comments