
Playing With Recursive Components In Angular 6.1.10
This past week, I started noodling on how to use recursion in an Angular application. And, instead of reaching directly for a component-based solution, I first took at look at implementing recursive views using the Ng-Template directive. Ng-Template is fairly flexible; and, it allows for a recursive view to be managed completely within a single component definition. But, it's not the cleanest code and it has some limitations. As such, I wanted to revisit the challenge of recursion using Angular components.
Run this demo in my JavaScript Demos project on GitHub.
View this code in my JavaScript Demos project on GitHub.
Whether we use the Ng-Template directive for recursion or we use Components for recursion, the mechanics are essentially the same. In both cases, we have to provide a point of initiation and a point of recursive invocation. In the previous demo, both of those responsibilities were implemented using the Ng-Template directive. In this demo, these responsibilities will be spread across two different components.
First, let's create a TreeComponent. This component will represent the ingress to the Tree widget and will provide Input and Output hooks for the calling context:
// Import the core angular services.
import { ChangeDetectionStrategy } from "@angular/core";
import { Component } from "@angular/core";
import { EventEmitter } from "@angular/core";

// ----------------------------------------------------------------------------------- //
// ----------------------------------------------------------------------------------- //

export interface TreeNode {
	label: string;
	children: TreeNode[];
}

@Component({
	selector: "my-tree",
	inputs: [ "rootNode", "selectedNode" ],
	outputs: [ "selectEvents: select" ],
	changeDetection: ChangeDetectionStrategy.OnPush,
	styleUrls: [ "./tree.component.less" ],
	template:
	`
		<my-tree-node
			[node]="rootNode"
			[selectedNode]="selectedNode"
			(select)="selectEvents.emit( $event )">
		</my-tree-node>
	`
})
export class TreeComponent {

	public rootNode: TreeNode | null;
	public selectedNode: TreeNode | null;
	public selectEvents: EventEmitter<TreeNode>;

	// I initialize the tree component.
	constructor() {

		this.rootNode = null;
		this.selectedNode = null;
		this.selectEvents = new EventEmitter();

	}

}
As you can see, this component does almost nothing. Its primary job is to provide a point of initiation for the recursion. In this case, it does so by rendering the root node, which will then render its own children, each of which will render their own children, and so on.
The TreeComponent provides two inputs:
- rootNode
- selectedNode
... and one output event stream:
- select
Since the node selection may happen at any point within the Tree widget, we have to pass our inputs down through the recursive rendering. And, conversely, we have to propagate any selection event back up through the recursive rendering. On its face, this sounds tedious; but, when you look at the code, you can see that this requires almost no effort: inputs simply become element properties and events get piped directly into EventEmitters.
And, since the rendering of this TreeComponent is based completely on its inputs and outputs, we can switch over to a more efficient change detection strategy: OnPush. This change detection strategy will avoid local digests unless the inputs or outputs change.
Other than providing the hooks for the calling context, the only other thing the TreeComponent does is initiate the recursive rendering using the TreeNodeComponent:
// Import the core angular services.
import { ChangeDetectionStrategy } from "@angular/core";
import { Component } from "@angular/core";
import { EventEmitter } from "@angular/core";

// Import the application components and services.
import { TreeNode } from "./tree.component";

// ----------------------------------------------------------------------------------- //
// ----------------------------------------------------------------------------------- //

@Component({
	selector: "my-tree-node",
	inputs: [ "node", "selectedNode" ],
	outputs: [ "selectEvents: select" ],
	host: {
		"[class.selected]": "( node === selectedNode )"
	},
	changeDetection: ChangeDetectionStrategy.OnPush,
	styleUrls: [ "./tree-node.component.less" ],
	template:
	`
		<a (click)="selectEvents.emit( node )" class="label">
			{{ node.label }}
		</a>

		<div *ngIf="node.children.length" class="children">

			<ng-template ngFor let-child [ngForOf]="node.children">

				<my-tree-node
					[node]="child"
					[selectedNode]="selectedNode"
					(select)="selectEvents.emit( $event )">
				</my-tree-node>

			</ng-template>

		</div>
	`
})
export class TreeNodeComponent {

	public node: TreeNode | null;
	public selectedNode: TreeNode | null;
	public selectEvents: EventEmitter<TreeNode>;

	// I initialize the tree node component.
	constructor() {

		this.node = null;
		this.selectedNode = null;
		this.selectEvents = new EventEmitter();

	}

}
Just like the TreeComponent, the TreeNodeComponent provides inputs and outputs for the consuming context. And, similar to the TreeComponent, the TreeNodeComponent must propagate both those inputs and outputs. The primary difference is that the TreeNodeComponent re-renders itself as it iterates over the current node's children. This is the recursive magic in action!
And, just as with the TreeComponent, propagating the inputs and outputs is fairly simple: inputs become element properties and outputs get piped directly into EventEmitters. There is basically no independent state; which means that the TreeNodeComponent can also be made to use the OnPush change detection strategy.
Now that we have the two Angular components that provide the necessary parts of the recursion view rendering, let's package them up in an NgModule so that they can be consumed by the application:
// Import the core angular services.
import { CommonModule } from "@angular/common";
import { NgModule } from "@angular/core";

// Import the application components and services.
import { TreeComponent } from "./tree.component";
import { TreeNodeComponent } from "./tree-node.component";

// Export the module data structures.
export { TreeNode } from "./tree.component";

// ----------------------------------------------------------------------------------- //
// ----------------------------------------------------------------------------------- //

@NgModule({
	imports: [
		CommonModule
	],
	exports: [
		// The root-level tree component is the only component that an external context
		// should be able to consume. We don't want people to break encapsulation and
		// try to use the TreeNodeComponent directly.
		TreeComponent
	],
	declarations: [
		TreeComponent,
		TreeNodeComponent
	]
})
export class TreeModule {
	// ...
}
This TreeModule then gets imported into our AppModule:
// Import the core angular services.
import { BrowserModule } from "@angular/platform-browser";
import { NgModule } from "@angular/core";

// Import the application components and services.
import { AppComponent } from "./app.component";
import { TreeModule } from "./tree/tree.module";

// ----------------------------------------------------------------------------------- //
// ----------------------------------------------------------------------------------- //

@NgModule({
	imports: [
		BrowserModule,
		TreeModule
	],
	declarations: [
		AppComponent
	],
	bootstrap: [
		AppComponent
	]
})
export class AppModule {
	// ...
}
... which makes the "my-tree" element directive available to the AppComponent.
Since the TreeComponent and the TreeNodeComponent are both "stateless" (or "dumb") components, the state has to be managed in the calling context. In this demo, that's the AppComponent. And, as you can see below, the AppComponent holds the data structure for the Tree; it holds the reference to the selected node; and, it translates "select" events into state mutations:
// Import the core angular services.
import { Component } from "@angular/core";

// Import the application components and services.
import { TreeNode } from "./tree/tree.module";

// ----------------------------------------------------------------------------------- //
// ----------------------------------------------------------------------------------- //

@Component({
	selector: "my-app",
	styleUrls: [ "./app.component.less" ],
	template:
	`
		<my-tree
			[rootNode]="tree"
			[selectedNode]="selectedTreeNode"
			(select)="handleSelection( $event )">
		</my-tree>
	`
})
export class AppComponent {

	public tree: TreeNode;
	public selectedTreeNode: TreeNode | null;

	// I initialize the app component.
	constructor() {

		this.selectedTreeNode = null;
		this.tree = {
			label: "first",
			children: [
				{
					label: "second-a",
					children: [
						{
							label: "third-first",
							children: [
								{
									label: "ferth",
									children: [
										{
											label: "fiver",
											children: []
										}
									]
								}
							]
						}
					]
				},
				{
					label: "second-b",
					children: [
						{
							label: "third",
							children: []
						}
					]
				}
			]
		};

	}

	// ---
	// PUBLIC METHODS.
	// ---

	// I handle the selection event from the tree component.
	public handleSelection( node: TreeNode ) : void {

		this.selectedTreeNode = node;

		console.group( "Selected Tree Node" );
		console.log( "Label:", node.label );
		console.log( "Children:", node.children.length );
		console.groupEnd();

	}

}
This demo is more verbose and has more moving parts when compared the Ng-Template approach. But, each part is, in and of itself, quite focused and straightforward. This approach is also quite a bit more flexible since we are not constrained by the limitations of the Ng-Template API.
That said, if we run this in the browser, and select a few TreeNode's, we get the following output:
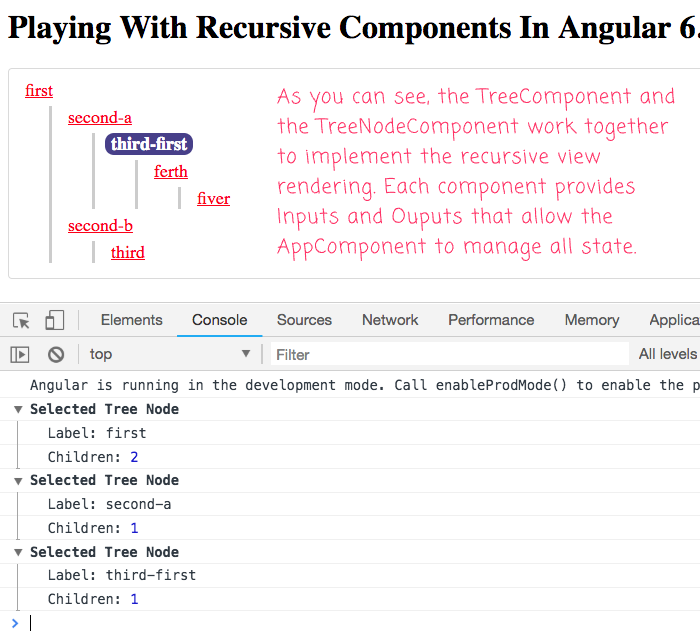
As you can see, we were able to render an arbitrarily-nested tree structure using the TreeComponent and its recursive child, TreeNodeComponent. Each of these components propagated Inputs and Outputs that allowed all of the state to be managed holistically by the AppComponent.
One curious thing that I noticed while writing this was that the recursive TreeNodeComponent instances were not given unique attributes for CSS simulated encapsulation:
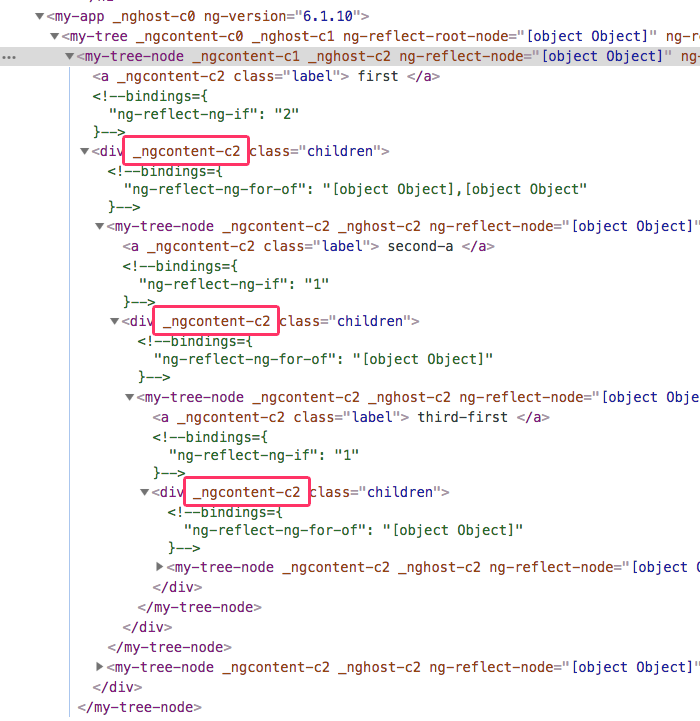
As you can see, each encapsulated view for the recursive TreeNodeComponent receives the same [_ngcontenet-c2] attribute. What this means is that some of my CSS logic has to include the "direct descendant" selectors (>) in order to not have CSS styling trickle down through an entire branch of the Document Object Model (DOM) tree. This feels a little "buggy" to me; but, I don't know enough about the simulation logic to say one way or the other.
Recursion is not a tool that you have to reach for a whole lot. But, when you need it, it's often the only sane and manageable solution. And, it's nice to see that Angular 6.1.10 provides recursive solutions for arbitrarily nested data structures that include both Ng-Template and Component-based mechanics. Hopefully this post sheds some light on the relatively straightforward way that data (inputs) and events (outputs) can be propagated up and down a recursive DOM structure.
Want to use code from this post? Check out the license.

Reader Comments
@All,
So, yesterday when I was experimenting with this stuff, I said that the
nghostandngcontentbehavior "seemed buggy". But, that was because I didn't really have a solid grasp on how emulated encapsulation worked in Angular. As such, I needed to step back and sort out my mental model:www.bennadel.com/blog/3514-emulated-encapsulation-host-and-content-attributes-are-calculated-once-per-component-type-in-angular-6-1-10.htm
What I codified in my mind was that the emulated encapsulation is calculated per component type - not per component instance. As such, it makes sense that all instances of the same component will have the same
nghostandngcontentattributes; which, in turn, explains why the nestedmy-tree-nodestyling worked.Just a question, I'm curious, why you prefer typing inputs outputs and binding in the host declaration of the component. I read somewhere that is not recommended, or at least it is quite limiting. Instead I'm using massively the decorators provided @Input, @Output, @HostBinding etc.
And looking at the other post you shared in the comments, my 2 cents is - I always put my styles in :host {}, not sure if this helps for your case.
@Zlati,
Good question. For me, I feel like the Inputs, Outputs, and Host bindings make more sense in the
@Component()because they are telling Angular how the Component relates to the View, not how the Component class works. This way, all the logic for the *class is inside of the Class; and, all the meta-data about how it relates to the view is inside the meta-data.After all, from a Class stand-point, the Inputs and Outputs don't mean anything. They are nothing put public properties. Inputs and Outputs are only meaningful in the way that Angular connects the class instance to the View. So, I keep it at the top, to make it easier to see where all the meta-data is.
As far as "limiting", they should be functionality equivalent. I don't believe there is anything you can do with an inline decorator that you can't do with the
@Component()meta-data; unless you were thinking of something specific?I guess, I never bothered to change the tslint config from angular cli. The property use-host-property-decorator is true and that's why https://angular.io/guide/styleguide#style-06-03
I also had some issues with animations when using the animations setting. So I had to rewrite and use the Animation Builder.
Generally I think it's ok for static stuff only, in the moment you want getter or something else dynamic you need the decorators.
@Zlati,
I agree with a lot of the style-guide stuff. But, I also disagree with some of it (like this stuff). The underlying theme in the style-guide is just "be consistent". As long as you find something you are comfortable with and stick to it, I think that's the most important part.
Hai! I've been reading your articles for many years. This one really helped me. Huge thanks for the article!
@Lazalu68,
Very cool! Thanks for dropping by and letting me know :D
I wonder whether its possible, following this approach, to do the next:
1 - Push a child into the selected Node (So far I've done this using buttons inside the node component, then traversing the tree to find the node by its unique id)
2 - To animate a just added child without animating all its siblings.
@Eduardo,
It's an interesting idea. To be honest, I'm pretty poor when it comes to the Animations API inside of Angular. Part of me longs for the AngularJS days, when it was all controlled by special
ng-enterandng-leaveCSS classes. Though, I do know that the new API is way more powerful (at the cost of simplicity).That said, my understanding is that the Animations API is powered by state; so, theoretically, if you already have state (re: which node is selected), then I think it would definitely be possible to trigger an animation based on a selected node. I think....
@Ben,
Thanks for replying to my comment :). I was able to implement drag and drop using the next method.
https://stackoverflow.com/questions/59711702/angular-drag-and-drop-not-working-when-dropping-elements-in-n-ary-tree-represent/59722190#59722190
I'll use something similar for the animations since every node has a universal id, therefore, I can make all of them to subscribe to an observer that will emit the uuid of the added/deleted/copied node.
Hi Ben,
Many Thanks for Article, I was trying to implement the same recursion component.
Can you please help me with acquiring the parent and grandparent reference?
I read this blog, but for the recursive component, it is not working.
"There is an API for navigating down the view hierarchy. Check out Query, QueryList, ViewChildren, and ContentChildren in the API Reference.
There is no public API for acquiring a parent reference. However, because every component instance is added to an injector's container, you can use Angular dependency injection to reach a parent component."
https://angular.io/guide/dependency-injection-navtree
@Ghous,
My guess would be that - because we are in a recursive context - when you try to inject the parent component of a given type, you actually receiving a reference to the current component. You might have to try experimenting with the decorators that skip the current component:
@SkipSelf().This decorator starts looking in the dependency-injector hierarchy above the current level (ie, skipping any matches in the current context). Now, I think that can get you the "parent"; but, I am not sure it can get your "grand parent". Off hand, I am not sure how you would do that.
An alternate approach to having to get a reference to the parent would be to emit an event. Then, the parent component can bind to that event and emit it's own event, essentially causing the event to bubble-up the component tree. I've used this approach in AngularJS when I needed to bubble "selection" events up to the root of an hierarchy. It adds a bit more verbosity to the code, since you have to bind-and-emit certain events. But, it wasn't so bad.
Hi Ben,
Thank you so much for taking out time, actually, I tried using @SkipSelf()
https://stackblitz.com/edit/angular-jgotd1?file=src%2Fapp%2Fparent-finder.component.ts
Somehow I am not getting y it is not working for me
I am trying to do recursion on barry components but it is throwing cyclic dependency error.
The emit an event is the last option I am left with
Regards,
Ghous Nawaz
Hi Ben,
Thanks for taking out time , Actually was able to figure it out using this post
https://github.com/johnpapa/angular-styleguide/issues/457
@Output() helps in this situation
@Ghous,
Interesting. I'm not immediately sure how
@Output()helps in this case. But, I'm glad you got it working!Hi Ben,
Somewhat like basically I am emitting output event when I want a parent reference, then in the call back I am assigning parent($event) value to an @Input parameter which is the pass to the child component,
hence recursively able to get the parent reference.
tree (selectEvents) = "getParentRefrence($event)" [parents] ="parent" >< // tree