
Using CSS Custom Properties To Theme Components In Angular 6.1.3
Earlier this week, I took my first look at theming Angular applications using the :host-context() binding. That approach worked really well, was straightforward, and did not have any special browser-support considerations since Angular just compiled it down to compound CSS selector paths. But, it was a bit verbose and required the knowledge of theme-implementation to "leak" down through the entire component tree. As such, I wanted to take a look at refactoring my previous demo to use CSS Custom Properties / CSS Variables instead of host-context. CSS Custom Properties make for a slightly more streamlined, more elegant solution to theming in an Angular application.
Run this demo in my JavaScript Demos project on GitHub.
View this code in my JavaScript Demos project on GitHub.
To quickly recap the demo from earlier this week, I was using the :host-context() binding to conditionally apply certain properties based on the state of the application. For example, if the root component had a ".light-theme" CSS class on it, I would render lighter colors; and, if the root component had a ".dark-theme" CSS class on it, I would render darker colors. In the Angular components, this theme-shifting was implemented inside theme-specific :host-context() blocks:
// Import the LESS CSS variables for our host-context declarations.
@import "./variables.less" ;

:host {
	display: block ;
	font-size: 18px ;
	min-height: 100vh ;
	padding: 1px 20px 1px 20px ;
}

:host-context( .light-theme ) {
	background-color: @light-background-color ;
	color: @light-color ;
}

:host-context( .dark-theme ) {
	background-color: @dark-background-color ;
	color: @dark-color ;
}
As you can see, I included a "variables.less" file in order to make the LESS Variables available to the component. Then, I applied different LESS Variables inside each :host-context() block.
This approach is simple and worked really well. But, it has a few downsides:
- You have to separate out the dynamic portions of the CSS. This makes it harder to develop a holistic understanding of a given component's phenotype.
- The amount of CSS will increase with the number of themes in the application. And, when a new theme is added, new :host-context() blocks will have to be added to all themed components.
- The breadth of themes is essentially hard-coded into the CSS files since the application has to know about the themes ahead of time in order to setup the necessary :host-context() blocks.
CSS Custom Properties / CSS Variables can essentially eliminate all of these drawbacks. Unlike theming with :host-context(), CSS Custom Properties allow you to change the value, not the variable. This means that the breath of themes and much of their implementation are tied to the definition of the CSS Custom Properties, not to their consumption.
To see what I mean, let's refactor the previous snippet to use CSS Custom Properties instead of :host-context():
:host {
	background-color: var( --background-color ) ;
	color: var( --color ) ;
	display: block ;
	font-size: 18px ;
	min-height: 100vh ;
	padding: 1px 20px 1px 20px ;
}
There's clearly less code here, which is an immediate win. But, the more profound value-add is the fact that this component no longer needs to know about themes in the broader sense. Yes, it needs to know about some variables (--color and --background-color). But, those variables are no longer tied to any specific theme. This means that themes can be added to and removed from the application without having to touch these component styles.
Furthermore, when the variables were being provided by the LESS CSS pre-processor, I had to include the "variables.less" file. With CSS Custom Properties, we get to leverage the natural inheritance of the DOM (Document Object Model) tree. This means that the components don't even have to care where the CSS Custom Properties are being defined - they only need to know that they are being made available somewhere higher-up in the chain of ancestor nodes. This may seem like an insignificant point; but, it acts to further decouple each component from the larger application.
Now that we can see why CSS Custom Properties have advantages over :host-context() bindings, let's look at refactoring the previous theming demo to use CSS Custom Properties. First, let's look at the Angular application's root component. Since this is the highest point in the component tree, this will be the place where we define the CSS custom property values for each theme:
ASIDE: Most CSS Custom Property demos have a strange obsession with the ":root" selector. But, there's nothing special about ":root", other than that it's very high in the DOM tree. You don't have to use ":root". And, in fact, in Angular's simulated CSS encapsulation, it won't even work (unless you use the ::ng-deep deprecated selector).
// CAUTION: CSS Custom Properties (aka CSS variables) are not supported in IE. As such,
// we're going to be using PostCSS to inject fallback values for our dynamic properties
// during the "build step". In order to do this without duplicating the list of values
// in two different files, we're going to define an "IE FALLBACK" block below which will
// be parsed and used to define the "variables" collection.
// --
// NOTE: The "postcss-loader" can technically use the :root block to perform this
// variables look-up; however, that would require us to have a :root block. And, it would
// require that said :root block to be in all of the components that have CSS files. In
// this application, that makes no sense. Parsing an explicit block in the code makes
// way more sense.

// ----------------------------------------------------------------------------------- //
// ----------------------------------------------------------------------------------- //

// Define all the CSS custom properties for the Light Theme.
// --
// NOTE: These will be available in all descendant components.
:host( .light-theme ) {
	// === BEGIN IE FALLBACK ===
	--background-color: #ffffff ;
	--color: #333333 ;

	--canvas-background-color: #fafafa ;
	--canvas-color: #333333 ;
	--canvas-border-color: #cccccc ;
	--canvas-gutter-background-color: #e0e0e0 ;
	--canvas-gutter-color: #999999 ;

	--panel-background-color: #f0f0f0 ;
	--panel-color: #161616 ;
	--panel-input-background-color: #ffffff ;
	--panel-input-color: #333333 ;
	--panel-button-background-color: #e0e0e0 ;
	--panel-button-color: #121212 ;
	--panel-button-border-color: #666666 ;
	// === END IE FALLBACK ===
}

// Define all the CSS custom properties for the Dark Theme.
// --
// NOTE: These will be available in all descendant components.
:host( .dark-theme ) {
	--background-color: #121212 ;
	--color: #f0f0f0 ;

	--canvas-background-color: #282923 ;
	--canvas-color: #f8f8f2 ;
	--canvas-border-color: #42433f ;
	--canvas-gutter-background-color: #20211C ;
	--canvas-gutter-color: #999999 ;

	--panel-background-color: #20211C ;
	--panel-color: #999999 ;
	--panel-input-background-color: #2e2f28 ;
	--panel-input-color: #dadada ;
	--panel-button-background-color: #121212 ;
	--panel-button-color: #dadada ;
	--panel-button-border-color: #333333 ;
}

// ----------------------------------------------------------------------------------- //
// ----------------------------------------------------------------------------------- //

:host {
	background-color: var( --background-color ) ;
	color: var( --color ) ;
	display: block ;
	font-size: 18px ;
	min-height: 100vh ;
	padding: 1px 20px 1px 20px ;
}

.layout {
	margin: 0px auto 0px auto ;
	width: 650px ;

	&__header {}

	&__canvas {
		margin: 20px 0px 20px 0px ;
	}

	&__tools {
		display: flex ;
		margin-bottom: 20px ;
	}

	&__left-panel {
		flex: 1 1 50% ;
		margin-right: 30px ;
	}

	&__right-panel {
		flex: 1 1 50% ;
	}

	&__footer {
		// By default, we're going to HIDE the option to SWITCH THEMES. We'll only show
		// it once we know that we are in a browser that actually supports CSS custom
		// properties.
		display: none ;
		margin-bottom: 20px ;

		// If the CSS parser supports the assignment of a CSS custom property (the key
		// and value in this case doesn't matter), then it is safe to show the SWITCH
		// THEMES tooling to the user.
		@supports ( --foo: "bar" ) {
			display: block ;
		}
	}
}

a {
	cursor: pointer ;
	text-decoration: underline ;
	user-select: none ;
}
Ignoring the notes on "IE FALLBACK" - more on that shortly - you can see that we're still using a CSS Class to drive the theming. However, the CSS Class is used only to conditionally apply different values to a single set of CSS Custom Properties. As such, the whole "light" and "dark" themes never leak outside of this root-component definition. And, since those themes - and any other themes we add - merely serve to update the CSS Custom Property values, the rest of the application can consume this single set of values while remaining blissfully unaware of the themes being offered by the application.
Once these CSS Custom Properties are defined in our root component, they then cascade down through the DOM tree, making themselves available to our Angular components. This means that we can consume these variables in order to implement dynamic styles. For example, let's look at the LESS CSS file for one of the nested components:
:host {
	display: block ;
}

.canvas {
	border: 3px solid var( --canvas-border-color ) ;
	border-radius: 4px 4px 4px 4px ;
	display: flex ;

	&__input {
		flex: 1 1 auto ;
	}

	&__syllables {
		flex: 0 1 70px ;
	}
}

.input {
	background-color: var( --canvas-background-color ) ;
	border: none ;
	color: var( --canvas-color ) ;
	font-size: 18px ;
	line-height: 25px ;
	padding: 10px 15px 10px 15px ;

	&:focus,
	&:active {
		outline: none ;
	}
}

.syllables {
	background-color: var( --canvas-gutter-background-color ) ;
	color: var( --canvas-gutter-color ) ;
	font-size: 18px ;
	font-weight: bold ;
	line-height: 25px ;
	list-style-type: none ;
	margin: 0px 0px 0px 0px ;
	min-height: 200px ;
	padding: 10px 0px 10px 0px ;
	text-align: center ;

	&__item {
		margin: 0px 0px 0px 0px ;
	}
}
As you can see, this component makes use of the var() function to consume the inherited CSS Custom Properties. But, it does so in a way that doesn't require it to know anything more about the theming.
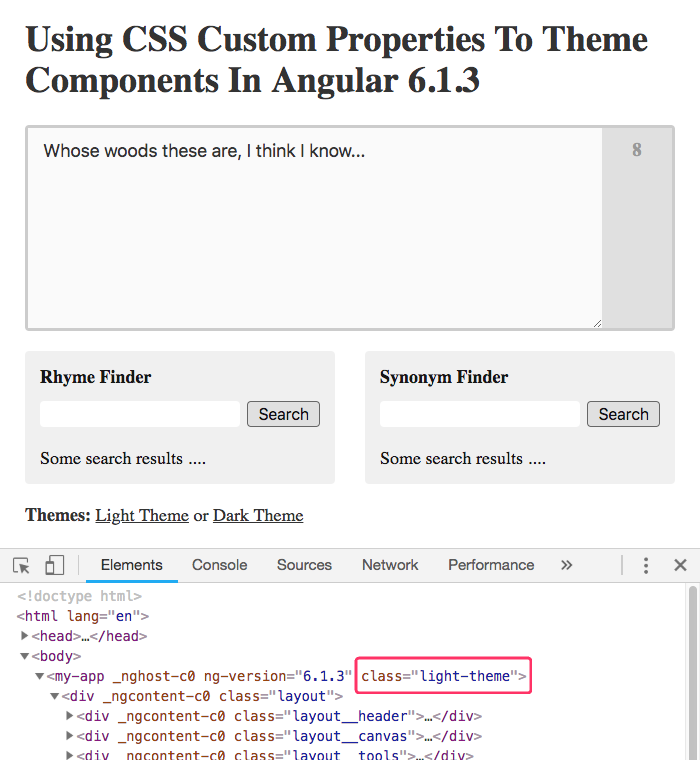
To demonstrate that this is actually working, here's what the Angular application looks like in light-theme mode:
And, here's what it looks like in dark-theme mode:

How freaking cool is that? When I change the CSS Custom Properties at the root level of the Angular application, all of the nested components immediately update to consume the new value of the inherited properties. Straight-up player!
As of this writing, CSS Custom Properties have solid support in modern browsers. But, they have no support in Internet Explorer (not to be confused with Microsoft Edge). This is fine if you only support modern browsers. But, if you need to support older browsers, we need to jump through a few hoops in order to "degrade gracefully".
There's no way that we can easily polyfilly CSS Custom Property functionality; but, we can fallback to using a set of variable values that are known at compile time. To do this, we're going to use PostCSS. PostCSS is a CSS processor that parses CSS string inputs into an AST (Abstract Syntax Tree), transforms the tree, and then compiles it back down to a CSS string output. During the transformation phase, we can have PostCSS inject "fallback" values that will provide the rendering definitions for earlier browsers.
In this case, PostCSS will transform snippets like this:
color: var( --canvas-color ) ;
... into snippets like this:
color: #333333 ;
color: var( --canvas-color ) ;
As you can see, it has injected a non-dynamic version of the "color" property just before the dynamic version. This way, in older browsers - which will skip over any CSS definitions that they don't understand - the non-dynamic version is the only one that gets applied.
To add this graceful degradation, I'm using the PostCSS-Loader for Webpack which will consume the PostCSS Preset Env plug-in. Because the value of a CSS Custom Property depends on the structure of the DOM tree at runtime, the Preset Env plug-in is limited in what it can do at compile time. When it comes to CSS Custom Property fallbacks, it can either pull values from the ":root" selector in the processed file. Or, it can use values explicitly provided to the plug-in configuration.
Since none of my Angular components define a ":root" selector (as that would make no sense), I've opted to use the explicitly provided variables approach. However, in order to prevent the duplication of code, I'm going to programmatically parse the values out of the App component's LESS CSS file.
If you look at App component's LESS CSS file earlier on this post, you'll see that there are two comments embedded in the ".light-theme" block:
- // === BEGIN IE FALLBACK ===
- // === END IE FALLBACK ===
In my Webpack configuration, I'm going to read this file in, extract the CSS properties that are defined in between those two comments, and then use those values to configure the PostCSS Preset Env plug-in. To see this in action, here's my Webpack configuration file - the dynamic parsing portion is at the top:
// Load the core node modules.
var fs = require( "fs" );
var HtmlWebpackPlugin = require( "html-webpack-plugin" );
var path = require( "path" );
var postcssPresetEnv = require( "postcss-preset-env" );
var webpack = require( "webpack" );

// ----------------------------------------------------------------------------------- //
// ----------------------------------------------------------------------------------- //

// IE11 (and earlier) doesn't support "CSS Custom Properties". As such, we're going to
// be using PostCSS to inject fallback values for our dynamic CSS properties. In order
// to not duplicate (and have to maintain) all of our CSS values, we're going to parse
// them right out of the root app component.
var ieFallbackVariables = (function() {

	// In this application, all of the CSS Custom Properties are defined in the root
	// component. Let's read that file into memory.
	var fileContent = fs.readFileSync(
		path.join( __dirname, "app", "app.component.less" ),
		"utf8"
	);

	// Now, let's break out the parts that are between the "IE FALLBACK" delimiters.
	var fallbackBlock = fileContent.match( /=== BEGIN IE FALLBACK ===[\s\S]+?=== END IE FALLBACK ===/ );
	var properties = Object.create( null );

	// If no fallback block was found, just return an empty object.
	if ( ! fallbackBlock ) {

		return( properties );

	}

	// We did fine a fallback block, so now we're going to iterate over it, looking for
	// strings in the form of, "--PROP_NAME : PROP_VALUE ;". These strings will be picked
	// apart and appended to the properties object.
	fallbackBlock.pop().replace(
		/--([^:\s]+)\s*:\s*([^;]+)/g,
		function ( $0, key, value ) {

			properties[ key ] = value.trim();

		}
	);

	return( properties );

})();

// ----------------------------------------------------------------------------------- //
// ----------------------------------------------------------------------------------- //

module.exports = {
	// I am going to generate 3 separate JavaScript files (that the HtmlWebpackPlugin
	// will automatically inject into my HTML template). Creating three files helps me
	// isolate the parts of the code that change often (my code) from the parts of the
	// code that change infrequently (the vendor code).
	entry: {
		polyfill: "./app/main.polyfill.ts",
		vendor: "./app/main.vendor.ts",
		main: "./app/main.ts"
	},
	// In normal development, I might use "[name].[chunkhash].js"; however, since this
	// is just getting committed to GitHub, I don't want to create a new hash-based file
	// for every file-save event. Instead, I can use the "hash" option in the
	// HtmlWebpackPlugin to help with cache-busting per build.
	output: {
		filename: "[name].js",
		path: path.join( __dirname, "build" )
	},
	resolve: {
		extensions: [ ".ts", ".js" ]
	},
	module: {
		rules: [
			{
				test: /\.ts$/,
				loaders: [
					// I compile the TypeScript content into ES5 JavaScript. In addition
					// to transpiling the code, it is also running type-checks based on
					// the tsconfig.json file.
					"ts-loader",
					// Given the transpiled code, I convert Template and Style URL
					// references into require() statements that will subsequently get
					// consumed by the raw-loader.
					// --
					// NOTE: Do not include the "keepUrl=true" that is in some examples;
					// that inlines the content, but does not replace the property name
					// used in the component meta-data.
					"angular2-template-loader"
				]
			},
			// When the "angualr2-template-loader" runs, it will replace the @Component()
			// "templateUrl" and "styleUrls" with inline "require()" calls. As such, we
			// need the raw-loader so that require() will know how to load .htm and .css
			// file as plain-text.
			{
				test: /\.(htm|css)$/,
				loader: "raw-loader"
			},
			// If our components link to .less files instead of .css files, then the
			// less-loader will parse the LESS CSS file on-the-fly during the require()
			// call that is generated by the "angular2-template-loader".
			{
				test: /\.less$/,
				loaders: [
					"raw-loader",
					// In between the raw file-read and the less-loader, we're going to
					// use PostCSS to clean-up the styling. Specifically, we're going to
					// have it inject fallback values for our "CSS Custom Properties" so
					// that browsers like IE11, which don't support custom properties,
					// won't completely break.
					// --
					// NOTE: PostCSS "preset" will also do other things by default, such
					// as apply the auto-prefixer plug-in.
					{
						loader: "postcss-loader",
						options: {
							ident: "postcss",
							plugins: [
								postcssPresetEnv({
									features: {
										"custom-properties": {
											variables: ieFallbackVariables
}
									}
								})
							]
						}
					},
					"less-loader"
				]
			}
		]
	},
	plugins: [
		// I move common references in the Entry files down into the lowest-common entry
		// file in this list.
		// --
		// CAUTION: The order of these chunk names has to be in the REVERSE order of the
		// order in which you intend to include them in the Browser. I believe, but am not
		// sure, that this is because common dependencies are moved to the next file down
		// in this list. So, if "main" and "vendor" have things in common, they will be
		// moved down to "vendor". Were the order reversed, with "vendor" above "main",
		// then common dependencies would be moved down to "main" (which is what we are
		// trying to avoid).
		new webpack.optimize.CommonsChunkPlugin({
			names: [
				"main",
				"vendor",
				"polyfill",
				// Extract the Webpack bootstrap logic into its own file by providing a
				// name that wasn't listed in the "entry" file list.
				// --
				// NOTE: I don't really need this for my kind of GitHub based development;
				// but, this seems to be a common pattern as it moves frequently changing
				// code out of the "vendor" file.
				"manifest"
			]
		}),
		// I generate the main "index" file and inject Script tags for the files emitted
		// by the compilation process.
		new HtmlWebpackPlugin({
			// Notice that we are saving the index UP ONE DIRECTORY, so that it is output
			// in the root of the demo.
			filename: "../index.htm",
			template: "./app/main.htm",

			// This will append a unique query-string hash (for cache busting) to the
			// injected files after each build. All files get the same hash, which makes
			// this DIFFERENT from using the "chunkhash" in the "output" config.
			hash: true
		}),
		// I compact the JavaScript content.
		new webpack.optimize.UglifyJsPlugin({
			mangle: {
				keep_fnames: true,
				keep_classnames: true
			}
		})
	]
};
As you can see, the portion at the top parses the App component's LESS file, looks for the "--VAR : VALUE ;" pattern matches and then uses those extracted values to provide a collection of variables to the postcssPresetEnv() plug-in. This way, I can use the App component's LESS file as the single source of truth for the CSS custom properties, even for the fallback values.
With this PostCSS loader in place, I can now run this application in IE11 using graceful degradation:
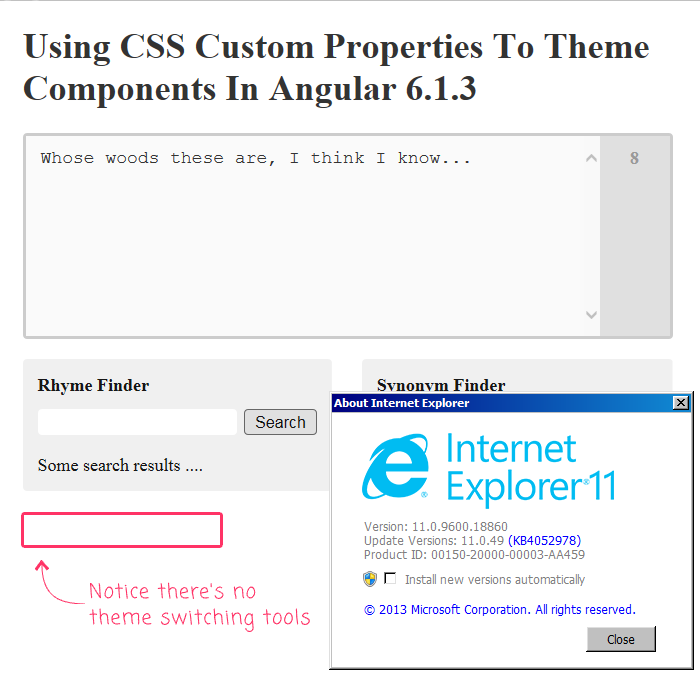
In addition to the fact that the application is still usable in IE 11, you'll notice that the "theme switching" tools are hidden from the user. This is because we're hiding the theme UI tooling by default. Then, only showing it in browsers that support CSS custom properties. If we refer to part of our Angular application's root component:
.layout {
	// ....
	&__footer {
		// By default, we're going to HIDE the option to SWITCH THEMES. We'll only show
		// it once we know that we are in a browser that actually supports CSS custom
		// properties.
		display: none ;
		margin-bottom: 20px ;

		// If the CSS parser supports the assignment of a CSS custom property (the key
		// and value in this case doesn't matter), then it is safe to show the SWITCH
		// THEMES tooling to the user.
		@supports ( --foo: "bar" ) {
			display: block ;
		}
	}
}
... you can see that we're using "display: none" followed by the @supports() conditional block. In this regard, we are using both "graceful degradation" and "progressive enhancement" when it comes to CSS Custom Properties. What an exciting time to be alive!
This is only the second time that I've looked at CSS Custom Properties. And, it's the first time I've ever looked at PostCSS. So, hopefully I haven't said anything in this post that is blatantly wrong or misleading. Getting the PostCSS to work with a Webpack-driven Angular app was a bit challenging. But, once I decided to parse the values at compile time, life got a lot easier. Of course, this approach only works if all of the CSS Custom Properties are defined in the root component. That said, if you don't need to support IE11 (which only has 2% global usage), things become much more simple.
Regardless, CSS Custom Properties make for a really elegant approach to theming in an Angular application. Hopefully this post has served to pique your curiosity on the matter. I know it has for me.
Want to use code from this post? Check out the license.

Reader Comments
I love the dark theme! The only bit I don't understand is the '&' stuff in your CSS! But I like the way you have condensed the CSS. I was kind of wondering why you had both light & dark blocks in the CSS to begin with? And then you condensed it, into one block, which makes it more modular! I have to say I have never used Angular Variables in CSS. It looks really cool. Looking forward to integrating some of these techniques into my projects!
The webpack stuff just went straight over my head, but I must get around to studying webpack config, someday!
@Charles,
The
&stuff is specific to LESS CSS -- a CSS pre-processor. It provides you with - among other things - a way to define nested CSS names with greater ease than raw CSS. For example, instead of having to hand-write something like:... LESS CSS allows you to do the following:
So, the
&is basically a "parent selector" (not sure what the LESS terminology is off-hand). But, I love it -- it makes it much easier to write CSS.As far as the Webpack stuff, honestly, 99% of it goes over my head. I basically found something that works and I copy/paste it into every new demo. Heck, I'm still running on Webpack 3 , not 4, because I can't figure out how to upgrade ;P
Thanks for the heads up on the '&'. This is a nice feature. I've never used LESS etc, because of the preprocessor bit. But I can see the advantages, so I may start using LESS, because I can see that it can provide real modularity. In the past I have just used Coldfusion style sheets: styles.css.cfml
@Charles,
I love LESS. I wouldn't start a project without out (unless it was super small).
That said, ColdFusion-based CSS files is a must-have if you need to change values based on the current user. BUT, it can get even more interesting if you use CSS Custom Properties. Because, you could use ColdFusion to inject Custom Prop values into the DOM, like:
... where the
user.colorPreferenceshas something like:... then, you could simply consume those values in your CSS file:
Would be pretty cool!
Yes. Nice. I love these CSS variables. I like to squeeze as much as I can out of the ordinary CSS model, but LESS, is something, I am keen to start learning!
Do I need to install anything on the server to get started with LESS.
And, is LESS used directly or compiled down to ordinary CSS, before the browser interprets it?
@Charles,
LESS requires some sort of compilation step. In my demo, I'm using Webpack. But, you can also use the
lesscompiler from the command-line. There are also GUI-based tools, like CodeKit, that will run it for you by watching files on the file-system. At work, we run thelesscompiler as part of our Gulp build scripts (I think).OK. I'm with you. So, essentially, a watcher responds to changes in the LESS file and then automatically compiles it down to CSS.
But it is the CSS file that the browser interperts?
@Charles,
Exactly. The content is CSS by the time it gets to the browser.
Hello!)
Your article has been very helpful to me. But, I just can not figure out how to do that:
By clicking on the child component, the theme changed throughout the site. If it's not hard for you, can you give advice?
@Vladimir,
I am sorry, I am not entirely sure what you are asking. CSS Custom Properties cascade like other CSS properties. So, if you are trying to theme an entire site, you have to define the variables high enough up in the DOM so that they can cascade down to the rest of the application.
@All,
This morning, I partook in a fun little code kata relating to CSS Themeing -- defaulting my Angular app's CSS theme to "dark" if it's being accessed during the early morning hours (according to the user's local date/time settings):
www.bennadel.com/blog/3594-alligator-io-code-kata-defaulting-theme-based-on-time-of-day-in-angular-7-2-11.htm
Just a fun activity to get my brain going for the day :D
Hey Ben,
Check out css-vars-ponyfill. It will allow you to modify custom property values on the client in both legacy browsers (IE9+) and modern browsers (so you have a single API for both). When you're ready to drop legacy support, just remove the ponyfill. Nice and easy. :)
@John,
I'll check it out -- can you give me the quick rundown on how it compares to the fallback that I am using? I tried to create mine such that removing the IE fallback was fairly easy:
Of course, my approach requires the custom properties to be defined in a single file; but, that seems like a reasonable approach for theming.
@All,
While modern build systems that come with Angular applications afford a lot of conveniences, there's a lot of legacy applications out there with terrible build systems ( cough this blog cough). As such, I've recently been doing some noodling on how I might apply theming in a legacy application with just LESS CSS and CSS Custom Properties:
www.bennadel.com/blog/3777-retrofitting-theming-into-a-legacy-app-using-less-css-and-css-custom-properties.htm