
Stacking Context Is The Key To Understanding The CSS Z-Index
NOTE: This post is primarily a "note to self," trying to build a better mental model for z-index stacking on the web.
Originally, I was going to title this post something like, "If you use z-index: 999999, you have no idea what you're doing." But, that felt too much like "click bait"; so I decided to focus on the importance of stacking context in a layered web application. But, the original intent of the title still holds true. Historically, I've used very large z-index values; or, z-index values with massive increments, like 1000, 2000, 3000 because, frankly, I didn't really have a good mental model for how stacking works. Once you understand the concept of a stacking context, however, your CSS z-index values don't have to be shrouded in so much fear, uncertainty, and doubt (FUD).
Run this demo in my JavaScript Demos project on GitHub.
The rules for when a stacking context is created may be a little surprising - there are definitely several that I had never considered (and several that I had never heard of); but, according to the Mozilla Developer Network (MDN), a stacking context is created by (abbreviated list):
- The root element (HTML).
- Any absolutely or relatively positioned element with z-index other than "auto".
- Any flexbox container with z-index other than "auto."
- Any fixed or sticky positioned element.
This is an abbreviated list, but these are the ones that most pertain to kind the of web development work that I do currently.
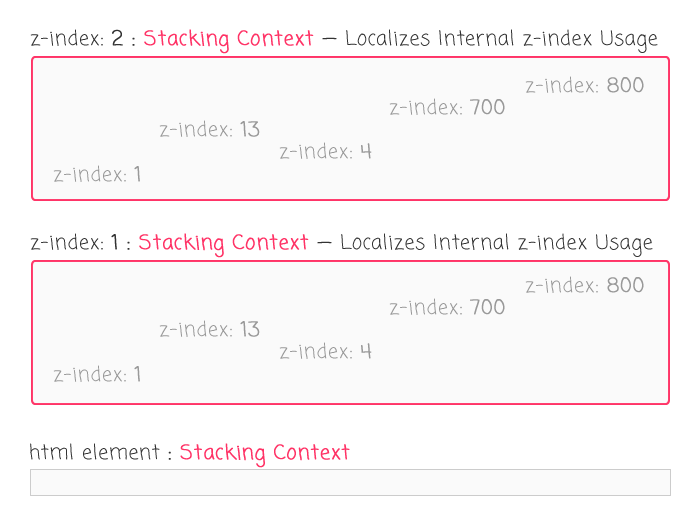
Understanding when a stacking context is defined is only half the battle. The other half is understanding what a stacking context does when it's created: it quarantines the CSS z-index values of its descendant nodes. In other words, it prevents the z-index values in the local DOM tree from interacting with the layering outside of the local DOM tree. And, from the larger document perspective, all elements within a stacking context are treated as if they have the same z-index:
It's a difficult concept to illustrate or articulate - it's really something that you just have to see and interact with before it clicks, at least for me. So, I created a small Angular 5 demo that allows you toggle the display of a few positioned elements. Each of the positioned elements creates its own stacking context, which isolates all of the layered elements within the local DOM (Document Object Model) tree:
// Import the core angular services.
import { Component } from "@angular/core";
// ----------------------------------------------------------------------------------- //
// ----------------------------------------------------------------------------------- //
@Component({
selector: "my-app",
styleUrls: [ "./app.component.less" ],
template:
`
<p>
<a (click)="toggleInbox()">Toggle Inbox</a> —
<a (click)="toggleModals()">Toggle Modals</a>
</p>
<p *ngFor="let i of [ 1, 2, 3, 4, 5 ]">
This is some body context. The Body is the stacking context.
</p>
<!-- STACKING CONTEXT -->
<div *ngIf="isShowingInbox" class="inbox">
<!-- STACKING CONTEXT -->
<header>
Header.
<!-- STACKING CONTEXT -->
<div class="menu">
Menu.
</div>
</header>
<section>
Content area.
</section>
<!-- STACKING CONTEXT -->
<footer>
Footer.
</footer>
<!-- STACKING CONTEXT -->
<div class="sticky">
Sticky.
</div>
</div>
<!-- STACKING CONTEXT -->
<div *ngIf="isShowingModals" class="modals">
<header>
Header.
</header>
<section>
Content area.
</section>
<footer>
Footer.
</footer>
<!-- STACKING CONTEXT -->
<div class="sticky">
Sticky.
</div>
</div>
`
})
export class AppComponent {
public isShowingInbox: boolean;
public isShowingModals: boolean;
// I initialize the app component.
constructor() {
this.isShowingInbox = false;
this.isShowingModals = false;
}
// ---
// PUBLIC METHODS.
// ---
// I toggle the visibility of the inbox overlay.
public toggleInbox() : void {
this.isShowingInbox = ! this.isShowingInbox;
}
// I toggle the visibility of the modals overlay.
public toggleModals() : void {
this.isShowingModals = ! this.isShowingModals;
}
}
In this code, we have two positioned Div elements, each of which has a z-index. This makes each of the Divs a unique stacking context, which means that all of the elements within each Div are layered according to the z-index of the Div itself. Here's the abbreviated LESS CSS file for this component (showing just the layering information):
// Abbreviated styles.

.inbox {
	position: absolute ;
	z-index: 10 ;

	header {
		position: relative ;
		z-index: 15 ;

		.menu {
			position: absolute ;
			z-index: 1515 ;
		}
	}

	footer {
		position: relative ;
		z-index: 17 ;
	}

	.sticky {
		position: fixed ;
		z-index: 1010 ;
	}
}

.modals {
	position: absolute ;
	z-index: 20 ;

	.sticky {
		position: fixed ;
		z-index: -1 ;
	}
}
If we run this code and open the first overlay, we get the following output:
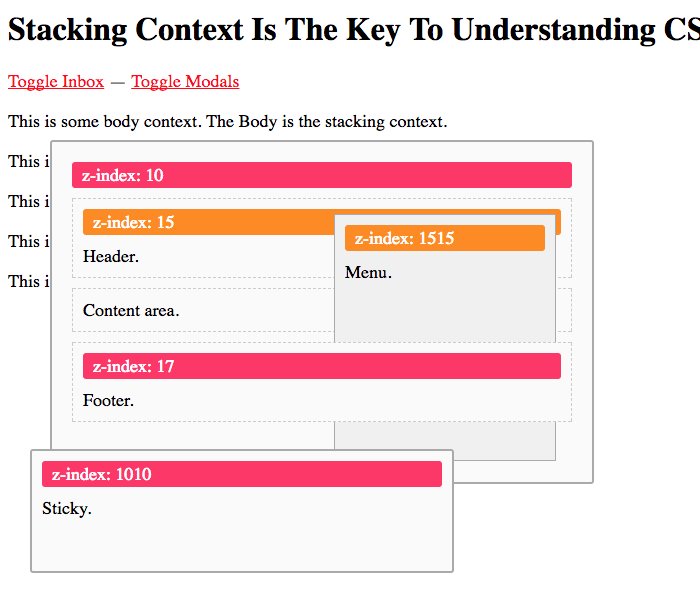
Notice that the item with z-index: 1515 doesn't layer over the element with z-index: 17, despite having a much higher z-index. This is because the z-index: 1515 element is contained within another element that uses z-index: 15. This z-index: 15 element creates a "stacking context" that quarantines the "1515" element. As such, from the z-index: 17 element's perspective, the z-index: 1515 element actually has a z-index of 15, as defined by its parent stacking context.
Again, this stuff is hard to articulate until you see it and play with it for yourself.
If we now open the second overlay, we get the following output:
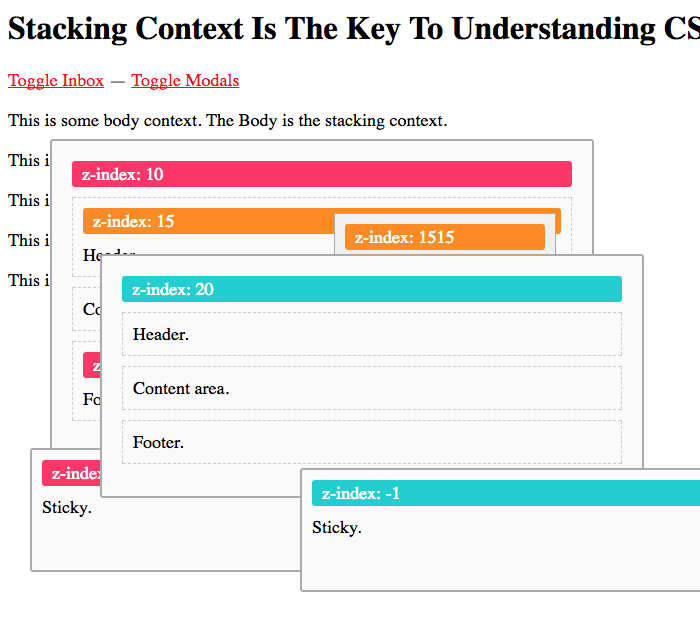
Here, we can see that the element with z-index: 20 - a sibling of the element with z-index: 10 - completely covers all of the elements contained within z-index: 10. This is because all of the elements within z-index: 10 are ultimately treated as if they have z-index: 10. And, all of the elements within z-index: 20 are treated as if they have z-index: 20. As such, all of the elements in z-index: 20 have a higher "atomic z-index" than all of the elements in z-index: 10.
When thinking about z-index, words don't really paint the right picture; you have to get hands-on and play with it yourself. I suggested going into the demo, opening the Chrome dev tools, and try editing the CSS values.
After stepping back and thinking about stacking context and how it isolates layering within subtrees of the DOM, what does a sane z-index strategy look like? For me, I think it starts to look something like this:
- auto: Body content.
- 1-49: Specialized content (ex, super-menu, drop-down menu).
- 50-99: Fixed positioned elements (ex, header, footer, drop-target).
- 100: Overlay (ex, fly-out menu).
- 101: Overlay (ex, modal window system).
- 102: Overlay (ex, ???).
- 200: Globally positioned pop-up menu.
- 201: Globally positioned tool-tip.
Notice that each different type of overlay increments its z-index by "1". It doesn't need to do anything more than that because the z-index will create its own stacking context which will isolate every element inside of it. As such, the z-index values don't need to vary all that much - they only need to differentiate at either the parent level or the local level.
Understanding stacking context won't solve all of your z-index complexities. But, it should shed light on how and why a layer is stacking like it does. And, if a layer is presenting with an unexpected stacking order, understanding the stacking context should allow you to walk up the DOM tree and see where the isolation is being created. If nothing else, understanding the stacking context removes the fear and uncertainty around the layering of your web application elements.
And just remember, if you're tempted to throw in a z-index of 999999, stop, take a step back, and think about why a stacking context would require such a value.
Want to use code from this post? Check out the license.

Reader Comments
Thanks yo, helpful
@Buh,
My pleasure, good sir!
Ben - I found this post looking for the answer to a particular question: how to manipulate/take advantage of how stacking contexts work to get my desired result. I have a modal that, when opened, I want its full screen background to be in front of my main nabar. Problem is the modal and its background are in their own stacking context which itself is the great-great-great-great-etc grandchild of the parent of the navbar. And I am unable to change the DOM in this instance (I'm using a wordpress theme/plugins). Is there a CSS solution for this?
<body>
<navbar>
<div>
<div>
<div>
<div>
<div>
<modal trigger>
<modal bg>
<modal dialog>
I am unable to relocate this modal html to be a direct child of <body> even though it would still open properly if I could relocate it.
Hmm, I think I figured it out. Perhaps this was obvious to you and others but I discovered that setting any intervening div to z-index: auto effectively makes it invisible within the enclosing stacking context. So this lets you "skip" layers or levels if you want the z-index of a child (any child) of the parent that creates the stacking context to relate to the z-index of a distant grandchild of a sibling. You can layer them above or below each other easily despite being "distant cousins".
(In my orig post above I attempted to show a dom tree but all the spacing got removed when I posted. Sorry if thats confusing).