
Creating A Custom Select Component With The Options-Menu In The Root Stacking Context In Angular 9.0.0-rc.3
Over the last few weeks, I've performed a number of experiments in Angular 9 in an attempt to work towards a particular solution: how can I create a custom Select / Dropdown component in which the Options menu mimics the stacking-order provided by the native <select> element? This is tricky because the native select element renders in a very specialized browser widget (which is part of why styling a native select element is very challenging). My solution is to dynamically render the Options menu in the root of document.body such that it can have an encumbered z-index that will stack above all other elements on the page.
Run this demo in my JavaScript Demos project on GitHub.
View this code in my JavaScript Demos project on GitHub.
The stacking order of positioned elements is a non-trivial topic. It's tricky, because getting it right depends on your understanding of "Stacking Contexts"; and, how those stacking contexts affect the z-index behavior across multiple elements. This is why simply throwing a z-index: 999999 on an element doesn't always get you to the outcome that you expect.
In order to ensure that a given element will always be stacked above all other elements, it:
It has to have the highest
z-indexproperty for its stacking context.It has to live in the root stacking context (ie,
document.body).
What this means is that if we want to create a custom Select / Dropdown component in Angular with good stacking behavior, we have to render the "options menu" in the root of the document. By doing this, however, we end-up putting the dropdown "root" element and the "menu" element is very different places within the DOM (Document Object Model) tree; which hampers a lot of the traditional methods we would use for positioning.
Luckily, we can use the .getBoundingClientRect() method to position our Options menu; and, we can translocate a view-fragment while maintaining Angular's template bindings. Together, these two feature work to create a powerful Select menu.
To see this in action, let's look at my App component. It instantiates a custom Select component, app-html-select, and then allows the user to position the Select in different locations. The Options menu for this custom Select component then dynamically renders itself in relation to the positioned Select such that it tries to make best use of the available viewport real estate:
// Import the core angular services.
import { Component } from "@angular/core";

// ----------------------------------------------------------------------------------- //
// ----------------------------------------------------------------------------------- //

@Component({
	selector: "app-root",
	styleUrls: [ "./app.component.less" ],
	template:
	`
		<p class="controls">
			<strong>Position:</strong>
			<a (click)="reposition( 'center' )">Center</a>
			<a (click)="reposition( 'top-left' )">Top-Left</a>
			<a (click)="reposition( 'top-right' )">Top-Right</a>
			<a (click)="reposition( 'bottom-right' )">Bottom-Right</a>
			<a (click)="reposition( 'bottom-left' )">Bottom-Left</a>
		</p>

		<app-html-select [(value)]="bff" [class]="menuClass">

			<app-html-select-root [ngSwitch]="( bff === null )">
				<ng-template [ngSwitchCase]="true">
					Select your bestie!
				</ng-template>
				<ng-template [ngSwitchCase]="false">
					<strong>{{ bff }}</strong> is my bestie!
				</ng-template>
			</app-html-select-root>

			<app-html-select-option [value]="null">
				I have no friends....
			</app-html-select-option>

			<app-html-select-option
				*ngFor="let friend of friends"
				[value]="friend"
				[class.selected]="( friend === bff )">

				{{ friend }}

			</app-html-select-option>

		</app-html-select>
	`
})
export class AppComponent {

	public bff: string | null;
	public friends: string[];
	public menuClass: string;

	// I initialize the app component.
	constructor() {

		this.bff = null;
		this.friends = [
			"Kim", "Joe", "Kit", "Tom", "Henry", "Hanna", "Dave", "Ellen", "Tina",
			"Bobby", "Todd", "Pam", "Zena The Warrior Princess"
		];
		this.menuClass = "center";

	}

	// ---
	// PUBLIC METHODS.
	// ---

	// I reposition the html-select menu so that we can see how it behaves when it gets
	// close to one of the viewport edges.
	public reposition( newMenuClass: string ) : void {

		this.menuClass = newMenuClass;

	}

}
Now, if we run this Angular 9 application in the browser and try to open the custom Select component in its various locations, we will see that the Options is positioned close the menu root; but, tries not to overlap with the browser's viewport:
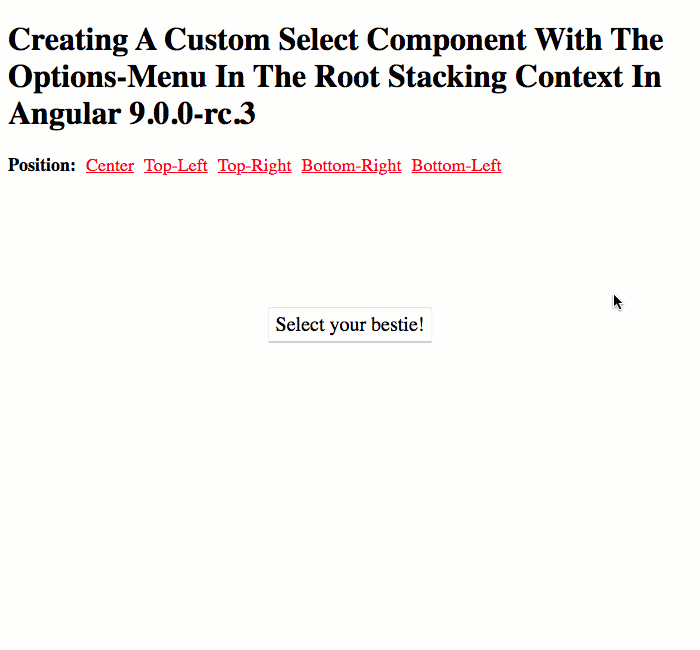
As you can see, the Options menu is always visible on the screen no matter where the Select component is positioned. And, if there's not enough room in the browser's viewport to render the entire dropdown menu content, the Select component shrinks the dimensions of the menu in order to ensure its visibility.
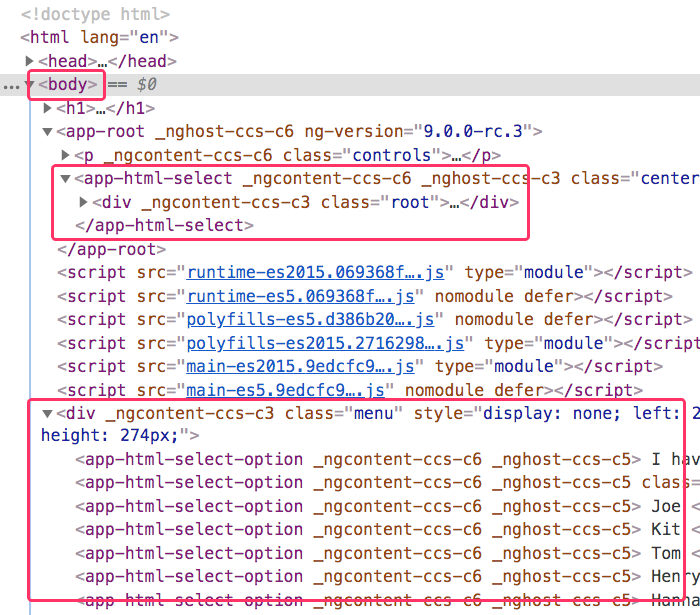
Furthermore, if we look at the Elements pane of the Chrome Dev tools, we will see that the Options menu is being rendered in the document.body despite the fact that it is defined in the App component:
To see how this works, let's look at the HtmlSelectComponent. This component file actually contains three components: the primary component and two helper components for the Root and the Options elements. The main features to see here are how the Options view-fragment is translocated to the document root after it is initialized; and, how the Options menu is positioned relative to its menu-root, which lives in a different part of the DOM tree.
// Import the core angular services.
import { ChangeDetectorRef } from "@angular/core";
import { ChangeDetectionStrategy } from "@angular/core";
import { Component } from "@angular/core";
import { ElementRef } from "@angular/core";
import { EventEmitter } from "@angular/core";
import { ViewChild } from "@angular/core";

// ----------------------------------------------------------------------------------- //
// ----------------------------------------------------------------------------------- //

@Component({
	selector: "app-html-select",
	inputs: [ "value" ],
	outputs: [
		"valueChangeEvents: valueChange"
	],
	host: {
		"(document:mousedown)": "handleMousedown( $event )",
		"(window:resize)": "hideMenu()",
		"(window:keydown.Esc)": "hideMenu()"
	},
	queries: {
		rootRef: new ViewChild( "rootRef" ),
		menuRef: new ViewChild( "menuRef" )
	},
	changeDetection: ChangeDetectionStrategy.OnPush,
	styleUrls: [ "./html-select.component.less" ],
	template:
	`
		<div #rootRef (click)="showMenu()" class="root">

			<ng-content
				select="app-html-select-root">
			</ng-content>

		</div>

		<div
			#menuRef
			class="menu"
			[style.display]="( isShowingMenu ? 'block' : 'none' )">

			<ng-content></ng-content>

		</div>
	`
})
export class HtmlSelectComponent {

	public isShowingMenu: boolean;
	public menuRef!: ElementRef;
	public rootRef!: ElementRef;
	public value!: any;
	public valueChangeEvents: EventEmitter<any>;

	private changeDetectorRef: ChangeDetectorRef;

	// I initialize the html-select component.
	constructor( changeDetectorRef: ChangeDetectorRef ) {

		this.changeDetectorRef = changeDetectorRef;

		this.isShowingMenu = false;
		this.valueChangeEvents = new EventEmitter();

	}

	// ---
	// PUBLIC METHODS.
	// ---

	// I handle the mousedown event on the document.
	public handleMousedown( event: MouseEvent ) : void {

		// If the user has moused-down OUTSIDE of the select-menu, we're going to
		// interpret that as moving focus away from the menu. As such, we're going to
		// close it.
		if (
			this.isShowingMenu &&
			! this.rootRef.nativeElement.contains( event.target ) &&
			! this.menuRef.nativeElement.contains( event.target )
			) {

			this.hideMenu();

		}

	}


	// I hide the pop-up menu.
	public hideMenu() : void {

		this.isShowingMenu = false;

	}


	// I get called once after the view template has been compiled.
	public ngAfterViewInit() : void {

		// CAUTION: Now that the view has been initialized, it means that Angular has
		// hooked up all of the directive and interpolation bindings. As such, it is safe
		// to move a portion of the view into the DOCUMENT ROOT without breaking those
		// bindings. How cool is that sauce!!
		document.body.appendChild( this.menuRef.nativeElement );

	}


	// I propagate the given value as a desired valueChange event.
	public selectValue( value: any ) : void {

		// NOTE: Since the selection method is part of the public API that is being
		// consumed from a different component, we have to explicitly tell the change-
		// detector to look for changes. Otherwise, the change-detector won't know that
		// the View-Model has changed (ex, the menu has been closed).
		this.changeDetectorRef.markForCheck();
		this.hideMenu();

		if ( this.value !== value ) {

			this.valueChangeEvents.emit( value );

		}

	}


	// I show the pop-up menu, and try to position it so it doesn't overlay with the
	// viewport of the browser.
	public showMenu() : void {

		var rootRect = this.rootRef.nativeElement.getBoundingClientRect();

		// By default, we're going to position the menu at the top-left corner of the
		// root button.
		this.isShowingMenu = true;
		this.menuRef.nativeElement.style.left = `${ rootRect.left }px`;
		this.menuRef.nativeElement.style.top = `${ rootRect.top }px`;
		this.menuRef.nativeElement.style.width = null;
		this.menuRef.nativeElement.style.minWidth = `${ rootRect.width }px`;
		this.menuRef.nativeElement.style.height = null;

		// Since we don't know what's inside the menu (the content is projected), there's
		// no way for us to know about the dimensions ahead of time. As such, we're going
		// to stop and force the browser to reconcile the view-model with the template
		// (ie, we're going to force it to render the menu). This will give the menu
		// physical dimensions in the viewport that we can then measure.
		this.changeDetectorRef.detectChanges();

		// Measure the viewport and the menu position.
		var windowWidth = document.documentElement.clientWidth;
		var windowHeight = document.documentElement.clientHeight;
		var menuRect = this.menuRef.nativeElement.getBoundingClientRect();

		// When we position the menu, we don't want it to butt-up against the viewport,
		// as that would be provide sub-par look-and-feel. Let's make sure it never gets
		// closer than 10px from any edge.
		var minLeft = 10;
		var minTop = 10;
		var maxRight = ( windowWidth - 10 );
		var maxBottom = ( windowHeight - 10 );

		// Ok, let's start out with the natural position reported by the browser.
		var adjustedRect = {
			top: menuRect.top,
			left: menuRect.left,
			right: menuRect.right,
			bottom: menuRect.bottom
		};

		// Now, let's adjust the rect so that the menu doesn't overlap with our min and
		// max offsets. First, we're going to do this by shifting the entire menu over.
		// Then, if the menu is still in a "bad" place, we're going to shrink the
		// dimensions in order to force the fit.

		// Constrain the left-edge. We're going to do this by shifting the entire menu.
		if ( adjustedRect.left < minLeft ) {

			adjustedRect.left += ( minLeft - adjustedRect.left );
			adjustedRect.right += ( minLeft - adjustedRect.left );

		// Constrain the right-edge. We're going to do this by shifting the entire menu.
		} else if ( adjustedRect.right > maxRight ) {

			adjustedRect.left -= ( adjustedRect.right - maxRight );
			adjustedRect.right -= ( adjustedRect.right - maxRight );

		}

		// Constrain the top-edge. We're going to do this by shifting the entire menu.
		if ( adjustedRect.top < minTop ) {

			adjustedRect.top += ( minTop - adjustedRect.top );
			adjustedRect.bottom += ( minTop - adjustedRect.top );

		// Constrain the bottom-edge. We're going to do this by shifting the entire menu.
		} else if ( adjustedRect.bottom > maxBottom ) {

			adjustedRect.top -= ( adjustedRect.bottom - maxBottom );
			adjustedRect.bottom -= ( adjustedRect.bottom - maxBottom );

		}

		// And, now that we've tried to shift the menu over in order to avoid edge-
		// overlap, we're going to ensure constraint by clamping the physical dimensions
		// of the menu.
		adjustedRect.left = Math.max( adjustedRect.left, minLeft );
		adjustedRect.top = Math.max( adjustedRect.top, minTop );
		adjustedRect.right = Math.min( adjustedRect.right, maxRight );
		adjustedRect.bottom = Math.min( adjustedRect.bottom, maxBottom );

		// Finally, we can update the position of the menu to reconcile it with the
		// calculated constraints of the viewport.
		this.menuRef.nativeElement.style.top = `${ adjustedRect.top }px`;
		this.menuRef.nativeElement.style.left = `${ adjustedRect.left }px`;
		this.menuRef.nativeElement.style.width = `${ adjustedRect.right - adjustedRect.left }px`;
		this.menuRef.nativeElement.style.height = `${ adjustedRect.bottom - adjustedRect.top }px`;

	}

}

// ----------------------------------------------------------------------------------- //
// ----------------------------------------------------------------------------------- //

@Component({
	selector: "app-html-select-root",
	changeDetection: ChangeDetectionStrategy.OnPush,
	styleUrls: [ "./html-select-root.component.less" ],
	template:
	`
		<ng-content></ng-content>
	`
})
export class HtmlSelectRootComponent {
	// ....
}

// ----------------------------------------------------------------------------------- //
// ----------------------------------------------------------------------------------- //

@Component({
	selector: "app-html-select-option",
	inputs: [ "value" ],
	host: {
		"(click)": "handleClick()"
	},
	changeDetection: ChangeDetectionStrategy.OnPush,
	styleUrls: [ "./html-select-option.component.less" ],
	template:
	`
		<ng-content></ng-content>
	`
})
export class HtmlSelectOptionComponent {

	public value!: any;

	private htmlSelect: HtmlSelectComponent;

	// I initialize the html-select option component.
	constructor( htmlSelect: HtmlSelectComponent ) {

		this.htmlSelect = htmlSelect;

	}

	// ---
	// PUBLIC METHODS.
	// ---

	// I handle the selection of the current option.
	public handleClick() : void {

		this.htmlSelect.selectValue( this.value );

	}

}
I've tried to leave a lot of comments in the code; so, I won't go into any more detail. Hopefully this is not too overwhelming.
And, to be clear, this is not intended to be a really robust Select / Dropdown menu: it lacks a number of common features such as keyboard navigation and ngModel integration. Really, this is just an exploration of how to dynamically render the Options menu in order to best leverage the Viewport real estate and CSS Stacking Order. That said, I think there's quite a bit of interesting material here. At least for me, this is one of the more complex things that I've ever built in Angular.
Want to use code from this post? Check out the license.

Reader Comments
@All,
As a tangentially-related follow-up, I revamped this demo to use
TemplateRefandNgTemplateOutletfor customization:www.bennadel.com/blog/3729-customizing-a-select-component-using-templateref-and-ngtemplateoutlet-in-angular-9-0-0-rc-3.htm
This was inspired by a recent episode of Adventures in Angular where Stephen Cooper talked about his Angular presentation and the ways to create flexible, reusable, and customizable components.
@All,
As a quick follow-up, I was looking through the Angular Material source code this morning and found a similar approach, but using a
TemplateRef. I thought this was pretty cool and wanted to try it myself:www.bennadel.com/blog/3737-rendering-a-templateref-as-a-child-of-the-body-element-in-angular-9-0-0-rc-5.htm
It's the same basic concept. But, sooo coool. I love Angular!