Converting An Image Into Selectable Text Using ColdFusion
Last week, Ryan Jeffords pointed me to a fun little demo where a block of text would reveal a pixelated image if you selected the characters within the text. Essentially, it was using the "selection" CSS pseudo-class to turn each character into a solid block of color upon selection. I found this pretty amusing and wanted to see if I could reproduce the same effect using ColdFusion.
The algorithm that I came up with is fairly straightforward. Basically, you have to think of each text character as an oddly-shaped pixel (with an aspect ratio of about 5:9 given the line-height of the font). Using a "monospace" font-family will help keep all the pixels the same size and dimension.
Keeping this in mind, you then have to sample the image using blocks with the same 5:9 aspect ratio. For each sample that you take, average the pixel colors together and use the average color to render the text selection block.
<cfscript>
// Inspired by: http://fichtre.net/yop.html
// I take an image and return the "pixelated" color data based
// on the sample size. The colors within the bounds of a given
// sample will be extracted and sampled. The colors will be
// returned as a two dimentional array (Width x Height).
function imageGetColorData( image, sampleWidth, sampleHeight ){
// Get the dimensions of the original image.
var width = imageGetWidth( image );
var height = imageGetHeight( image );
// Get the underlying buffered image. This will give us access
// to the actual pixel data that represents the raw image.
var bufferedImage = imageGetBufferedImage( image );
// Create a holder for our average image data.
var colorData = [];
// We are going to collect color data from the top to the
// bottom, scanning across the width of the image as we go.
for (var y = 0 ; y < height ; y += sampleHeight){
// Create an array to collect the row data.
var rowData = [];
// Scan across the width of the image.
for (var x = 0 ; x < width ; x += sampleWidth){
// As we get towards the edge of the image, we may not
// be able to take a full sample. As such, we'll have
// to make sure we don't go out-of-bounds.
var pixelWidth = min( sampleWidth, (width - x) );
var pixelHeight = min( sampleHeight, (height - y) );
// Extract the array of pixels for the smaple.
var pixelSample = bufferedImage.getRGB(
javaCast( "int", x ),
javaCast( "int", y ),
javaCast( "int", pixelWidth ),
javaCast( "int", pixelHeight ),
javaCast( "null", "" ),
javaCast( "int", 0 ),
javaCast( "int", pixelWidth )
);
// Average the sample pixels and collect the result.
arrayAppend(
rowData,
getAveragePixelValue( pixelSample )
);
}
// Add the row of color data for this y-offset.
arrayAppend( colorData, rowData );
}
// Return the extracted and averaged color values.
return( colorData );
}
// I take an array of pixels and average them together. I return
// the integer value that encodes the averaged RGB values.
function getAveragePixelValue( pixelData ){
// Each pixel value encodes the Red, Green, and Blue values
// based on the bits that are turned: ...RRRGGGBBB. The
// leading value may be a sign bit.
var redTotal = 0;
var greenTotal = 0;
var blueTotal = 0;
// Get the total number of pixels - this will be used for the
// loop as well as for the averaging.
var pixelCount = arrayLen( pixelData );
// Loop over the pixel data to average it.
for (var i = 1 ; i <= pixelCount ; i++){
// Get the colors for the given pixel.
var colors = parseRGB( pixelData[ i ] );
// Add the pixel to the running total.
redTotal += colors.red;
greenTotal += colors.green;
blueTotal += colors.blue;
}
// Get the average colors.
var redAverage = fix( redTotal / pixelCount );
var greenAverage = fix( greenTotal / pixelCount );
var blueAverage = fix( blueTotal / pixelCount );
// Return the coded color average.
return(
encodeRGB(
redAverage,
greenAverage,
blueAverage
)
);
}
// I get the RGB values from the given integer, assuming that
// the integer codes the RGB values by bit:
// Right-most bits: RRRRRRRRGGGGGGGGBBBBBBBB
function parseRGB( colorValue ){
// Each color is represented by 8-bits within the color
// value. In order to get the bits isolated, we must shift
// them to the right until they are the right-most 8 bits.
// Then, we can bit-AND them with 255 (11111111) to break
// them out of the color value.
var colors = {
"red" = bitAnd( bitShrn( colorValue, 16 ), 255 ),
"green" = bitAnd( bitShrn( colorValue, 8 ), 255 ),
"blue" = bitAnd( colorValue, 255 )
};
// Return the separated RGB values.
return( colors );
}
// I take the 0-255 color values for Red, Green, and Blue and
// encode them in a single single integer.
function encodeRGB( red, green, blue ){
// Start off with the Blue color as the base RGB value - all
// the others will be AND-ed to it.
var rgb = blue;
// Add the Red.
rgb = bitOr( bitShln( red, 16 ), rgb );
// Add the Green.
rgb = bitOr( bitShln( green, 8 ), rgb );
// Return the encoded RGB integer.
return( rgb );
}
// I build the color index - using pixel values as the keys and
// parsed RGB values as the value.
function buildColorIndex( colorData ){
// Use a struct - each duplicate color key will smiply
// override the one before it, leaving us with a set of
// unique color values.
var colorIndex = {};
// Cache the length of data.
var rowCount = arrayLen( colorData );
// Loop over all the colors, top-to-bottom, to build index.
for (var y = 1 ; y <= rowCount ; y++){
// Cache the width count.
var columnCount = arrayLen( colorData[ y ] );
// Loop across the row.
for (var x = 1 ; x <= columnCount ; x++){
// Get the RGB encoding. We'll use the encoding as
// the index; but, we'll use the invidual RGB values
// as the value of the index (for use in the CSS
// output).
colorEncoding = colorData[ y ][ x ];
// Prefix class with "c" to avoid all-numeric naming.
colorIndex[ "c#colorEncoding#" ] = parseRGB( colorEncoding );
}
}
// Return the color index.
return( colorIndex );
}
// ----------------------------------------------------- //
// ----------------------------------------------------- //
// ----------------------------------------------------- //
// ----------------------------------------------------- //
// Load the target image.
portrait = imageNew( "./helena.jpg" );
// Get the color data from the image.
colorData = imageGetColorData( portrait, 5, 9 );
// Now that we have the color data, let's create an index of
// unique colors for our display.
colorIndex = buildColorIndex( colorData );
</cfscript>
<!--- Build up a cache of text to use in the display. --->
<cfsavecontent variable="copy">
Lorem ipsum dolor sit amet, consectetur adipiscing elit. Aenean
ante ante, vulputate sit amet lobortis et, faucibus vel urna.
Vivamus porttitor ultricies diam non facilisis. In ut leo quis
massa scelerisque dignissim sit amet sed velit. Curabitur lobortis
justo sed mi volutpat blandit. Nulla facilisi. Duis porta odio
ornare nunc interdum tempor. Curabitur blandit elit sed urna
pharetra quis iaculis enim pretium. Sed nec neque erat. Etiam
rhoncus posuere pulvinar. Donec eu ligula eget erat interdum
convallis vel sit amet lorem. Nunc sit amet sapien ut augue
tincidunt adipiscing a ut leo. Quisque eu accumsan libero.
Curabitur blandit mi sed libero scelerisque tincidunt. Proin
magna sem, luctus a euismod a, ultrices at ipsum.
</cfsavecontent>
<!--- Strip out extra spacing. --->
<cfset copy = ltrim(
reReplace( copy, "\s+", " ", "all" )
) />
<cfoutput>
<style type="text/css">
div.pixelated {
font-family: monospace ;
font-size: 16px ;
white-space: nowrap ;
}
div.pixelated div.row {
clear: both ;
}
div.pixelated span {
float: left ;
}
<!--- Output each unique color as its own class. --->
<cfloop item="class" collection="#colorIndex#">
<cfset rgb = colorIndex[ class ] />
span.#class#::selection {
color: rgb( #rgb.red#, #rgb.green#, #rgb.blue# ) ;
background-color: rgb( #rgb.red#, #rgb.green#, #rgb.blue# ) ;
}
span.#class#::-moz-selection {
color: rgb( #rgb.red#, #rgb.green#, #rgb.blue# ) ;
background-color: rgb( #rgb.red#, #rgb.green#, #rgb.blue# ) ;
}
</cfloop>
</style>
<div class="pixelated">
<!---
As we output the spans, we need to pluck a new character
from the copy text. Let's keep an index of the plucking.
--->
<cfset copyIndex = 0 />
<!---
Loop over the color data from top to bottom; we'll be
outputting the rows as we move down the data collection.
--->
<cfloop
index="y"
from="1"
to="#arrayLen( colorData )#"
step="1">
<div class="row">
<!--- Output each color sample in its own span. --->
<cfloop
index="x"
from="1"
to="#arrayLen( colorData[ y ] )#"
step="1">
<!--- Get the character to display. --->
<cfset char = mid( copy, ++copyIndex, 1 ) />
<!---
Clean up the space (otherwise it won't display
properly with the float-left).
--->
<cfif (char eq " ")>
<cfset char = " " />
</cfif>
<span class="c#colorData[ y ][ x ]#">#char#</span>
<!--- Check to see if we've run out of copy. --->
<cfif (copyIndex gt len( copy ))>
<cfset copyIndex = 0 />
</cfif>
</cfloop>
</div>
</cfloop>
</div>
<br clear="all" />
</cfoutput>
If you run this code and select some of the text, you will see that a pixelated but beautiful Helena Bonham Carter peeks out from behind the curtain of characters:
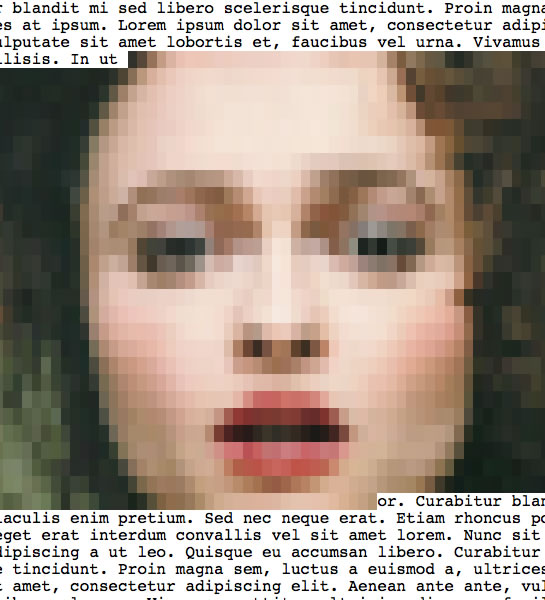
You can view the demo here - Helena Bonham Carter.
The effect is simple, but the output to the page is enormous (this demo results in almost 100,000 lines of code). I can't see an practical use for this effect; but, it was fun to try and reproduce!
Want to use code from this post? Check out the license.

Reader Comments
Nice demo! Incredible result! Where did you get this idea :D ? I will take more time to understand your code as soon as possible!
Found this fascinating Ben.It occurred to me you might be able to adapt this for captcha e.g. select the text and type in what's in the image. But at 100,000 lines I agree its not too practical.
@Loic,
I got the idea from a co-worker, Ryan Jeffords. He sent me a link that did something similar; so I tried to reverse-engineer it :)
@Kevin,
That's actually a fun idea! This photo is only a ton of lines of code because there are so many colors (and spans). For captcha, you would only need two colors (white and black) - would be significantly less code, I think. Very interesting / fun idea!
thank you for this topic
thank you for this topic