Creating A Custom Image Upload Service For Tweetie (Twitter For iPhone) Using ColdFusion
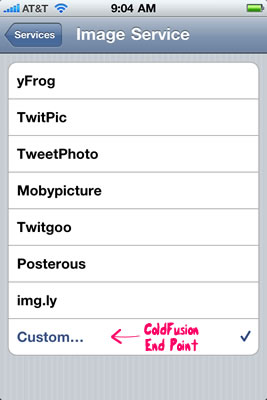
The other day, I was uploading a photo from Tweetie (Twitter for iPhone) when it occurred to me that I might be able to write my own custom image upload service using ColdFusion. After all, if Tweetie supports multiple image upload services, then I figured all I would have to do is follow some standard API to make it work. As it turns out, this is exactly correct. If you look in the Services section of your Tweetie settings, it allows you to define a custom image upload service:

This setting is nothing more than a single web service URL that supports a common API. According to the documentation on the AteBits development site, the web service API to model is the TwitPic image upload API. From what I can tell, though, the API supported by Tweetie is a subset of the image upload functionality provided by TwitPic.
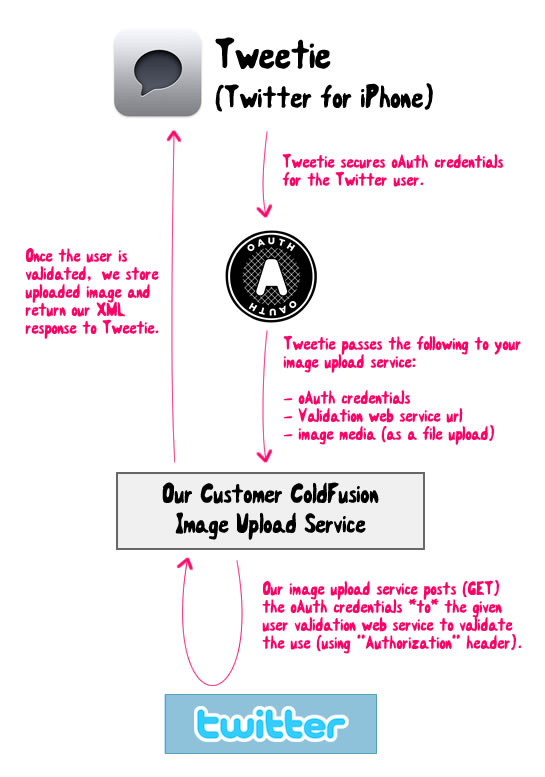
Since Tweetie was bought by Twitter, the documentation on AteBits has become outdated. Tweetie no longer posts the Twitter username and password of the individual uploading the given photo. After a good deal of Googling, I finally figured out that Tweetie is now taking an "oAuth Echo" approach to user validation. In this approach, the client application - Tweetie - secures oAuth credentials for the user. It then posts the image along with both the oAuth credentials and a user validation web service URL to the 3rd party application - our image uploader. Our image uploader then uses both the oAuth credentials and the user validation web service URL to validate the user. Once the user is validated, we can then store the uploaded image and return our XML web service response to the client application (Tweetie).

Once the 3rd party application has secured the oAuth credentials, it posts the following HTTP headers along with the image upload:
- X-Auth-Service-Provider
- X-Verify-Credentials-Authorization
The "X-Auth-Service-Provider" header provides a URL to the user validation service that our image uploader is supposed to use to validate the user (posting the image). In this case, is posts the following Twitter API url:
https://api.twitter.com/1/account/verify_credentials.json
The "X-Verify-Credentials-Authorization" header provides the oAuth credentials that we are supposed to post the above validation web service. This value will look something like this:
OAuth oauth_timestamp="1279135448", oauth_version="1.0", oauth_consumer_key="IQKbtAYlXMLDipLGPWd0HUA", oauth_token="15148392-0X4TUDVS1137rkucSCoxLMgtPhGldnHpq02v", oauth_signature="VwqniHwBe%2BdangTastydYUGj3BTxz5c%3D", oauth_nonce="7C7D01FD-2777-FFC0-802C-087077ACABC6", oauth_signature_method="HMAC-SHA1"
This oAuth value needs to be posted as the "Authorization" header to the validation web service. The validation web service will either respond with a 401 Unauthorized response, or it will respond with a 200 OK response. If it returns with a 200 OK response, then the content of the HTTP response will be a JSON representation of the authorized Twitter user. It is from this JSON structure that we can get the username of the Twitter user that is uploading the given image.
Understanding the oAuth Echo work flow was the biggest hurdle in creating a custom ColdFusion image upload service for Tweetie. Once I figure it out, however, the rest was little more a standard file upload. According to the TwitPic API, you are supposed to return different error codes based on what aspect of the image upload algorithm failed (authorization, file size, etc.); but, for this demo, I am keeping it very simple - it either works or it doesn't. I'm not bothering to break down the exception reasons, although, you'll see in the following code that I am raising different exceptions which can be caught and handled individually if you like.
That said, here is the ColdFusion code that handles the image upload from Tweetie. It is this file that is defined as the end point in the custom upload service setting.
Tweetie Custom Image Upload Service
<!---
	Define the uploads directory - this is where the images
	will be stored after the user has been authorized.
--->
<cfset uploadDirectory = expandPath( "./uploads/" ) />

<!---
	Define the uploads URL. This is the externally-accessible URL
	to the uploads directory. When we respond to this web service
	call, we have to return a media URL.
--->
<cfset uploadUrl = (
	"http://" &
	cgi.server_name &
	getDirectoryFromPath( cgi.script_name ) &
	"uploads/"
	) />


<!---
	Wrap a Try/Catch around the processing since we might
	break something and we need to be able to send back a
	failure response.
--->
<cftry>

	<!--- Check to make sure that the request is a POST. --->
	<cfif (cgi.request_method neq "post")>

		<!--- Throw error - we only accept POST. --->
		<cfthrow
			type="InvalidMethod"
			message="Only POST is supported."
			/>

	</cfif>


	<!--- ------------------------------------------------- --->
	<!--- ------------------------------------------------- --->


	<!--- Param the form parameters. --->

	<!---
		This is the form field that contains the image data. This
		image data is coming across in the same way a standard
		File/Upload works.
	--->
	<cfparam name="form.media" type="string" />

	<!---
		This is the twitter message associated with the image being
		uploaded. We will not be making use of it in this demo, but
		you can certainly use it.
	--->
	<cfparam name="form.message" type="string" default="" />


	<!--- ------------------------------------------------- --->
	<!--- ------------------------------------------------- --->


	<!---
		Get the HTTP request header data. We will make repeated use
		of this, so let's just get a short-hand reference to it.
	--->
	<cfset httpHeaders = getHttpRequestData().headers />

	<!---
		Check to make sure that the Twitter client has passed
		along the appropriate headers with the request. We are going
		to be using an "oAuth Echo" approach which means the client
		will be passing us the oAuth information as well as a service
		we need to use to verify the credentials.
	--->
	<cfif !(
		structKeyExists( httpHeaders, "X-Auth-Service-Provider" ) &&
		structKeyExists( httpHeaders, "X-Verify-Credentials-Authorization" )
		)>

		<!--- Throw error - we are missing authorization headers. --->
		<cfthrow
			type="Unauthorized"
			message="oAuth Echo authorization headers were not supplied."
			/>

	</cfif>


	<!--- ------------------------------------------------- --->
	<!--- ------------------------------------------------- --->


	<!---
		Since we have the authorization headers for the oAuth Echo
		approach, let's validate the user's credentials with the
		Twitter service. We are hoping for a 200 response with the
		Twitter USER data.

		NOTE: We are going to assume that this is coming back in JSON
		format. We could check the URL, but we'll just go with it
		for the moment.
	--->
	<cfhttp
		result="oAuthEcho"
		method="get"
		url="#httpHeaders[ 'X-Auth-Service-Provider' ]#">

		<!--- Pass along the oAuth information. --->
		<cfhttpparam
			type="header"
			name="Authorization"
			value="#httpHeaders[ 'X-Verify-Credentials-Authorization' ]#"
			/>

	</cfhttp>

	<!---
		Check to make sure that we got a 200 response. If we didn't,
		then something went wrong - either bad credentials or the
		timestamp of the oAuth signature was no longer valid.
	--->
	<cfif !findNoCase( "200", oAuthEcho.statusCode )>

		<!--- Throw error - Twitter authorization failed. --->
		<cfthrow
			type="Unauthorized"
			message="Twitter authorization failed."
			/>

	</cfif>


	<!--- ------------------------------------------------- --->
	<!--- ------------------------------------------------- --->


	<!---
		Since authorization worked, let's parse the Twitter response.
		It should contain the JSON data for the authorized user.
	--->
	<cfset user = deserializeJSON(
		toString( oAuthEcho.fileContent )
		) />

	<!---
		Twitter may have authorized this user, but let's make sure
		that this user is "internally" authorized to use this image
		upload service. For this demo, only Ben can upload.
	--->
	<cfif (user.screen_name neq "bennadel")>

		<!--- Throw error - user is not internally authorized. --->
		<cfthrow
			type="Unauthorized"
			message="Internal authorization failed."
			/>

	</cfif>


	<!--- ------------------------------------------------- --->
	<!--- ------------------------------------------------- --->


	<!---
		If we've made it this far, then the user is authorized. Let's
		upload the photo. The Image data is posted in the form in the
		"media" form field.
	--->
	<cffile
		result="upload"
		action="upload"
		filefield="media"
		destination="#uploadDirectory#"
		nameconflict="makeunique"
		/>

	<!--- Make sure the file type is acceptable. --->
	<cfif !listFindNoCase( "jpg,gif,png", upload.serverFileExt )>

		<!--- The file is no good, delete it. --->
		<cffile
			action="delete"
			file="#uploadDirectory##upload.serverFile#"
			/>

		<!--- Throw an error - file is not a valid type. --->
		<cfthrow
			type="InvalidFileType"
			message="Only files with JPG, GIF, or PNG extensions are supported."
			/>

	</cfif>


	<!--- ------------------------------------------------- --->
	<!--- ------------------------------------------------- --->

	<!---
		If we've made it this far, then the user has been
		authorized and the image has been SUCCESSFULY uploaded.
		Let's return a success response.

		At this point, you'd probably want to actually store the
		image upload record in a database and return something like
		a Unique ID or short URL to a "view page". But, to keep
		this demo super simple, I am just returning the physical
		image resource url.

		NOTE: The FORM scope also has a "message" field, which is the
		twitter message accompanied with the image. We are not making
		any use of this field at this sime.

		NOTE: Tweetie (Twitter for iPhone) doesn't support the
		MediaID node in our response; but, TwitPic uses it, and
		TwitPic is the API we are supposed to model so I am just
		throwing it in here.
	--->
	<cfsavecontent variable="response">
		<cfoutput>

			<?xml version="1.0" encoding="UTF-8"?>
			<rsp stat="ok">
				<mediaid>#getTickCount()#</mediaid>
				<mediaurl>#uploadUrl##upload.serverFile#</mediaurl>
			</rsp>

		</cfoutput>
	</cfsavecontent>


	<!--- ------------------------------------------------- --->
	<!--- ------------------------------------------------- --->


	<!---
		Catch any raised exceptions. In the above work flow, we have
		been throwing typed-errors. This gives us the ability to
		catch specific errors; but, for this demo, I am only catching
		general errors. If you wanted to add some CFCatch/Type tags,
		you'd be able to better support the TwitPic error response
		specifications for error codes (see "err" XML node below):

		1001 - Invalid twitter username or passwor
		1002 - Image not found
		1003 - Invalid image type
		1004 - Image larger than 4MB

		For now, I'm just returning error "2001" since I am not
		mapping exceptions to valid error types.
	--->
	<cfcatch>

		<!---
			If anything went wrong, try to delete the temporary file
			from the implicit ColdFusion upload directory. This gets
			cleared out periodically, but let's help the cause.

			The file path to the .TMP file is stored in the media
			form field.
		--->
		<cftry>

			<!--- Delete the TMP file from the form post. --->
			<cffile
				action="delete"
				file="#form.media#"
				/>

			<cfcatch>
				<!---
					The temp file could not be deleted. Perhaps it
					has already been (moved and) deleted by a step
					above.
				--->
			</cfcatch>

		</cftry>


		<!---
			Define the error response. Since we are creating XML,
			be sure to escape the dynamic text in case it has any
			non-XML safe characters.
		--->
		<cfsavecontent variable="response">
			<cfoutput>

				<?xml version="1.0" encoding="UTF-8"?>
				<rsp stat="fail">
				<err code="2001" msg="Unknown error - #xmlFormat( cfcatch.message )#" />
				</rsp>

			</cfoutput>
		</cfsavecontent>

	</cfcatch>

</cftry>


<!--- ----------------------------------------------------- --->
<!--- ----------------------------------------------------- --->


<!--- Stream the XML response back to the client. --->
<cfcontent
	type="text/xml"
	variable="#toBinary( toBase64( trim( response ) ) )#"
	/>
Because there are so many dependent steps in this work flow that might break, I am using a CFTry / CFCatch / CFThrow approach (as outlined in my ColdFusion API Presentation). In using this approach, not only can I easily respond to individual exceptions using typed-CFCatch tags, I can also be sure that at every step along the way, all of the previous steps were valid.
To keep this demo as simple as possible, I am returning the physical resource URL of the uploaded image. In reality, you'd probably want to take the uploaded URL, insert it into a database, and create some sort "view" page for said image. Then, you'd probably want to return a short-url to said view page in lieu of returning the actual image URL. But, at that point, we would need to get much more specific in our implementation. This code is meant to be a general approach to handling custom image uploads from Tweetie.
Want to use code from this post? Check out the license.

Reader Comments
Thanks I was looking for something like tweetie, for a project I'm considering for http://redtideflorida.org/page/ where people could upload photos and tweet to help track the oil damage on beaches (and red tide when it comes back) in Florida.
But hey, maybe a little fairy will come, wave her wand and make this service not necessary!
BTW, your code above is freakin beautiful.
@Texxs,
Thanks my man. Good luck with your app - sounds like a very environmentally cool service.