
Generating PDF Signatures With Google Fonts And html2canvas In JavaScript
The other day, someone sent me a PDF to sign. This is the modern-day equivalent of sending someone a Fax. And, it's far more complicated than it needs to be. In a perfect world, all signatures would be gathered online in something like DocuSign. But, not everyone has access to a DocuSign-like service. That said, as I was dealing with this chore, I thought it would be a fun project to create a simple JavaScript site that generates signature images (transparent PNGs) that can then be used to annotate PDFs.
Run this demo in my Signature Generator site on Netlify.
View this code in my Signature Generator project on GitHub.
A few years ago, I came across an awesome JavaScript library by Niklas von Hertzen called html2canvas. This library takes a "screenshot" of your HTML page (or an element within your page) by redrawing the DOM (Document Object Model) state onto an HTML Canvas element. This canvas element can then be flattened into a PNG and subsequently saved using the anchor download attribute. In the past, I've used this library to generate meme images in Angular.
As for the signatures, Google Fonts has a load of "hand written" fonts that kind of look like human signatures. And, a little trial and error proved that the html2canvas library was capable of rendering Google Fonts onto a canvas. Which meant, the only thing left to do was wire it all together!
First, I spent some time combing through the Google Fonts library, looking for font families that would make for decent-enough signatures. I compiled a JavaScript file that contained an array of options:
var fontOptions = [
	{
		href: "https://fonts.googleapis.com/css2?family=Walter+Turncoat&display=swap",
		family: "Walter Turncoat",
		adjustSize: 3
	},
	{
		href: "https://fonts.googleapis.com/css2?family=Patrick+Hand&display=swap",
		family: "Patrick Hand",
		adjustSize: 6
	},
	{
		href: "https://fonts.googleapis.com/css2?family=Long+Cang&display=swap",
		family: "Long Cang",
		adjustSize: 19
	},
	{
		href: "https://fonts.googleapis.com/css2?family=Rock+Salt&display=swap",
		family: "Rock Salt",
		adjustSize: -5
	},
	// .... more fonts ....
];
Notice that each option has an adjustSize property. The visual size of each font family is wildly different. As such, in order to render them at roughly the same size on the screen, I increase or decrease the font-size property by the given number of pixels.
Each of these font options then becomes an example signature in my signature generation app. At first, I thought about using something like Angular or Vue. But, I decided to keep it simple and just use vanilla JavaScript. To that end, each one of these options is used to take a <template> element and "stamp out" a cloned node.
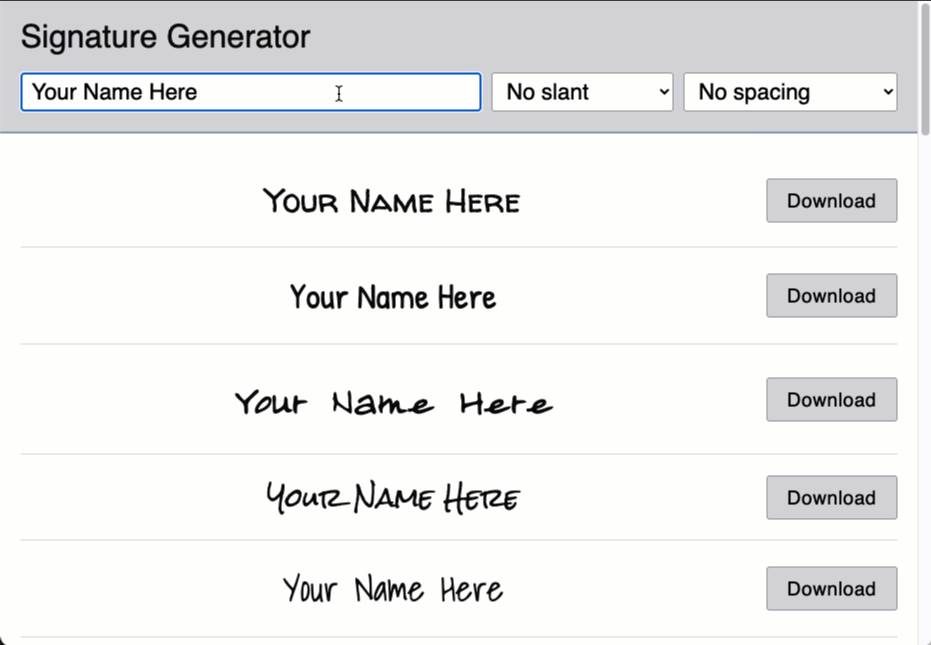
Here's the HTML page for signature generation. It has options for:
- The text of the signature.
- The slant of the signature (ie, CSS
transform: skew()). - The spacing of the signature (ie, CSS
letter-spacing).
The <template> element is then cloned once for each font family and append to the <main> element:
<!doctype html>
<html lang="en">
<head>
	<meta charset="utf-8" />
	<meta name="viewport" content="width=device-width, initial-scale=1" />
	<title>
		Signature Generator
	</title>
	<link rel="preconnect" href="https://fonts.googleapis.com" />
	<link rel="preconnect" href="https://fonts.gstatic.com" crossorigin />
	<link rel="stylesheet" type="text/css" href="./linked/index.css" />
	<link rel="shortcut icon" type="image/png" href="./linked/favicon.png" />
</head>
<body>

	<header class="header">
		<h1 class="header__title">
			Signature Generator
		</h1>

		<form method="get" class="header__form">
			<input
				type="text"
				name="name"
				value="Your Name Here"
				autocomplete="off"
			/>
			<select name="slant">
				<option value="30deg">Most Back</option>
				<option value="20deg">More Back</option>
				<option value="10deg">Back</option>
				<option value="0deg" selected>No slant</option>
				<option value="-10deg">Forward</option>
				<option value="-20deg">More Forward</option>
				<option value="-30deg">Most Forward</option>
			</select>
			<select name="spacing">
				<option value="-2px">Most Condensed</option>
				<option value="-1px">More Condensed</option>
				<option value="-0.5px">Condensed</option>
				<option value="0px" selected>No spacing</option>
				<option value="0.5px">Expanded</option>
				<option value="1px">More Expanded</option>
				<option value="2px">Most Expanded</option>
			</select>
		</form>
	</header>

	<main class="main">
		<!-- To be populated dynamically with fonts, yay! -->
	</main>

	<!-- Each row of our signature options will be stamped-out using this template. -->
	<template>
		<div class="version">
			<div class="version__main">
				<div class="version__signature">
					<!-- To be populated dynamically. -->
				</div>
			</div>
			<div class="version__aside">
				<button class="version__download">
					Download
				</button>
			</div>
		</div>
	</template>

	<footer class="footer">
		<p>
			Created by <a href="https://www.bennadel.com/" target="_blank">Ben Nadel</a>.
			This site is powered by
			<a href="https://fonts.google.com/?category=Handwriting" target="_blank">Google Fonts</a> and
			<a href="https://html2canvas.hertzen.com/" target="_blank">html2canvas</a>.
		</p>
	</footer>

	<!-- Load vendor scripts. -->
	<script type="text/javascript" src="./vendor/umbrellajs-3.3.0.js"></script>
	<script type="text/javascript" src="./vendor/html2canvas-1.4.1.min.js"></script>
	<!-- Load application scripts. -->
	<script type="text/javascript" src="./linked/index-umbrella.js"></script>
	<script type="text/javascript" src="./linked/index-fonts.js"></script>
	<script type="text/javascript" src="./linked/index.js"></script>

</body>
</html>
All of the DOM (Document Model Manipulation) is performed using Umbrella.js. I recently switched from jQuery to Umbrella.js as my DOM helper because it just makes life so much easier in a few KB. Though, if you look at the HTML, you'll see that I also include an index-umbrella.js file to create some jQuery function parity.
That said, the JavaScript for this entire page is shockingly simple. Really, all of the heavy lifting is being performed by the html2canvas API, which is incredibly simple to use. All I'm doing is wiring-up the button clicks.
The font-family property is hard-coded per <template> clone. But, I'm using CSS custom properties to apply the slant and spacing aspects across the entire document. In my CSS, my html block has:
html {
	--letter-spacing: 0px ;
	--skew: 0deg ;
}
Then, my "signature" block consumes those values with the var() syntax:
.version__signature {
	letter-spacing: var( --letter-spacing ) ;
	transform: skew( var( --skew ), 0deg ) ;
}
Then, as the user adjusts the form inputs, all I do is update the --skew" and --letter-spacing properties on the html element. And, kablamo! Everything implicitly updates its own rendering!
Here's my full JavaScript file. In just over 150 lines of code, I have document signature generation:
// CAUTION: Assumes that the "index-fonts.js" file was already loaded and exposed a
// "fontOptions" array of Google Fonts.

// First, let's get the dynamic parts into the document. This way, the rest of our DOM
// queries will be executing in an expected state.
addFontsToDocument();
addSignaturesToDocument();

var root = u( "html" );
var body = u( document.body );
var nameInput = u( "input[ name = 'name' ]" );
var slantInput = u( "select[ name = 'slant' ]" );
var spacingInput = u( "select[ name = 'spacing' ]" );
var nameLabels = body.find( ".version__signature" );
var downloadButtons = body.find( ".version__download" );

nameInput.on( "input", applyFormValues );
slantInput.on( "change", applyFormValues );
spacingInput.on( "change", applyFormValues );
downloadButtons.on( "click", handleDownloadClick );

applyUrlParameters();
applyFormValues();

// ----------------------------------------------------------------------------------- //
// ----------------------------------------------------------------------------------- //

// I add each of the font options as a LINK tag to the document head.
function addFontsToDocument() {

	for ( var font of fontOptions ) {

		u( "<link>" )
			.attr( "rel", "stylesheet" )
			.attr( "href", font.href )
			.appendTo( document.head )
		;

	}

}


// For each of the font options, I clone the template and add it to the document with the
// appropriate font-family and font-size.
function addSignaturesToDocument() {

	var main = u( "main" );
	var template = u( "template" );

	for ( var font of fontOptions ) {

		var fragment = u( template.first().content.cloneNode( true ) );

		fragment.find( ".version__signature" )
			.attr( "title", `Font: ${ font.family }` )
			.css({
				"font-family": font.family,
				"font-size": `${ 30 + font.adjustSize }px`
			})
		;

		// CAUTION: We have to append the fragment to the body as the LAST STEP here
		// otherwise the .find() seems to fail. It looks like appending the template to
		// the body somehow clears the fragment contents.
		fragment.appendTo( main );

	}

}


// I apply the current form values to the document rendering and URL query-string.
function applyFormValues() {

	// Apply the form to the DOM.
	root.css({
		"--skew": slantInput.val(),
		"--letter-spacing": spacingInput.val()
	});
	nameLabels.text( nameInput.val() );

	// Apply the form to the URL (so that a refresh will re-render the same settings).
	var params = new URLSearchParams();
	params.append( nameInput.attr( "name" ), nameInput.val() );
	params.append( slantInput.attr( "name" ), slantInput.val() );
	params.append( spacingInput.attr( "name" ), spacingInput.val() );

	var nextUrl = (
		window.location.origin +
		window.location.pathname + "?" +
		params.toString()
	);

	window.history.replaceState( null, "", nextUrl );

}


// I apply the current URL search parameters to the form values, allowing the URL to be
// used to reflect the current information.
function applyUrlParameters() {

	var params = new URLSearchParams( window.location.search );

	for ( var [ key, value ] of params ) {

		switch ( key.toLowerCase() ) {
			case "name":
				nameInput.val( value );
			break;
			case "slant":
				slantInput.val( value );
			break;
			case "spacing":
				spacingInput.val( value );
			break;
		}

	}

}


// I handle the download button clicks, generating a PNG for the selected signature and
// then prompting the browser to download it.
function handleDownloadClick( event ) {

	var signatureNode = u( event.target )
		.closest( ".version" )
		.find( ".version__signature" )
		.first()
	;
	// We want our canvas to be generated with a transparent background since the
	// resultant image will be pasted into other documents (and will almost certainly
	// overlap with other document elements).
	var renderOptions = {
		backgroundColor: null,
		logging: false
	};

	html2canvas( signatureNode, renderOptions ).then(
		( canvas ) => {

			// Once the canvas object has been generated, we want to set it as the target
			// of a transient anchor tag and then simulate a user-click. By including the
			// "download" attribute, this should force the browser to save it rather than
			// forwarding the user to the signature.
			var autoDownload = u( "<a>" )
				.attr( "href", canvas.toDataURL() )
				.attr( "download", "signature.png" )
				.appendTo( body )
			;
			autoDownload.first().click();
			autoDownload.remove();

		}
	);

}
It's kind of crazy how simple the handleDownloadClick() function is! Generating the PNG and then prompting the browser to download it is like 6 lines of code! Amazing!
With that said, if we now run this page and enter a name in the input, we get the following output:
Now, getting this document signature image into an actual PDF is still more complicated than it has to be. In the demo video, I show how you can do it using Mac's Preview app.
This was a lot of fun to build! I sorely missed having Less CSS in this demo - hand-writing BEM (Block Element Modifier) syntax and nested selectors feels so anachronistic. But, at least I was able to build this JavaScript demo without any npm installs or compilation steps.
Want to use code from this post? Check out the license.

Reader Comments
If you notice in my JavaScript code, I have this comment and line:
It turns out, that's exactly how document fragments work. It's been so long since I've worked with fragments directly (using mostly Angular and AngularJS these days), I simply wasn't thinking right about it. I wrote up a clear demo of this behavior here:
www.bennadel.com/blog/4263-caveat-when-using-umbrella-js-with-template-elements-in-javascript.htm
Hopefully now I'll never forget.