
Using A "Drag Shield" To Block Mouse Events During A Drag-And-Drop Workflow In Angular 7.1.2
The other day, I ran into an issue within a drag-n-drop feature in an Angular 1.6 application in which the drag action kept interacting with other parts of the page. Meaning, as I dragged the selected element around, my mouse - depending on relative CSS stacking index and how fast I dragged - kept trigging hover and mouseover events in other parts of the page. To prevent these unwanted interactions, I ended up using what I'm calling a "drag shield". This was a fixed-position DIV element that I laid over the entire viewport so that my mouse couldn't trigger mouse events on lower levels of the Document Object Model (DOM) tree. This isn't the right approach for every drag-based workflow; but, I thought it was useful enough to share as a potential solution. As such, I put together a little draggable demo in Angular 7.1.2.
Run this demo in my JavaScript Demos project on GitHub.
View this code in my JavaScript Demos project on GitHub.
The idea behind this approach is rather simple: When a user starts to drag an element of the User Interface (UI) around, I have the application render a full-viewport DIV element that stacks above the rest of the UI elements. This way, as the user mouses around in the viewport, this "shield" element captures all of the mouse events, thereby shielding the rest of the DOM tree. Of course, the application can still listen for mousemove and mouseup events on the Window or Document; so, we can still calculate drag updates even with the "drag shield" overlay in place.
This drag shield element is super simple. It's just a fixed-position element that covers the entire viewport:
.drag-shield {
	bottom: 0px ;
	left: 0px ;
	position: fixed ;
	right: 0px ;
	top: 0px ;
	z-index: 2 ; /* Or whatever your application requires to be on TOP. */
}
And, on the Angular side, all I need is some sort of "drag start" and "drag end" events that allow me to show and hide the drag shield, respectively:
<my-app>
	<!-- .... rest of Angular app .... -->

	<div *ngIf="isProtectingDragAction" class="drag-shield">
		<!-- This layer acts as an "event sink" for the mouse. -->
	</div>
</my-app>
To see this in action, I've put together a drag demo in which the draggable items emit (dragStart) and (dragEnd) events. I then hook into these events in order to tell the application to update the class property that drives the ngIf for the drag shield. In the following code, I have three key elements:
- The draggable UI.
- A toggle that determine whether or not the drag shield should be used.
- The drag shield.
I added the toggle so that you can see how this Angular application behaves both with and without the drag shield. Here's the code (note that my drag shield is a bit more complicated than the snippet above so as to be more visible to the user of the demo):
// Import the core angular services.
import { Component } from "@angular/core";

// ----------------------------------------------------------------------------------- //
// ----------------------------------------------------------------------------------- //

interface Item {
	id: number;
	label: string;
	position: {
		left: number;
		top: number;
	}
}

@Component({
	selector: "my-app",
	styleUrls: [ "./app.component.less" ],
	template:
	`
		<p>
			You can click and drag the following things around:
		</p>

		<my-draggable>
			<my-draggable-item
				*ngFor="let item of items"
				[left]="item.position.left"
				[top]="item.position.top"
				(dragStart)="enableDragProtection()"
				(dragEnd)="disableDragProtection()"
				(move)="updateItemPosition( item, $event.left, $event.top )">

				<div class="item">
					{{ item.label }}
				</div>

			</my-draggable-item>
		</my-draggable>

		<label class="toggle">
			<input
				#toggle
				type="checkbox"
				checked
				(click)="handleShieldToggle( toggle.checked )"
			/>
			Use drag-shield while dragging.
		</label>

		<div
			*ngIf="( isProtectingDragAction && isUsingShieldInDemo )"
			class="drag-shield">
			<span class="drag-shield__message">
				I am here to prevent mouse-events from hitting lower-level DOM elements.
			</span>
		</div>
	`
})
export class AppComponent {

	public isProtectingDragAction: boolean;
	public isUsingShieldInDemo: boolean;
	public items: Item[];

	// I initialize the app component.
	constructor() {

		this.isProtectingDragAction = false;
		this.isUsingShieldInDemo = true;
		this.items = this.generateItems( 30, 500, 500 );

	}

	// ---
	// PUBLIC METHODS.
	// ---

	// I disable the drag-shield protection (ie, I hide the drag-shield).
	public disableDragProtection() : void {

		this.isProtectingDragAction = false;

	}


	// I enable the drag-shield protection (ie, I show the drag-shield).
	public enableDragProtection() : void {

		this.isProtectingDragAction = true;

	}


	// I handle changes to the shield toggle. This determine whether or not we are using
	// the drag-shield at all (regardless of whether or not drag-protection is enabled).
	// This way, you can compare the drag behavior with and without the drag-shield.
	public handleShieldToggle( isUsingShieldInDemo: boolean ) : void {

		this.isUsingShieldInDemo = isUsingShieldInDemo;

	}


	// I update the position of the given item.
	public updateItemPosition( item: Item, newLeft: number, newTop: number ) : void {

		item.position.left = this.constrain( newLeft, -25, 575 );
		item.position.top = this.constrain( newTop, -25, 475 );

	}

	// ---
	// PRIVATE METHODS.
	// ---

	// I constrain the given number to the given min/max span.
	private constrain( value: number, min: number, max: number ) : number {

		return( Math.max( Math.min( value, max ), min ) );

	}


	// I generate a set of items that are randomly positioned.
	private generateItems( count: number, maxLeft: number, maxTop: number ) : Item[] {

		var items: Item[] = [];

		for ( var i = 0 ; i < count ; i++ ) {

			items.push({
				id: i,
				label: i.toString(),
				position: {
					left: Math.floor( Math.random() * maxLeft ),
					top: Math.floor( Math.random() * maxTop )
				}
			});

		}

		return( items );

	}

}
As you can see, the (dragStart) and the (dragEnd) events are used to call the public methods, enableDragProtection() and disableDragProtection() respectively. These methods show and hide the drag shield. So, if we render this Angular application in the browser and start to drag a draggable element around, we can see the drag shield in action:
NOTE: My mouse cursor doesn't get captured in screenshots; so, I've replaced my mouse cursor with a pink circle in the following image.
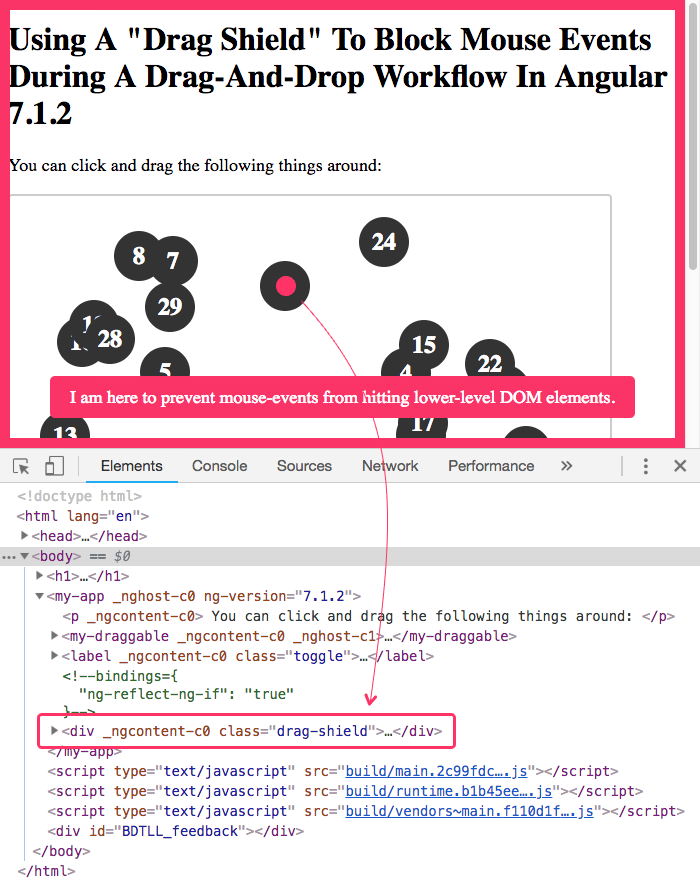
As you can see, when the user starts to drag the draggable item around, the application reacts to the (dragStart) event and renders the drag shield above all of the other elements. This prevents the mouse from reaching into the lower-level DOM elements, thereby removing the chance for accidental mouse interactions. Of course, the draggable UI is still listening for mousemove events on the window, so the drag interaction continues to work.
The point of this demo was to showcase the concept of the drag shield - it wasn't to dive into the implementation detail of draggable mechanics. But, in case you are curious, here's the code for my draggable widgetry. I coded this up for the demo specifically; so, this kind of draggable implementation is definitely not battle-tested or even necessarily recommended. It's literally the least I could do to get the demo working.
// Import the core angular services.
import { Component } from "@angular/core";
import { ElementRef } from "@angular/core";
import { EventEmitter } from "@angular/core";
import { OnDestroy } from "@angular/core";
import { OnInit } from "@angular/core";

// ----------------------------------------------------------------------------------- //
// ----------------------------------------------------------------------------------- //

@Component({
	selector: "my-draggable",
	styleUrls: [ "./draggable.component.less" ],
	template:
	`
		<ng-content></ng-content>
	`
})
export class DraggableComponent {
	// ...
}

// ----------------------------------------------------------------------------------- //
// ----------------------------------------------------------------------------------- //

export interface MoveEvent extends Position {
	// ...
}

interface Position {
	left: number;
	top: number;
}

@Component({
	selector: "my-draggable-item",
	inputs: [
		"left",
		"top"
	],
	outputs: [
		"dragEndEvents: dragEnd",
		"dragStartEvents: dragStart",
		"moveEvents: move"
	],
	host: {
		"[style.left.px]": "left",
		"[style.top.px]": "top"
	},
	styleUrls: [ "./draggable-item.component.less" ],
	template:
	`
		<ng-content></ng-content>
	`
})
export class DraggableItemComponent implements OnInit, OnDestroy {

	public left!: number; // NOTE: Using "Definite Assignment Assertion".
	public top!: number; // NOTE: Using "Definite Assignment Assertion".

	public dragEndEvents: EventEmitter<void>;
	public dragStartEvents: EventEmitter<void>;
	public moveEvents: EventEmitter<MoveEvent>;

	private element: Element;
	private mousePosition: Position;
	private originalPosition: Position;

	// I initialize the draggable item component.
	constructor( elementRef: ElementRef ) {

		this.element = elementRef.nativeElement;

		this.dragEndEvents = new EventEmitter();
		this.dragStartEvents = new EventEmitter();
		this.moveEvents = new EventEmitter();

		this.mousePosition = {
			left: 0,
			top: 0
		};

		this.originalPosition = {
			left: 0,
			top: 0
		}

	}

	// ---
	// PUBLIC METHODS.
	// ---

	// I get called once when the component is being unmounted.
	public ngOnDestroy() : void {

		// Clean-up event handlers that we attached to the DOM.
		this.element.removeEventListener( "mousedown", this.handleMousedown, false );
		window.removeEventListener( "mousemove", this.handleMousemove, false );
		window.removeEventListener( "mouseup", this.handleMouseup, false );

	}


	// I get called once after the inputs have been checked for the first time.
	public ngOnInit() : void {

		if ( this.left === undefined ) {

			throw( new Error( "Required input [left] not provided." ) );

		}

		if ( this.top === undefined ) {

			throw( new Error( "Required input [top] not provided." ) );

		}

		this.element.addEventListener( "mousedown", this.handleMousedown, false );

	}

	// ---
	// PRIVATE METHODS.
	// ---

	// I handle mousedown events on the element.
	private handleMousedown = ( event: MouseEvent ) : void => {

		// I in order to prevent Selection of text and other elements during the drag
		// operation, let's kill the default behavior of the mousedown event.
		event.preventDefault();

		// Record the position of the initial mousedown. This will help us figure out how
		// far the mouse moves in each subsequent mousemove event.
		this.mousePosition.left = event.clientX;
		this.mousePosition.top = event.clientY;

		// Record the current position of the item at the start of the drag workflow.
		// This will help us figure out how to emit move events with the suggested new
		// position. Each move event will be an absolute change (not a delta change).
		this.originalPosition.left = this.left;
		this.originalPosition.top = this.top;

		// Once an element has been selected for drag, we have to start paying attention
		// to the mousemove and mouseup events so that we know how to emit move events.
		// We are tracking this on the WINDOW, not on the draggable item (or draggable
		// container), since we want to be able to respond to the user no matter where
		// the user places their cursor.
		window.addEventListener( "mousemove", this.handleMousemove, false );
		window.addEventListener( "mouseup", this.handleMouseup, false );

		this.dragStartEvents.emit();

	}


	// I handle mousemove events on the window.
	private handleMousemove = ( event: MouseEvent ) : void => {

		// Determine the distance the mouse has moved since the last mouse event.
		var deltaLeft = ( event.clientX - this.mousePosition.left );
		var deltaTop = ( event.clientY - this.mousePosition.top );

		// The move event will contain the suggested new location of the item. Notice
		// that this emitted position is relative to the original location of the item
		// as the start of the drag workflow. This is what allows us to emit an absolute
		// change, not a relative change.
		this.moveEvents.emit({
			left: ( this.originalPosition.left + deltaLeft ),
			top: ( this.originalPosition.top + deltaTop )
		});

	}


	// I handle mouseup events on the window.
	private handleMouseup = ( event: MouseEvent ) : void => {

		window.removeEventListener( "mousemove", this.handleMousemove, false );
		window.removeEventListener( "mouseup", this.handleMouseup, false );

		this.dragEndEvents.emit();

	}

}
As you can see, the draggable-item component accepts two inputs for position and exposes three outputs for drag events. It's these drag events that ultimately power the drag shield.
I won't go into too much detail about how the dragging works, other than to say that I had a lot of fun coding it up. I just love how easy Angular makes it to define input, output, and host bindings in the component meta-data. Honestly, I find much Angular just a a joy to work with, especially the template syntax.
Again, this is not intended to be the right solution for all drag-based workflows. But, for my particular use-case, rendering a drag shield during the drag event was simple and perfectly effective. And, it removed the need for me to have to worry about undesirable mouse interactions with the rest of the page.
Want to use code from this post? Check out the license.

Reader Comments