From Noob To Docker On DigitalOcean With Nginx, Node.js, DataDog Logs, DogStatsD, And LetsEncrypt SSL Certificates
Historically, when I've deployed code to the internet, it's either been a ColdFusion website running in managed hosting; or, it's been a static file that I've deployed to GitHub Pages. This is really all that I know how to do. And, this dearth of knowledge has started to hinder my creative outlet. As such, I decided that it was time for me to sit down and actively learn about Docker and about deploying containerized services to a production machine. So, for the last week-and-a-half, I've done nothing else (outside of work) other than try to get a non-trivial "hello world" application running in a set of containers in a production host (DigitalOcean in this case). And, I'd like to share what I've done so that I might be able to give others a bit of a running start.
DISCLAIMER: Before we go into the details, I must disclose that I have no idea what I'm doing! Two weeks ago, none of this made any sense to me. So, please don't be deluded into thinking that I have any authority to talk about Docker or containerization. This is simply what I was able to piece together thanks to the articles written by many other much more experienced developers.
That said, what I ultimately built was a Node.js application being load-balanced by an nginx server on a single host machine:
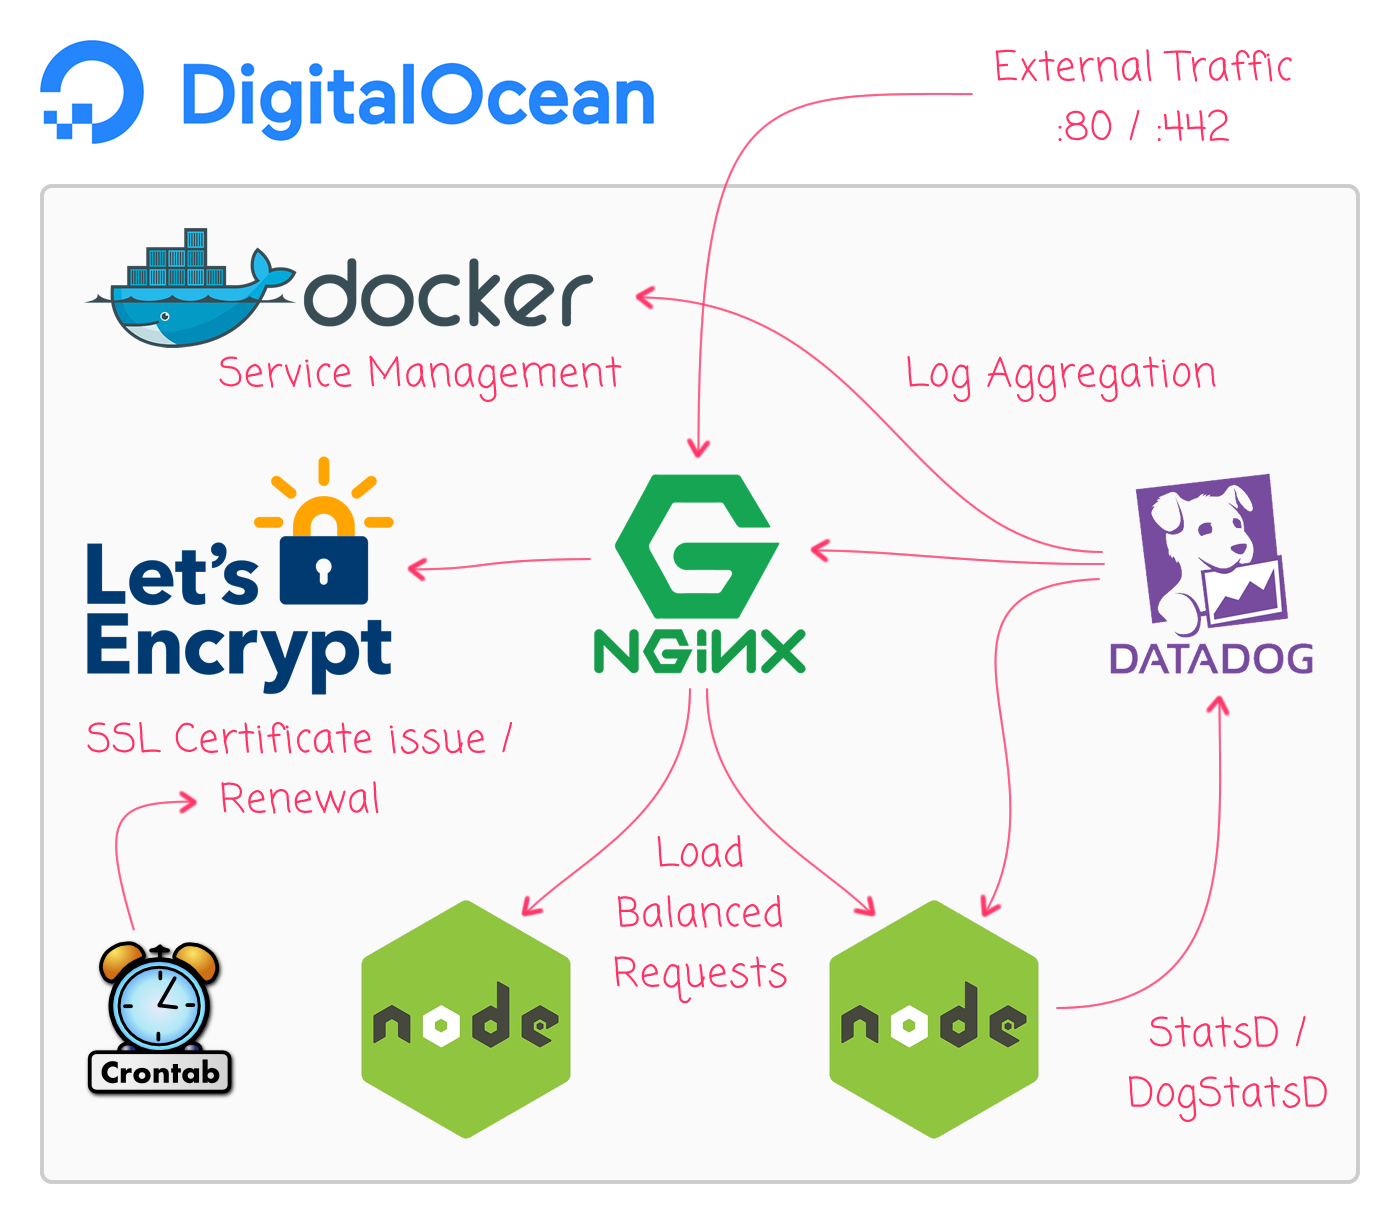
Locally, I only run Nginx and Node.js over port 80. But, in production, I am also running the LetsEncrypt certbot container for SSL certificates so that I may run production over HTTPS / port 443. The production deployment also has the DataDogHQ dd-agent container for log aggregation and DogStatsD / StatsD metrics collection.
Getting This Running In Local Development
First, let's look at getting this running in the local development environment. Since we use Docker at work, I already had Docker For Mac (Docker Community Edition, Version 17.12.0-ce-mac55) installed on my local computer. As such, I didn't have to install anything to get this up an running. But, you may need to install Docker in order to get the "docker" and "docker-compose" command-line tools.
The details of the Node.js application aren't super important since they pertain to my site-idea specifically. But, for the time-being, it's just a single index.js file that creates an Express.js server and mounts a single route:
// Require core modules.
var express = require( "express" );
var DogStatsD = require( "hot-shots" );
var os = require( "os" );
var path = require( "path" );

// ----------------------------------------------------------------------------------- //
// ----------------------------------------------------------------------------------- //

// Create our DogStatsD client.
var statsd = new DogStatsD({
	host: process.env.DOGSTATSD_HOST,
	port: process.env.DOGSTATSD_PORT,
	errorHandler: function ( error ) {

		console.log(
			JSON.stringify({
				log_level: "error",
				error: error
			})
		);

	}
});

var app = express();

// Route all calls to "/assets" to the in-built static-file module.
app.use(
	"/assets",
	express.static( path.join( __dirname, "assets" ) )
);

// Define our hello-world route.
app.all(
	"/",
	function ( request, response, next ) {

		statsd.increment( "page_request" );

		console.log(
			JSON.stringify({
				log_level: "trace",
				message: `Handling request on web host ${ os.hostname() }.`
			})
		);

		response.sendFile(
			( __dirname + "/index.htm" ),
			{
				headers: {
					"X-Host-Name": os.hostname()
				}
			}
		);

	}
);

var port = ( process.env.PORT || 8080 );

// Wire the Expression application to an exposed port so that it can start
// receiving traffic.
app.listen(
	port,
	function () {

		console.log( "Express server has bootstrapped on port:", port );

	}
);
Notice that the Express.js server instantiates a DogStatsD client using the following settings:
- process.env.DOGSTATSD_HOST
- process.env.DOGSTATSD_PORT
Locally, we don't have the DataDogHQ agent running, so we'll create a "mock" StatsD server for development. But, more on that later. First, let's look at how we can create a container for our Node.js application. I created a Dockerfile that provides instructions on how to build the image for this service:
FROM node:9.7.0-alpine

#
# This label becomes available as meta-data on the running container. We can
# then use this label in the DataDogHQ log aggregation configuration to define
# which Docker services the DataDog agent should watch for logs.
#
LABEL me.dailyprime.service="web"

WORKDIR /var/www/dailyprime.me

#
# Copy over the node installation files and install the modules.
# --
# NOTE: Since we are not mounting the node_modules folder, you have to run
# "npm install" from within the container.
#
COPY ./package.json ./package-lock.json ./
RUN npm install

COPY ./ ./

#
# It is apparently best practice to not run the docker container as root.
# However, if I run it as "node", then I can't figure out how to bash-in and
# augment the node_modules (was getting a permission denied). The "sudo"
# command didn't seem to exist. So, I'm commenting this directive out while
# I actively develop the container. Then, when I'm ready to build it for
# deployment, I put it back in place.
# --
# NOTE: The node-alpine image comes pre-installed with the "node" user.
#
USER node

CMD [ "node", "./wwwroot/index.js" ]
For this service, I'm using the base image provided by the Node.js organization. And, as the process command, I'm just using "node" to bootstrap the Express.js server. This is fine in production, but makes for poor development ergonomics. As such, we'll override this command later in our docker-compose file so that we can make local code changes and have them picked up immediately.
ASIDE: I'm running the node command using the "node" user that is provided by the base node.js image. According to John Lees-Miller, this is good for security. But, in talking to some other people, they don't believe that such measures are really necessary anymore with the latest Docker releases.
When I build the image for this service, I'm running "npm install" as part of the build process. As such, I don't want to copy my "node_modules" folder into the container while it's building. To prevent the "COPY ./ ./" directive from doing just that, I created a .dockerignore file to omit certain files from being copied into the resultant image:
.*
Dockerfile
node_modules
Ok, so far, our local directory structure looks like this:
dailyprime.me
-- web
-- -- node_modules (empty)
-- -- wwwroot
-- -- -- assets (static files)
-- -- -- index.js
-- -- .dockerignore
-- -- Dockerfile
-- -- package.json
NOTE: I actually have a "package-lock.json" as well; but, that gets created by the "npm install" command.
The node_modules folder is empty because it is being mounted as a shared volume in our docker-compose.yml file, which we'll see later. But, for now, just understand that we don't want to mount the node_modules folder as a simple host binding otherwise it will end up overwriting the node_modules folder that was installed during the build process.
Now, let's look at our mock StatsD server. Since I don't have the DataDogHQ agent running locally, I need something to receive packets over UDP. For this, I literally copy-pasted the UDP server demo from the Node.js documentation:
const dgram = require('dgram');
const server = dgram.createSocket('udp4');

server.on('error', (err) => {
console.log(`Server error:\n${err.stack}`);
server.close();
});

server.on('message', (msg, rinfo) => {
console.log(`Server got: ${msg} from ${rinfo.address}:${rinfo.port}`);
});

server.on('listening', () => {
const address = server.address();
console.log(`Server listening ${address.address}:${address.port}`);
});

server.bind(8125);
As you can see, all this server does is listen for messages over port 8125 and then logs them to the standard-out, where I can see them with a "docker-compose logs -f" command.
I then created a Dockerfile to build this mock server on top of the base node.js image:
FROM node:9.7.0-alpine
WORKDIR /var/www/statsd
COPY ./index.js ./
CMD [ "node", "./index.js" ]
Ok, so far, our local directory structure looks like this:
dailyprime.me
-- statsd-mock
-- -- Dockerfile
-- -- index.js
-- web
-- -- node_modules (empty)
-- -- wwwroot
-- -- -- assets (static files)
-- -- -- index.js
-- -- .dockerignore
-- -- Dockerfile
-- -- package.json
Next, let's get the nginx proxy up and running. In the local development environment, I'm just listening on "localhost", port 80. To configure this, I created a default.conf configuration file that we'll copy into the nginx machine during the build process:
upstream web_containers {
	server web_1:8080;
	server web_2:8080;
}

server {
	listen 80;
	server_name localhost;

	location / {
		proxy_pass http://web_containers;
		proxy_set_header Host $host;
		proxy_set_header Referer $http_referer;
		proxy_set_header X-Real-IP $remote_addr;
		proxy_set_header X-Forwarded-For $proxy_add_x_forwarded_for;
		proxy_set_header X-Forwarded-Host $server_name;
		proxy_set_header X-Forwarded-Proto $scheme;
	}
}
As you can see, this nginx configuration directs all traffic on port 80 to the upstream servers on port 8080. In this case, I am providing two upstream servers (two instances of our Node.js server). And, by default, nginx will use a round-robin algorithm to distribute requests to the two servers.
The name of the upstream servers - web_1 and web_2 - are based on the container name in our local user-defined network, which is controlled by our docker-compose.yml file, which we'll see shortly. But first, let's look at the Dockerfile that builds our nginx image:
FROM nginx:1.13.9-alpine

#
# This defines the site configuration for the local-development nginx.
#
COPY ./default.conf /etc/nginx/conf.d/
Just like node.js, the nginx organization provides a base image on which to build nginx servers. In this case, I'm just using the base image and copying over the aforementioned default.conf file.
Ok, so far, our local directory structure looks like this:
dailyprime.me
-- proxy
-- -- default.conf
-- -- Dockerfile
-- statsd-mock
-- -- Dockerfile
-- -- index.js
-- web
-- -- node_modules (empty)
-- -- wwwroot
-- -- -- assets (static files)
-- -- -- index.js
-- -- .dockerignore
-- -- Dockerfile
-- -- package.json
Now that we have our local node.js server, our mock StatsD server, and our nginx proxy server defined, let's finally look at the local docker-compose.yml file. The docker-compose.yml file is used by the docker-compose command-line executable to manage the running Docker containers and the local network:
version: "3"
services:
web:
build: ./web/.
container_name: web
command: npm run dev
restart: unless-stopped
networks:
dailyprime-net:
# When running locally, the nginx proxy is expecting two upstream servers to be
# available. However, locally, I don't need high-availability. As such, I'm going
# to create one instance of "web" and just give it the two aliases that are being
# used in the nginx proxy-pass definition.
aliases:
- web_1
- web_2
environment:
DOGSTATSD_HOST: dd_agent
DOGSTATSD_PORT: 8125
NODE_ENV: development
PORT: 8080
volumes:
- ./web:/var/www/dailyprime.me
- /var/www/dailyprime.me/node_modules
links:
- dd_agent

proxy:
build: ./proxy/.
container_name: proxy
restart: unless-stopped
networks:
- dailyprime-net
ports:
- 80:80
links:
- web

dd_agent:
build: ./statsd-mock/.
container_name: dd_agent
restart: unless-stopped
networks:
- dailyprime-net

networks:
dailyprime-net:
driver: bridge
This docker-compose.yml file defines a user-defined network, "dailyprime-net". You can see that each of the services is bound to that user-defined network. This is an important detail because all ports on all containers within the user-defined network are implicitly exposed internally. This is why I don't have to explicitly expose any ports on any of the services, other than nginx, which needs to communicate with the outside world over port 80 on the host computer. Port 8125 is implicitly exposed on the mock StatsD server. Port 8080 is implicitly exposed on the node.js web server.
By default, the services don't know about each other. But, by adding a "links" declaration, we can control which services can reference which other services; and, the order in which the services are bootstrapped. For example, the "web" service can send UDP traffic to the mock StatsD service because the "web" service has a "links" entry for "dd_agent" (which is the container name for our running "statsd-mock" image).
Now, in production, I want two node.js servers running and being load-balanced by nginx. But locally, I don't really need this. But, I do need to have two upstream servers defined for the nginx configuration file. As such, I'm defining two aliases for the local "web" service, "web_1" and "web_2". These are the server-names used in the nginx configuration file. This allows nginx to perform the load-balancing. But, ultimately, all requests are going to the same, underlying node.js instance.
NOTE: It would probably make more sense to just have two node.js servers running locally since they are so light-weight. But, I took this approach so that I could learn more about Docker configuration.
Under the "web" service, notice that I have an anonymous volume mount for my node_modules folder:
- /var/www/dailyprime.me/node_modules
I don't fully understand what this is doing; but, apparently this is telling Docker to bind this directory to a host volume that is managed by Docker itself. By doing this, we prevent the "COPY ./ ./" directive in the web's Dockerfile from overwriting the node_modules folder inside the container.
The other thing to notice in the "web" configuration is that we are overwriting "command" script. Internally, the web container is using "node" as the command. But, if we spin it up using this docker-compose.yml file, we'll start the Docker process using the npm run script, "npm run dev", which is actually using nodemon under the hood:
"nodemon -L --watch ./wwwroot ./wwwroot/index.js"
With this docker-compose.yml file in place, we can now run the following command to bring the network online locally:
docker-compose up -d
This will make the nginx server available on "127.0.0.1", which will proxy traffic to our node.js server.
Ultimately, our local directory structure looks like this:
dailyprime.me
-- proxy
-- -- default.conf
-- -- Dockerfile
-- statsd-mock
-- -- Dockerfile
-- -- index.js
-- web
-- -- node_modules (empty)
-- -- wwwroot
-- -- -- assets (static files)
-- -- -- index.js
-- -- .dockerignore
-- -- Dockerfile
-- -- package.json
-- docker-compose.yml
Getting This Running In Production
Once I had my "hello world" app running locally with Docker and docker-compose, it was time to figure out how to get this stuff into production. So, to start, I logged into DigitalOcean and selected the "Docker" installation under their "One-click apps":
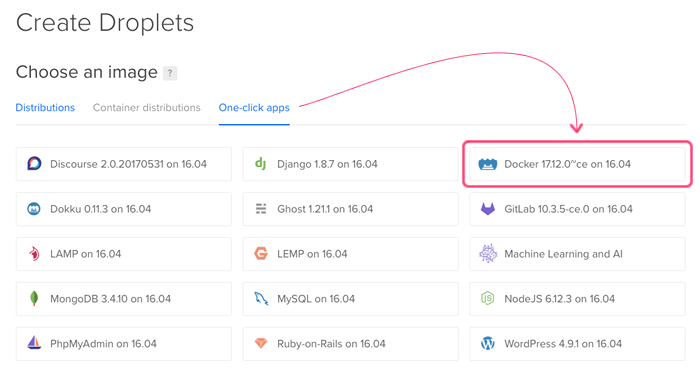
At this point, I was given a machine with Docker and docker-compose pre-installed. But, of course, none of my code what there. So, in order to get my local docker images up to this production machine, I signed up for an account on https://hub.docker.com. The Docker Hub is a repository for docker images that I can push-to locally and then pull-from in production.
Now, I needed to push my local images to Docker Hub. To do this, I logged into docker locally (ie, I authenticated against Docker Hub using the local docker command-line executable); and then, built and pushed each container:
cd ./web
docker build -t dailyprime/web:latest .
docker push dailyprime/web:latest
cd ../proxy
docker build -t dailyprime/proxy:latest .
docker push dailyprime/proxy:latest
This builds and tags the images for the web service and the proxy service. That "tag" is important because this is how we identify which images to pull-down to the DigitalOcean Docker host machine. For now, while I'm learning about Docker, I'm just using the ":latest" tag for everything since I don't have a goog sense for a long-term tagging schema.
At this point, I did a lot of stumbling. The "web" service is environment-agnostic; but, nothing else really is. For example, my local nginx "proxy" service runs over port 80, not 443. As such, this isn't the version of the nginx server that I was to push to production. Instead, I had to create another version of the "proxy" service specifically for production, "proxy-prod".
I know that a lage value-add for Docker is that your local development environment can match your production environment as much as possible. But, as someone who is new to this, I couldn't quite figure out how to do that. So, I created a folder, "proxy-prod", and defined another Dockerfile:
FROM nginx:1.13.9-alpine

#
# This label becomes available as meta-data on the running container. We can
# then use this label in the DataDogHQ log aggregation configuration to define
# which Docker services the DataDog agent should watch for logs.
#
LABEL me.dailyprime.service="proxy"

#
# The dhparams.pem file defines how OpenSSL performs the Diffie-Hellman (DH)
# key-exchange. I generated this file locally using:
# ---
# openssl dhparam -out dhparam.pem 4096
# ---
#
COPY ./dhparams.pem /etc/ssl/private/

#
# This defines the site configuration for the production nginx.
#
COPY ./default.conf /etc/nginx/conf.d/
I then created a default.conf nginx file that would listen on port 443:
upstream web_containers {
	server web_1:8080;
	server web_2:8080;
}

server {
	listen 80;
	server_name localhost;

	#
	# This is the folder that is being used for the LetsEncrypt webroot
	# plug-in-based authentication challenge. The LetsEncrypt certbot will
	# store files in this directory, which will then be requested over :80
	# by the LetsEncrypt authority.
	#
	location /.well-known/acme-challenge {
		root /tmp/letsencrypt/www;
	}

	location / {
		proxy_pass http://web_containers;
		proxy_set_header Host $host;
		proxy_set_header Referer $http_referer;
		proxy_set_header X-Real-IP $remote_addr;
		proxy_set_header X-Forwarded-For $proxy_add_x_forwarded_for;
		proxy_set_header X-Forwarded-Host $server_name;
		proxy_set_header X-Forwarded-Proto $scheme;
	}
}

server {
	listen 443;
	server_name localhost;

	ssl on;

	#
	# These two files will be generated by the LetsEncrypt certbot and be
	# placed on the HOST machine. We can then pull them in through the host
	# volume mounting.
	#
	ssl_certificate /etc/letsencrypt/live/dailyprime.me/fullchain.pem;
	ssl_certificate_key /etc/letsencrypt/live/dailyprime.me/privkey.pem;

	ssl_session_timeout 5m;
	ssl_protocols TLSv1 TLSv1.1 TLSv1.2;
	ssl_ciphers 'EECDH+AESGCM:EDH+AESGCM:AES256+EECDH:AES256+EDH';
	ssl_prefer_server_ciphers on;

	ssl_session_cache shared:SSL:10m;
	ssl_dhparam /etc/ssl/private/dhparams.pem;

	location / {
		proxy_pass http://web_containers;
		proxy_set_header Host $host;
		proxy_set_header Referer $http_referer;
		proxy_set_header X-Real-IP $remote_addr;
		proxy_set_header X-Forwarded-For $proxy_add_x_forwarded_for;
		proxy_set_header X-Forwarded-Host $server_name;
		proxy_set_header X-Forwarded-Proto $scheme;
	}
}
This configuration file is much more complicated than the one running locally. And, it contains file references that don't exist yet. As it turns out, this is the trickiest part of provisioning an SSL certificate using LetEncrypt. You sort of run into a Catch-22: In order prove that you own the domain, you have to setup an nginx server on port 80. However, you can boot the nginx server if you're trying to reference PEM files that don't exist yet.
To get this to work, I had to run through a whole dog-and-pony show. What I actually ended up doing was pulling down the local development "proxy" image to production while I authenticated against LetsEncrypt. Then, once the SSL certificate had been provisioned, I switched over to using the production "proxy" image.
Honestly, it was a frustrating hassle. I am not sure how to really do this in a cleaner way. And, many of the other tutorials that I looked at did something similar (essentially spinnin-up an 80-only server, performing the authentication, and the adding the 443 binding later).
Once I had this proxy-prod service defined, I built it, tagged it, and pushed it to Docker Hub:
cd ./proxy-prod
docker build -t dailyprime/proxy-prod:latest .
docker push dailyprime/proxy-prod:latest
Now that I had three images up on Docker Hub, I needed to pull them down to my DigitalOcean Docker host machine. To do this, I SSH'd into the DigitalOcean droplet and created a new docker-compose.yml file:
version: "3"

services:
web_1:
image: dailyprime/web:latest
container_name: web_1
restart: unless-stopped
networks:
- dailyprime-net
environment:
DOGSTATSD_HOST: dd_agent
DOGSTATSD_PORT: 8125
NODE_ENV: production
PORT: 8080
links:
- dd_agent

web_2:
image: dailyprime/web:latest
container_name: web_2
restart: unless-stopped
networks:
- dailyprime-net
environment:
DOGSTATSD_HOST: dd_agent
DOGSTATSD_PORT: 8125
NODE_ENV: production
PORT: 8080
links:
- dd_agent

proxy:
image: dailyprime/proxy-prod:latest
container_name: proxy
restart: unless-stopped
networks:
- dailyprime-net
ports:
- "80:80"
- "443:443"
volumes:
- /etc/letsencrypt:/etc/letsencrypt
- /tmp/letsencrypt/www:/tmp/letsencrypt/www
links:
- web_1
- web_2

dd_agent:
image: datadog/agent:latest
container_name: dd_agent
networks:
- dailyprime-net
environment:
DD_API_KEY: _____REPLACE_WITH_YOUR_DATADOG_KEY_____
DD_DOGSTATSD_NON_LOCAL_TRAFFIC: "true"
DD_LOGS_ENABLED: "true"
volumes:
- /opt/datadog-agent/conf.d:/conf.d:ro
- /opt/datadog-agent/run:/opt/datadog-agent/run:rw
- /proc/:/host/proc/:ro
- /sys/fs/cgroup/:/host/sys/fs/cgroup:ro
- /var/run/docker.sock:/var/run/docker.sock:ro

networks:
dailyprime-net:
driver: bridge
In local development, I was creating a single node.js service and then providing two aliases for it, "web_1" and "web_2". In production, I want to actually create two instances and have nginx load-balance between the two. Now, docker-compose has a way to scale images; and, I could have used a command like:
docker-compose up -d --scale web=2
The problem with this is that the names of the resultant "web" containers are dynamic. Locally, it creates two contains based on the current working directory and the service:
- dailyprimeme_web_1
- dailyprimeme_web_2
But, in production, I'm not in a directory called "dailyprime.me", I'm in a directory called "root". As such, this becomes janky. Furthermore, I read in a GitHub Issue that the incrementing aspect of the container names (ie, _1, _2, ... _N) is going to be deprecated. As such, I didn't want to depend on any auto-generated names.
To get around this, I defined two different services in my docker-compose file - web_1 and web_2 - that just happen to build off of the same image and take the same configuration.
In addition to my application code, I am using DataDog for log aggregation and DogStatsD / StatsD collection. For this, I am using the dd-agent container provided by DataDog, "datadog/agent:latest". The DataDog docs walk you through this configuration. But, one important part of this is the mounting of this host volume:
/opt/datadog-agent/conf.d:/conf.d:ro
When the DataDog agent container boots up, it will look for any ".yaml" files (not ".yml") in the "conf.d" directory on the host and copy them into the dd-agent container. This allows us to provide custom configuration for things like log aggregation. I created these two files for the "proxy" and "web" services:
/opt/datadog-agent/conf.d/proxy.yaml
init_config:
instances:

logs:
- type: docker
label: me.dailyprime.service:proxy
service: dailyprime
source: nginx
and, /opt/datadog-agent/conf.d/web.yaml
init_config:
instances:

logs:
- type: docker
label: me.dailyprime.service:web
service: dailyprime
source: nodejs
Notice that I'm using the "label" in the configuration. This "label" corresponds to the "LABEL" directive in the Dockerfile for the services outlined earlier in this post.
Getting SSL To Work In Production
As I mentioned earlier, getting the SSL stuff to work in production was a bit of a nightmare. But, this is how I got it working. First, I edited my "docker-compose.yml" file in production to use my development version of proxy:
image: dailyprime/proxy:latest
This version of the proxy only runs on port 80, so we know we can boot it in production even if we don't have any SSL certificates created. Once I pulled down the image and started the network:
docker-compose up -d
... I then bashed into the proxy:
docker-compose exec proxy ash
... where I found the running configuration file at "/etc/nginx/conf.d/default.conf". I then used "vi" (shudders) to open up the default.conf and added the location for the LetsEncrypt authentication challenge:
upstream web_containers {
	server web_1:8080;
	server web_2:8080;
}

server {
	listen 80;
	server_name localhost;

	#
	# This is the folder that is being used for the LetsEncrypt webroot
	# plug-in-based authentication challenge. The LetsEncrypt certbot will
	# store files in this directory, which will then be requested over :80
	# by the LetsEncrypt authority.
	#
	location /.well-known/acme-challenge {
		root /tmp/letsencrypt/www;
	}

	location / {
		proxy_pass http://web_containers;
		proxy_set_header Host $host;
		proxy_set_header Referer $http_referer;
		proxy_set_header X-Real-IP $remote_addr;
		proxy_set_header X-Forwarded-For $proxy_add_x_forwarded_for;
		proxy_set_header X-Forwarded-Host $server_name;
		proxy_set_header X-Forwarded-Proto $scheme;
	}
}
This tells nginx to map requests for "/.well-known/acme-challenge" to a folder that we have mounted as a host volume (see the docker-compose.yml file above). At this point, I exited the nginx machine and restarted it:
docker-compose restart proxy
Now that I had an nginx machine running over port 80 with a mapping to the "well-known" location on the host volume, I could use the LetsEncrypt cert bot. Instead of installing the "certbot" executable, I'm using the Docker container provided by LetsEncrypt. To pull down, spin up, and execute the LetsEncrypt container, I created a shell script:
#!/bin/bash

#
# /etc/letsencrypt
# WHAT: This is the default configuration directory. This is where certbot will store all
# generated keys and issues certificates.
#
# /var/lib/letsencrypt
# WHAT: This is default working directory.
#
# /tmp/letsencrypt/www
# WHAT: This is the webroot into which the authentication challenge files will be placed.
# We're going to map this file to the root of the "/.well-known/acme-challenge" location
# in our nginx configuration.
#
# certonly
# WHAT: This certbot subcommand tells certbot to obtain the certificate but not not
# install it. We don't need to install it because we will be linking directly to the
# generated certificate files from within our subsequent nginx configuration.
#
# -d
# WHAT: Defines one of the domains to be used in the certificate. We can have up to 100
# domains in a single certificate.
#
# --authenticator webroot
# WHAT: We are going to use the webroot plug-in for the LetsEncrypt authentication
# challenge. This means that we're going to satisfy the ownership requirement by placing
# files in a public folder on our web-server.
#
# --webroot-path /var/www
# WHAT: This is the folder that we're going to use as the web-root in our "webroot"
# plug-in authentication challenge. Notice that we are mapping this folder to the
# "/tmp/letsencrypt/www" folder on the host machine (which will subsequently be included
# in our nginx configuration).
#
# --renew-by-default
# WHAT: Re-issue the certificate even if it already exists and is not expiring.
#
# --server https://acme-v01.api.letsencrypt.org/directory
# WHAT: ??? The resource that provides the actual certificate ???
#
docker run -it --rm --name letsencrypt \
	-v "/etc/letsencrypt:/etc/letsencrypt" \
	-v "/var/lib/letsencrypt:/var/lib/letsencrypt" \
	-v "/tmp/letsencrypt/www:/var/www" \
	quay.io/letsencrypt/letsencrypt:latest \
		certonly \
		-d dailyprime.me \
		-d www.dailyprime.me \
		--authenticator webroot \
		--webroot-path /var/www \
		--renew-by-default \
		--server https://acme-v01.api.letsencrypt.org/directory
This script uses the webroot plug-in to perform the authentication challenge (ie, it looks in the "/.well-known/acme-challenge" location on our proxy server). I'm asking it to create an SSL certificate for both the "dailyprime.me" and "www.dailyprime.me" domains. Apparently you can add up to 100 domains to the same certificate.
Once the SSL certificate was provisioned, I killed my production network:
docker-compose down
Then, I went back into my docker-compose.yml file and switched my proxy server back to the "prod" version:
image: dailyprime/proxy-prod:latest
At this point, I brought the network back online:
docker-compose up -d
And, since the SSL certificate's .pem files were all in the right place, the production version of the proxy service was pulled-down and booted-up successfully.
At this point, the site was available over SSL. However, LetsEncrypt SSL certificates are only valid for 90-days, which means they have to be renewed. In order to perform the renewal, I created another shell script that used the LetsEncrypt docker container:
#!/bin/bash
/usr/bin/docker run -it --rm --name letsencrypt \
	-v "/etc/letsencrypt:/etc/letsencrypt" \
	quay.io/letsencrypt/letsencrypt:latest \
		renew &&

#
# When a certificate is renewed, the nginx proxy container needs to be restarted in order
# to pick up the new certificates. However, according to the documentation:
#
# > certbot renew exit status will only be 1 if a renewal attempt failed. This means
# > certbot renew exit status will be 0 if no cert needs to be updated. If you write a
# > custom script and expect to run a command only after a cert was actually renewed you
# > will need to use the --post-hook since the exit status will be 0 both on successful
# > renewal and when renewal is not necessary.
#
# However, since the certbot is running inside a container, it doesn't have access to
# the nginx process, at least as far as I know - I'm a Docker noob. As such, I'm going to
# have this script restart nginx no matter what the outcome. And, since this will only
# happen occasionally, and nginx restarts really fast, this will only lead to a tiny bit
# of down time.
#
# NOTE: We are using absolute paths to the docker-compose command and to the config file
# because we can't depend on the PATH or the context of the crontab execution. As such,
# this makes it very clear exactly what will be executed.
#
/usr/local/bin/docker-compose -f /root/docker-compose.yml restart proxy &&

#
# I sent a DogStatsD metric to DataDog, recording the successful completion of the
# certificate renewal.
#
/usr/local/bin/docker-compose -f /root/docker-compose.yml exec dd_agent bash -c "echo 'script.renew_certificate:1|c' > /dev/udp/127.0.0.1/8125"
This script executes the "renew" subcommand against the LetsEncrypt container, which will only renew certificates if they are within 30-days of expiring. This makes it suitable for automation tasks.
Once the certificate is [possibly] renewed, I use docker-compose to restart the nginx container (in order to pick up the new SSL certificate) and then emit a StatsD metric against my dd-agent container. I'm emitting a StatsD metric so that I can add monitoring / alerting in DataDog to keep track of whether or not the SSL renewal is taking place.
You may have noticed that in this renewal script, I'm using full paths to the executable and I'm being very explicit about which docker-compose.yml file to use. This is because I want to be able to run this script as part of a cron-job; and, I don't believe I can depend on things like PATH and working-directory during cron execution.
That said, to set this up as a cron job, I edited my "crontab" entry:
crontab -e
... and added the "renew_certificate.sh" such that it would run every Sunday morning at 7AM:
00 07 * * sun /root/scripts/renew_certificate.sh
That's a lot of stuff to cover! And, it felt like a lot of trial and error to get it working. But, the SSL certificate provided by LetsEncrypt is well rated. Here's my rating using Qualys SSL Labs:
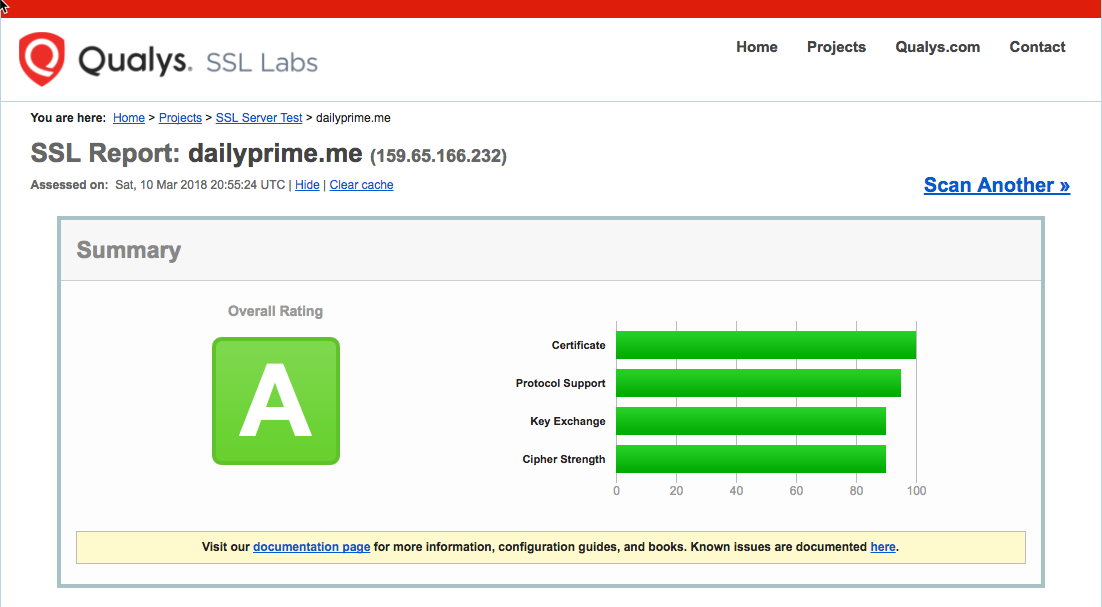
Ultimately, much of this complexity goes away if you just purchase an SSL certificate. But, free is always nice, especially when it's for fun little side projects.
At the end of all this, my local directory looked like this:
dailyprime.me
-- proxy
-- -- default.conf
-- -- Dockerfile
-- proxy-prod
-- -- default.conf
-- -- dhparams.pem
-- -- Dockerfile
-- scripts
-- -- renew_certificate.sh
-- -- request_certificate.sh
-- statsd-mock
-- -- Dockerfile
-- -- index.js
-- web
-- -- node_modules (empty)
-- -- wwwroot
-- -- -- assets (static files)
-- -- -- index.js
-- -- .dockerignore
-- -- Dockerfile
-- -- package.json
-- docker-compose.prod.yml
-- docker-compose.yml
Not all of these files are relevant to local development. But, I wanted to keep a record of the scripts even if they only existed in production.
Honorable Mention
I hope I didn't include too much misinformation in this post. I know there was a lot to cover; and, I tried to roll a week-and-half of failures into one final painting of success. Hopefully it was somewhat cogent and cohesive. That said, none of this would have been possible without the generous contributions of other authors. Here are some resources that I found particularly helpful:
https://blog.codeship.com/using-docker-compose-for-nodejs-development/ - Using docker-compose for node.js development - this was the first, really helpful article that I read.
https://gist.github.com/bastman/5b57ddb3c11942094f8d0a97d461b430 - Cleaning up unused Docker resources.
https://github.com/docker/compose/issues/4186 - Needing to use -p and -f for when you supply an explicit docker-compose.yml file.
https://egghead.io/courses/build-a-twelve-factor-node-js-app-with-docker - Building a 12-factor application with Node.js and Docker.
http://container-solutions.com/tagging-docker-images-the-right-way/ - An interesting take on tagging using git hashes of the current repo.
https://www.sep.com/sep-blog/2017/02/28/load-balancing-with-nginx-and-docker/ - Load-balancing nginx in a single host.
https://medium.com/@gfogle/productive-with-docker-in-20-minutes-8997297a35bb - Health-checks in docker-compose. I didn't end up using this; but, I may in the future.
http://deployeveryday.com/2016/09/28/composing-docker-environments-scale.html - Scaling dynamically with docker-gen. I didn't end up using this (I had two explicit "web" services in my docker-compose.yml); but, I like knowing that it's possible.
http://jdlm.info/articles/2016/03/06/lessons-building-node-app-docker.html - Good pointer on using the non-root user to execute the docker process.
https://blog.codeship.com/ensuring-containers-are-always-running-with-dockers-restart-policy/ - Using "unless-stopped" restart policy.
https://www.computerhope.com/unix/ucrontab.htm - What the heck is crontab.
Final Thoughts
As I mentioned at the beginning, I don't really have any idea what I'm doing. I started this project a week-and-a-half ago knowing next-to-nothing about Docker. And, this is what I was able to get working based on lots of reading and lots of trial-and-error. I am sure that there are easier ways to do this. And, I'm sure that I got some of this dead wrong (or omitted important steps). But, hopefully this can serve to help others get up to speed, or find little details that alluded them previously.
If nothing else, I've caught the Docker bug and I'm excited to see a whole world of possibility opening up for me.
Want to use code from this post? Check out the license.

Reader Comments
Hmmm, looks like none of my space-indented code is indenting properly. Probably because my back-end code assumes that any spaces would be used by mistake (ha ha ha ha). Lame yaml files can't use tabs. Is that the kind of world we have to live in?
Will fix shortly.
Ha ha, AND I posted my DataDog API key in the original gist ... so, guess I'll be rotating that key :D #NoobMistakes
@All,
As a quick follow-up to this, LetsEncrypt just released the ability to issue wildcard SSL certificates. So, I provisioned a "*." domain for my Docker site:
www.bennadel.com/blog/3420-obtaining-a-wildcard-ssl-certificate-from-letsencrypt-using-the-dns-challenge.htm
I believe this should "just work" with the existing renewal script.
I've pushed much of this code up to GitHub if anyone is confused about where the files should be:
https://github.com/bennadel/DailyPrime.me
@All,
I realized that my crontab renew-certificate script stuff wasn't running as I expected. In order to debug, I updated the crontab execution to run every 2-minutes and write the output to a file:
*/2 * * * * /root/scripts/renew_certificate.sh > /root/scripts/renew_certificate.sh.log 2>&1
... this causes the execution to write to the file, "renew_certificate.sh.log". From there, I discovered two issues. First, the output said:
"the input device is not a TTY"
From what I understand (from what I've read), when crontab executes, it doesn't allocate a TTY interface, which is what docker needs when we have the "-t" option. As such, I removed the "-it" options for the first "docker run" command in the script.
Source: https://stackoverflow.com/questions/43099116/the-input-device-is-not-a-tty
Once I fixed that, I was then presented with a new error on the next crontab execution:
===
Traceback (most recent call last):
File "bin/docker-compose", line 6, in <module>
File "compose/cli/main.py", line 71, in main
File "compose/cli/main.py", line 124, in perform_command
File "compose/cli/main.py", line 467, in exec_command
File "site-packages/dockerpty/pty.py", line 338, in start
File "site-packages/dockerpty/io.py", line 32, in set_blocking
ValueError: file descriptor cannot be a negative integer (-1)
Failed to execute script docker-compose
===
Apparently, this is a known issue with docker-compose when running inside a script, like with my crontab task. The work-around (from what I've read) is to use the "-T" option. This tells docker NOT to create a pseudo-TTY interface for the execution.
Source: https://github.com/docker/compose/issues/3352
You can see the changes to the repository here: https://github.com/bennadel/DailyPrime.me/commit/10a7120dc7d98fd6ec5b1ac61532040a3390bc20
Hmm, I'm getting an error with the certbot renewal! Getting the following error:
> Encountered exception during recovery
> 'HTTP01' object has no attribute 'achalls'
>
> AttributeError: 'HTTP01' object has no attribute 'achalls'
> Attempting to renew cert from /etc/letsencrypt/renewal/dailyprime.me.conf
> produced an unexpected error: [Errno 2] No such file or directory:
> '/var/www'. Skipping.
Trying to figure it out.
Actually, that previous error was for the old certificate (non-wildcard). The renewal for the wildcard certificate seems to be breaking with this error:
> Cert is due for renewal, auto-renewing...
> Could not choose appropriate plugin: The manual plugin is not
> working; there may be problems with your existing configuration.
> The error was: PluginError('An authentication script must be provided
> with --manual-auth-hook when using the manual plugin non-interactively.',)
It seems that because I issues the certificate "manually", it's expecting the renewal process to do the same. Which seems kind of whack. Trying to figure it out.
Ok, so it seems that domain ownership needs to be verified both at the initial issuance AND at RENEWAL time. This is why the "renew" command was expecting me to perform the manual DNS authentication challenge. DigitalOcean provides a plug-in to help with this. But, it seems to be more complicated than I need at this time. As such, I'll likely fallback to the explicit subdomain certificate so that I can use the webroot authentication (which doesn't require any manual shenanigans).