
Experimenting With Auth0 Passwordless Email Authentication In Angular 2.4.1
This year - hopefully sooner than leter - I'd like to actually build and deploy an offline-first Angular 2 application. For my local data storage system, I've settled on PouchDB for its master-master replication capabilities. And, for user management and authentication, I'm currently exploring Auth0. So far, I like Auth0 because it provides both passwordless authentication and a rich Rules-based authentication workflow that facilitates a serverless architecture. This post is just my exploration of the Auth0 JavaScript client and its use within an Angular 2 application to send and verify one-time-use tokens for email-based, passwordless authentication.
Run this demo in my JavaScript Demos project on GitHub.
Unlike regular username and password based authentication protocols, "passwordless authentication" uses one-time tokens that are sent to your email address or your mobile phone number (via SMS). A passwordless authentication workflow means that you don't have to configure and remember yet another password. Instead, you provide a user-specific communications pathway (ex, email) to which a temporary password is sent. You can then use this temporary password to log into the target application.
Auth0 supports more than just passwordless authentication. In fact, the major selling point of Auth0 is that it easily and abstractly supports a wide variety of authentication protocols including SSO (Single Sign-On) and social media based logins (ex, Twitter). But, I chose passwordless authentication because it feels like a very low-friction workflow that neither requires sign-up nor ties a user to any particular social media profile. To me, it seems like the most flexible authentication model.
NOTE: There may be special security considerations with a passwordless authentication workflow. For example, I've heard that SMS communications may not be as secure as other communication options. That said, at this time, I do not have a robust mental model for passwordless authentication that would allow me to make any strong statements about concrete security concerns.
With Auth0, authentication - passwordless or otherwise - is much more than just login functionality. When Auth0 processes a user's credentials, it runs through a Rules engine that is hosted on WebTask.io - a serverless, Function-as-a-Service (FaaS) platform, built by the Auth0 team. As an administrator of my Auth0 account, I can create custom Rules in JavaScript that process and augment a user's profile as part of the authentication workflow. And, since these rules run in a sandboxed Node.js environment, I can do just about anything in these rules, including calling external APIs on behalf of the user.
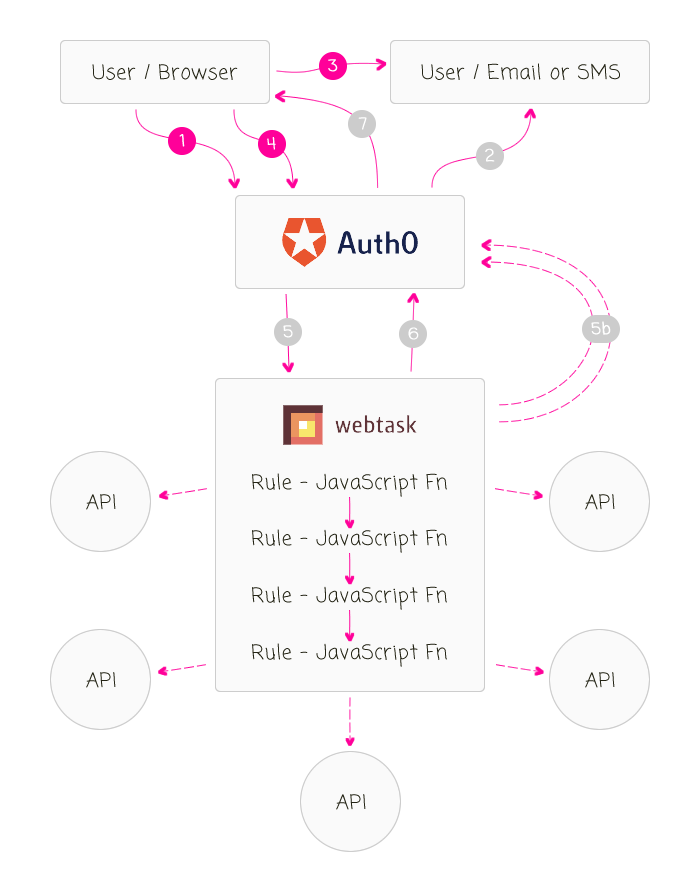
This Auth0 passwordless workflow, the way I understand it (which may have logical holes), goes as followed:
- User asks application / Auth0 to send the one-time-use password to the user's communications channel using the user identifier (email in my case).
- Auth0 sends the one-time-use password to the communications channel, which is valid for about 5-minutes.
- User retrieves the one-time password from the communications channel.
- User authenticates against Auth0 using the original user identifier (ex, email address) and the one-time password.
- Auth0 authenticates the user and then initiates the asynchronous Rules engine on Webtask.io. Each Rule builds on the results on the previous rule (kind of like a series of Middleware functions). Each Rule can consume the 900+ node modules available in the Webtask.io context. Each Rule can call out to other APIs. Each rule returns the augmented User object or an UnauthorizedError() instance. (5B) Any one of the Rules can make a RESTful call back to the Auth0 server in order to persist app_metadata and user_metadata.
- Webtask.io returns the authenticated, augmented User object back to Auth0 (or an UnauthorizedError in the case that authorization should be blocked).
- Auth0 returns the authorization result (including a JWT - JSON Web Token) to the client / browser.
NOTE: In the above list, when I use the term "returns", I am using it in a general sense, not in a technical implementation sense.
At this point, the user profile object that was augmented during the authorization process is cached for the current login transaction. The client-side application can then turn around and make a subsequent request back to Auth0 in order to retrieve said user profile. Transient values, calculated during the Rules engine workflow, are only available to the current login transaction. However, the user_metadata and app_metadata collections are shared across all login transactions for the given user.
CAVEAT: If the Rules engine wants to persist changes to the app_metadata or the user_metadata collections, it must make an explicit API request back to the Auth0 server (see step 5B).
ASIDE: The user_metadata should be used to store non-critical information about the user, like preferences and statistics. app_metadata, on the other hand, should be used to store critical "read only" information about how a user can operate within the application. I say "read only" because an authenticated user can make RESTful calls to update their own user_metadata but not their own app_metadata.
To experiment with this workflow in Angular 2, I've opted to use the core JavaScript library provided by Auth0. Auth0 also provides a library called Lock, which implements an entire user interface (UI) on top of the API; but, in the long term, I'll probably have a custom UI, so I think it makes more sense to bypass Lock.
First, I created an Angular 2 service that proxies the Auth0 API so that this service can be injected into other portions of my Angular 2 application. For this simple exploration, I only have three methods:
- requestEmailCode() - Initiates the passwordless authentication workflow (ie, sends the email).
- verifyEmailCode() - Authenticates the user against Auth0 using the user's email and the one-time token.
- getUserInfo() - Gets the Profile object that was calculated during the authorization, Rules-based workflow.
You'll also notice that I have a number TypeScript interfaces at the top of the following service. I tried looking in the Definitely Typed repository; and, there are a number of Auth0 type definition files. But, the core one didn't seem to be up-to-date. Specifically, it didn't have the .getUserInfo() method defined. And, the type defintion files also seemed to have too many "optional" properties. So, I took a stab at creating my own TypeScript Interfaces. If nothing else, I think doing this helped me learn about what data was actually available.
// Import the core angular services.
import { Injectable } from "@angular/core";
import * as Auth0 from "auth0";

// CAUTION: I cobbled together the following interfaces in an attempt to self-document
// what the API calls were doing. These are NOT OFFICIAL interfaces provided by Auth0.
// I tried to find a "Definitely Typed" set of interfaces; but, they didn't appear to
// be up-to-date.
// --
// Definitely Types for JS - https://github.com/DefinitelyTyped/DefinitelyTyped/blob/master/auth0-js/index.d.ts

export interface IAuthorization {
	accessToken: string;
	idToken: string; // JWT token.
	idTokenPayload: { // Parsed JWT content.
		aud: string; // The audience. Either a single case-sensitive string or URI or an array of such values that uniquely identify the intended recipients of this JWT. For an Auth0 issued id_token, this will be the Client ID of your Auth0 Client.
		exp: number; // Expires at (UTC seconds).
		iat: number; // Issued at (UTC seconds).
		iss: string; // The issuer. A case-sensitive string or URI that uniquely identifies the party that issued the JWT. For an Auth0 issued id_token, this will be the URL of your Auth0 tenant.
		sub: string; // The unique identifier of the user. This is guaranteed to be unique per user and will be in the format (identity provider)|(unique id in the provider), e.g. github|1234567890.
	};
	refreshToken?: string; // Optional, if the offline_access scope has been requested.
	state?: any;
}

export interface IIdentity {
	connection: string;
	isSocial: boolean;
	provider: string;
	user_id: string;
}

export interface IMetadata {
	[ key: string ]: any;
}

export interface IProfile {
	// Fields that are always generated - https://auth0.com/docs/user-profile/normalized
	identities: IIdentity[];
	name: string;
	nickname: string;
	picture: string; // The profile picture of the user which is returned from the Identity Provider.
	user_id: string; // The unique identifier of the user. This is guaranteed to be unique per user and will be in the format (identity provider)|(unique id in the provider), e.g. github|1234567890.

	// Optional fields, but still "core" ?? !! The documentation is confusing !!
	app_metadata?: IMetadata;
	clientID: string; // The unique ID of the Auth0 client.
	created_at: string; // TZ formatted date string.
	sub: string; // The unique identifier of the user. This is guaranteed to be unique per user and will be in the format (identity provider)|(unique id in the provider), e.g. github|1234567890.
	updated_at: string; // TZ formatted date string.
	user_metadata?: IMetadata;

	// Fields that are generated when the details are available:
	email: string; // The email address of the user which is returned from the Identity Provider.
	email_verified: boolean;
}

export class AuthenticationService {

	private auth0: any;


	// I initialize the Authentication service.
	constructor() {

		this.auth0 = new Auth0({
			domain: "bennadel.auth0.com",
			clientID: "erNlgZHZ4MyDFrfwFOc0JCAJ1Znzg6Fm", // JavaScript Demos Client.
			responseType: "token"

			// Since I am using an email-based token workflow, I don't need to define
			// a callback URL - this would only be necessary if I was passing the user
			// control over to Auth0's website.
			// --
			// callbackURL: "{YOUR APP URL}"
		});

	}


	// ---
	// PUBLIC METHODS.
	// ---


	// I get the user info / profile for the given access token (which should have been
	// returned as part of the authorization workflow).
	// --
	// NOTE: Internally, I am using the .getUserInfo() method, which takes the
	// accessToken. In the Auth0 documentation, however, they discuss the .getProfile()
	// method that takes the idToken. But, if you try to use that method, you get the
	// following deprecation warning:
	// --
	// DEPRECATION NOTICE: This method will be soon deprecated, use `getUserInfo` instead.
	// --
	// Apparently Auth0 is trying to migrate to a slightly different workflow for
	// accessing the API based on accessTokens. But, it is not yet fully rolled-out.
	public getUserInfo( accessToken: string ) : Promise<IProfile> {

		var promise = new Promise<IProfile>(
			( resolve, reject ) : void => {

				this.auth0.getUserInfo(
					accessToken,
					( error: any, result: IProfile ) : void => {

						error
							? reject( error )
							: resolve( result )
						;

					}
				);

			}
		);

		return( promise );

	}


	// I send a one-time use password to the given email address.
	public requestEmailCode( email: string ) : Promise<void> {

		var promise = new Promise<void>(
			( resolve, reject ) : void => {

				this.auth0.requestEmailCode(
					{
						email: email
					},
					( error: any ) : void => {

						error
							? reject( error )
							: resolve()
						;

					}
				);

			}
		);

		return( promise );

	}


	// I log the user into the application by verifying that the given one-time use
	// password was provisioned for the given email address.
	public verifyEmailCode( email: string, code: string ) : Promise<IAuthorization> {

		var promise = new Promise<IAuthorization>(
			( resolve, reject ) : void => {

				this.auth0.verifyEmailCode(
					{
						email: email,
						code: code
					},
					( error: any, result: IAuthorization ) : void => {

						error
							? reject( error )
							: resolve( result )
						;

					}
				);

			}
		);

		return( promise );

	}

}
Since Auth0 can, internally, authenticate against a large number of sources, it can't provide a universal set of information across all login transactions. As such, it constructs a normalized user Profile that always has a core set of attributes. Then, it adds any additional attributes that may be available from the given identify provider. The Auth0 documentation is pretty good; but, it's kind of spread-out. As such, I found it difficult to nail down which attributes I should or should not expect. You can see this confusion in my attempt to build the IProfile interface above.
Clearly, I have much more to learn about the nuances of Auth0 - I'm just getting my feet wet.
That said, once I had this authentication service, I could inject into my root component where I could experiment with the passwordless workflow. To keep things super simple, I'm just putting two inputs on the screen - one for the user's email address and one of for the one-time-use token that Auth0 will emit. Then, I'm just logging the results to the console as they are available.
// Import the core angular services.
import { Component } from "@angular/core";

// Import the application components and services.
import { AuthenticationService } from "./authentication.service";
import { IAuthorization } from "./authentication.service";
import { IProfile } from "./authentication.service";

@Component({
	moduleId: module.id,
	selector: "my-app",
	styleUrls: [ "./app.component.css" ],
	template:
	`
		<strong>Email:</strong>
		<input type="text" [value]="email" (input)="email = $event.target.value;" />
		<input type="button" value="Send Email" (click)="sendEmail()" />

		<br /><br />

		<strong>Code:</strong>
		<input type="text" [value]="code" (input)="code = $event.target.value;" />
		<input type="button" value="Verify Code" (click)="verifyCode()" />

		<div *ngIf="name">

			<h3>
				Welcome {{ name }}
			</h3>

			<img [src]="avatarUrl" />

		</div>
	`
})
export class AppComponent {

	public avatarUrl: string;
	public code: string;
	public email: string;
	public name: string;

	private authenticationService: AuthenticationService;


	// I initialize the component.
	constructor( authenticationService: AuthenticationService ) {

		this.authenticationService = authenticationService;

		this.email = "";
		this.code = "";

	}


	// ---
	// PUBLIC METHODS.
	// ---


	// I send the one-time use password to the currently-entered email address. The
	// one-time password is valid for about 5-minutes.
	public sendEmail() : void {

		this.code = "";

		this.authenticationService
			.requestEmailCode( this.email )
			.then(
				() => {

					console.log( "Email sent (with one-time use code)." );

				}
			)
			.catch(
				( error: any ) : void => {

					console.error( error );

				}
			)
		;

	}


	// I log the current user into the application using the currently-entered email
	// address and the one-time use token.
	public verifyCode() : void {

		// In the following workflow, first, we're going to log the user into the app;
		// then, once the user is authenticated, we'll go back to the Auth0 API to get
		// the user's full profile (included persisted metadata).
		this.authenticationService
			.verifyEmailCode( this.email, this.code )
			.then(
				( authorization: IAuthorization ) : Promise<IProfile> => {

					console.group( "Verify Email Code / Authorization Result" );
					console.log( authorization );
					console.groupEnd();

					// Now that the user is logged-in, let's go back to the API to get
					// the full user profile.
					// --
					// NOTE: There is an earlier API method call .getProfile() which
					// takes the idToken. That workflow, however, is being deprecated
					// in favor of a new workflow that emphasizes accessToken.
					return( this.authenticationService.getUserInfo( authorization.accessToken ) );

				}
			)
			.then(
				( profile: IProfile ) : void => {

					console.group( "Profile Result" );
					console.log( profile );
					console.groupEnd();

					this.name = profile.nickname;
					this.avatarUrl = profile.picture;

				}
			)
			.catch(
				( error: any ) : void => {

					console.warn( "Something went wrong!" );
					console.error( error );

				}
			)
		;

	}

}
On its own, this code exercises the authentication workflow. Of course, this exploration wouldn't be nearly as fun if we didn't take a look at the Rules engine as well. As such, I went into my Auth0 dashboard and I created two rules. One that reports the number of logins:
function addLoginCount( user, context, callback ) {

	// Ensure that the user_meteadata exists.
	// --
	// NOTE: It won't exist on the user object until one of the rules explicitly
	// creates it (or we assign metadata to the user through something like the API).
	user.user_metadata = ( user.user_metadata || {} );

	// NOTE: I believe that stats.loginsCount always exists; but, the documentation only
	// goes so far as confirming "stats" - it doesn't state that loginsCount is always
	// available. As such, I am trying to be safe about accessing it.
	user.user_metadata.loginCount = ( context.stats && context.stats.loginsCount )
		? context.stats.loginsCount
		: 0
	;

	callback( null, user, context );

}
... and, one that keeps track of the 10 most recent logins:
function addLoginAudit( user, context, callback ) {

	// Ensure that the user_meteadata exists.
	// --
	// NOTE: It won't exist on the user object until one of the rules explicitly
	// creates it (or we assign metadata to the user through something like the API).
	user.user_metadata = ( user.user_metadata || {} );

	// Ensure that the login audit log exists.
	user.user_metadata.logins = ( user.user_metadata.logins || [] );

	// Track the current login (in descending order).
	user.user_metadata.logins.unshift({
		ip: context.request.ip,
		userAgent: context.request.userAgent,
		createdAt: Date.now()
	});

	// Limit the audit log to only 10 most recent logins.
	user.user_metadata.logins = user.user_metadata.logins.slice( 0, 10 );

	// At this point, all we've done is updated the in-memory user-metadata associated
	// with this login request. Now, we have to push this data back over to Auth0 (from
	// the current webtask.io server), using an API call, so that these changes will be
	// persisted over to the next login.
	auth0.users
		.updateUserMetadata( user.user_id, user.user_metadata )
		.then(
			function handleResolve() {

				callback( null, user, context );

			}
		)
		.catch(
			function handleError( error ) {

				callback( error );

			}
		)
	;

}
Notice that in the second rule, I have to make an explicit call to auth0.users.updateUserMetadata() in order to persist the user_metadata object back to the Auth0 server. This is because changes to the user object are only cached for the current login transaction (accessible via getProfile() or getUserInfo()) and won't be available to subsequent logins. If we persist the user_metadata back to Auth0, however, we can carry data across login transactions.
In retrospect, my first rule should not have used the user_metadata object to report the login-count. Doing so accidentally persisted the login count as part of the execution of the second rule, which used the same user_metadata as the first rule, but posted it back to Auth0. As rule of thumb (no pun intended), it seems you should only use the user_metadata object for data that you want to be available across login transactions.
Anyway, with these rules in place, if I load the app and then request a one-time-use password, Auth0 sends out the following email:
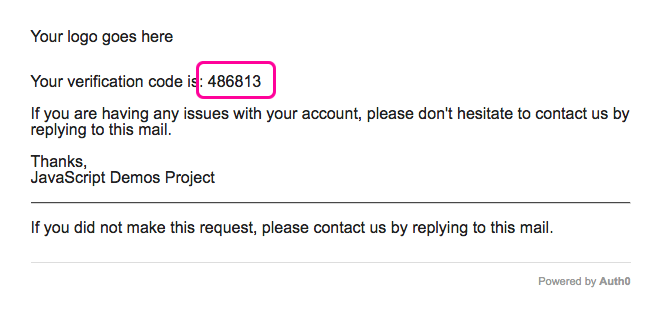
Then, if I authenticate against Auth0 using both the original email address and the one-time-use token (above), I get the following output:
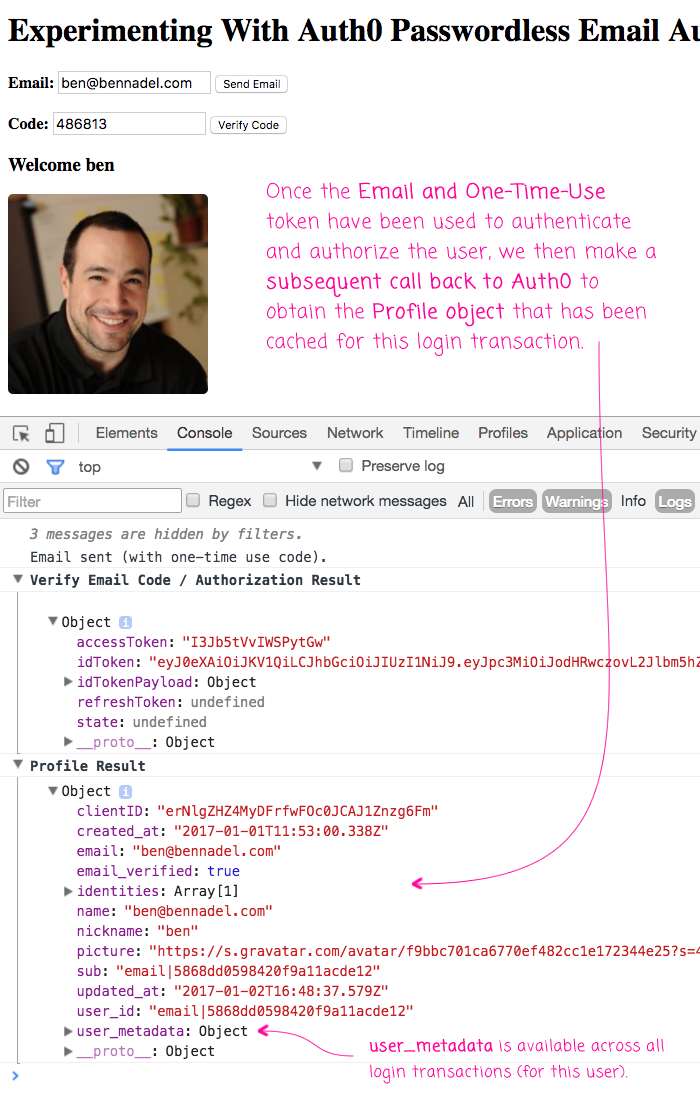
As you can see the, the authentication step returns an idToken, which is the user's JWT (JSON Web Token); and, the idTokenPayload, which is the parsed JWT data. In this case, there is no refreshToken because I did not ask Auth0 to provide one (something that I have not yet tried). As such, the idToken will eventually expire (based on a duration that you can configured in your Auth0 dashboard).
All in all, working with the Auth0 API was painless. The Auth0 JavaScript library did most of the heavy lifting for me; and, the authorization Rules were quite easy to author. I updated them manually as I was learning, but you can also deploy them using GitHub (which I have not tried). There's a lot more to learn about Auth0; but, I'm starting to feel confident in using it for my offline-first application.
Want to use code from this post? Check out the license.

Reader Comments
Ben, nice tutorial!
I'm building an app that would run on a mobile device (hybrid using Cordova) and also run as a web app (via browser). It would use PouchDB and CouchDB two way synching to ensure that regardless of the platform that the user is currently using they will have access to the most current data.
I've got the synching working but the app is currently only a single user app..not very useful...so now I have to "expand" its capabilities to make it a multi-user app by adding in login capability with authorization and using the single DB per user pattern. BTW I'm doing this SPA w/o any Framework...just pure javascript.
This maybe a silly question, as I'm new to AuthO but in the passwordless scenario you are describing would the user have to retrieve the auth code each and every time they accessed the app?
If so that seems like a major P.I.T.A for the user (i.e., user has to get the auth code from email/sms each and every time before they can use the application). Thoughts?
In my ideal scenario I'd like to be able to login once (with userId and password) and then, unless I explicitly log out, be able to have the app authenticate behind the scenes with the server via a token (e.g., JWT?) and not have to login again (unless I explicitly logout or after X days due to expiration of the token).
Is this doable with Auth0? Any downsides to this approach as it pertains to multi-user app and single DB per user using PouchDb and CouchDb (Cloudant in my case)? Or security ramifications? Thoughts?
Cheers
@Jet,
Great questions. It's been a little while since I looked at this stuff; but, like you, I had wanted to create a multi-user, PouchDB, syncing application. In my case, I wanted to create a little fitness app. But, never followed through. That said, I have another post that may be of interest, which was specifically about provisioning CouchDB via Auth0:
www.bennadel.com/blog/3208-provisioning-cloudant-couchdb-databases-from-auth0-for-a-database-per-user-architecture-in-angular-2-4-1.htm
.... I think the thing that never felt quite right was the Cloudant stuff. I'm not really a "server admin" person; so, the idea of managing my own databases felt unsafe. I liked that Cloudant had hosted stuff; but not even sure if they have a free tier at this point.
But, to get to your questions, I'm pretty sure you can manage the duration of the session however you see fit. Meaning, once you get the access token from Auth0, I think maybe that is, essentially, the user's session. Cause, remember, Auth0 is more just the user management - I think it defers to you to figure out how manage the session stuff .... I think. It's been quite a while.
So, I think the idea would be have the user login and then cache their access key in something like
localStorage. Then, when the user re-opens the app in the same device / browser, you can pull the key out of thelocalStorage; or, have them login again if it doesn't exist.The only real security concern is making sure you have the right user writing to the right database. In the post that I linked above, I ended up provisioning the Cloudant database as part of the authorization workflow in the Auth0 web functions. Then, I cache the database access information in the user meta-data that is persisted in Auth0, so I only provision the database once. This meta-data gets returned to the user, which is then used, on the client-side, to initialize the PouchDB connection.
I'm very rusty on this stuff. And, I'm not really a security expert :D But, I think that's roughly how it would work.
The downside to working with a direct Client-to-Database call is that lurking feeling that you don't have control. ie, that you don't have a server-side component that can authorize each incoming request. But, as long as the database has an ApiKey, and that ApiKey is only known to the user after they login, and it can't be guessed / brute-forced; then, I think you are in a good place.
But, again, I'm not really a big security guy.
Hope some of this rambling was meaningful.
Hey Ben,
First, thanks for the response and thanks again for sharing this series of posts (and BTW I've reviewed your complete "series" of post related to your fitapp/user management). It really is EXTREMELY useful stuff. Even though I may not follow your exact footsteps this series of posts have given me a foothold and the spark that I needed to begin to tackle the problems along this pathway...You gave me a lot to think about. So thank you for sharing!
Just a couple of notes/comments re: your response:
Cloudant does have a free tier. Can't recall what the free tier allows in terms of monthly "transactions" before you have to move to the pay tier;
I'm wrestling with whether I go down the path of using 3rd party services (e.g., Cloudant and Auth0) or try and build everything myself. My initial thought is to leverage 3rd party services to hasten time to market (assuming I could get there quicker...and this is where tutorials like yours really help ) and then possibly replace them later if the # of users scale me out of the free tiers (wishful thinking).
Like you (with your fitApp) I'm creating my app mainly as a learning exercise. But for me it's also to create an app as a primary portfolio item for landing a job. The question is will I learn more employable skills and be better served by building it "all" myself (e.g., use CouchDB and build out my own user management protocol by leveraging libraries wherever it makes sense) or by spending my time learning how to do this using some 3rd party services (cloudant & auth0). And another important dimension for me is how long will it take to accomplish each of these paths. So it's a cost/time to learning employable skills tradeoff. Any thoughts?
Thanks again.
Cheers.
@Jet,
Super great question(s). I was actually just listening to a podcast a few days ago that made me think of what you're noodling-on. The podcast was "101: Ben Orenstein - How to Build an App in a Week", http://www.fullstackradio.com/101 . In that episode they talk about giving yourself a hard deadline of 1-week to get something working. Part of that is deferring as much of the tech as you can since it's not the "core value-add" of the product. It's an interesting listen.
I struggle with the same exact question. How much do I "build"? How much do I "buy"? For me, I've been getting a lot more comfortable lately with "buying" more than I "build", especially when the goal of the experiment is not to build the dependency (such as the database), but is to leverage the dependency in my application. So, for example, I've been much more open to use using Firebase lately (a back-end as a service), since I've been much more focused on front-end development the last year or two.
But, that's not to say that some part of me doesn't always feel guilty that I can't do "all the things." It's a really tough line to walk, emotionally. Which brings me back to the aforementioned podcast -- I think it makes more sense to make choices that get you closer to the finish line. Building and finishing an experiment with a managed dependency is going to be better (I think) that never finishing an experiment in which you tried to build all the things yourself.
For example, I recently starting using Netlify, which is a super easy-to-use hosting platform for "static" sites with some light dynamic features. Do I feel like I should be able to manage that myself on something like DigitalOcean myself? Sure; but, at the end of the day, I don't have those skill; and, those skills aren't necessarily part of my core-competency on day-to-day basis. So, I've relaxed my view on the world and started to embrace more "buying" of services in order to get more stuff done.
So, that's just me rambling a lot .... not sure if any of it made any sense. Happy New Year :D