Learning ColdFusion 8: CFImage Part II - Tag Based Image Manipulation
ColdFusion 8 has a load of awesome image manipulation functionality. So much so, in fact, that it will take several posts to discuss it in any sort of decent way. In the first part of this series, we spent the entire post just exploring all the ways in which ColdFusion 8 can read in and write out / save images. If you haven't read that already, do so now because I am not going to explain the reading / writing of images going forward (I am assuming that you already understand all the crazy, awesome combinations of ways in which this can be done).
Just as with the reading and writing, image manipulation can be done through both the ColdFusion 8 CFImage tag and through the ColdFusion 8 image manipulation functions. For this post, we are going to focus on all the stuff that you can accomplish with just the CFImage tag (and a few of the functions). The CFImage tag provides a very small subset of all that can be done, so I figured it would make for a good primer post on manipulation.
In addition to the reading and writing images, the ColdFusion 8 CFImage tag provides these image manipulation functions:
- Adding a border
- Resize image
- Rotate image
- Creating a CAPTCHA image
Before we get into any of it, I am just going to start off by saying that I believe that 90% of the image manipulation that people want to accomplish is merely the resizing of uploaded images to create thumbnails (come on, let's be honest). If that's the case, you are gonna be tickled pink with excitement. CFImage resizes images fast and with a furious amount of quality. I am not that surprised; after all, this is Adobe we are talking about - the ruler of the photo and image editing empire.
In order to help present these image manipulation features a little more clearly, I have created a function called AddImageInfo(). This user defined ColdFusion function takes in a ColdFusion image object and writes the width and height of the image to the top, left corner of the graphic. This will help us see how the size of the image changes as we manipulate it. The algorithm of the AddImageInfo() function goes beyond the scope of this CFImage blog post, but hopefully, seeing some of this will get you more excited about the ColdFusion 8 image editing possibilities:
<cffunction
	name="AddImageInfo"
	access="public"
	returntype="any"
	output="false"
	hint="Takes the image, duplicates it, adds info text to it (graphically), and then returns the resultant image.">

	<!--- Define arguments. --->
	<cfargument
		name="Image"
		type="any"
		required="true"
		/>

	<!--- Define the local scope. --->
	<cfset var LOCAL = {} />

	<!---
		Copy the image. We don't want to mess up the original
		since the text will ruin it. Here, we have to use the
		ImageCopy() function since Duplicate() will not copy
		the underlying buffered image (at least that's what
		I assume is why Duplicate() doesn't work).
	--->
	<cfset ARGUMENTS.Image = ImageCopy(
		ARGUMENTS.Image,
		0,
		0,
		ARGUMENTS.Image.GetWidth(),
		ARGUMENTS.Image.GetHeight()
		) />


	<!---
		ASSERT: At this point, we have copied the actual
		graphical data into our new image with ImageCopy().
		This has NOT copied over any of the environmental
		setting (color, antialiasing, etc). We have a clean
		slate in which we must set our own properties.
	--->


	<!---
		Now that we have a fresh image, let's build up the
		attribute collection that we are going to use when
		writing the text. This can define the font family,
		size, and style. This CANNOT define the font color.
		That must be set using ImageSetDrawingColor() which
		is done farther below.
	--->
	<cfset LOCAL.Attributes = {
		font = "Courier New",
		size = "14",
		style = "plain"
		} />

	<!---
		Since our text might be on crazy colored images, we
		are going to write the text first in black for a drop
		shadow, and then we are going to write it in white
		sligtly above that.
	--->

	<!--- Create an offset value for the text. --->
	<cfset LOCAL.Offset = 0 />

	<!--- Loop over the two color choices. --->
	<cfloop
		index="LOCAL.Color"
		list="##000000,##FFFFFF"
		delimiters=",">

		<!--- Set the current color. --->
		<cfset ImageSetDrawingColor(
			ARGUMENTS.Image,
			"#LOCAL.Color#"
			) />


		<!---
			We want the drop shadow text to be a little bit
			fuzzy (it's a drop shadow). Therefore, if we have
			a zero offset (first go), turn antialiasing on.
		--->
		<cfif LOCAL.Offset>

			<!--- Clean text. --->
			<cfset ImageSetAntialiasing(
				ARGUMENTS.Image,
				"off"
				) />

		<cfelse>

			<!--- Fuzzy text. --->
			<cfset ImageSetAntialiasing(
				ARGUMENTS.Image,
				"on"
				) />

		</cfif>


		<!--- Write the width overlayed on the image. --->
		<cfset ImageDrawText(
			ARGUMENTS.Image,
			("Width: " & (ARGUMENTS.Image.GetWidth() & "px")),
			(10 - LOCAL.Offset),
			(20 - LOCAL.Offset),
			LOCAL.Attributes
			) />

		<!--- Write the height overlayed on the image. --->
		<cfset ImageDrawText(
			ARGUMENTS.Image,
			("Height: " & (ARGUMENTS.Image.GetHeight() & "px")),
			(10 - LOCAL.Offset),
			(38 - LOCAL.Offset),
			LOCAL.Attributes
			) />

		<!---
			Increment the offset so that the white text
			will be up and left one of the drop shadow.
		--->
		<cfset LOCAL.Offset++ />

	</cfloop>


	<!--- Return the updated image. --->
	<cfreturn ARGUMENTS.Image />
</cffunction>
Even though it's not entirely relevant to this post, there is something I would like to go into a tad bit of detail (regarding the above UDF) because at first, it was throwing me through a loop. Once I get the ColdFusion image object passed in the AddImageInfo() function, I create a copy of it using the ImageCopy() method. I do this because I don't want to corrupt the image the was passed in as it was passed in by reference (not by value).
At first, I thought I would just copy the image using the CFImage tag:
<!---
	Copy the image and overwrite the passed in argument
	value. Since ColdFusion images are passed around by
	referene, this should create a COPY of the image and
	then save that new image reference over the one that
	was passed in.
--->
<cfimage
	action="read"
	source="#ARGUMENTS.Image#"
	name="ARGUMENTS.Image"
	/>
Notice that we are reading in the passed-in ColdFusion image object and then overwriting the ARGUMENTS.Image value. This SHOULD have created a new variable value, there by, detaching this reference from the image that was passed in. However, ColdFusion is doing something very strange here - CFImage[ action=read ] does not copy the image to a new variable, it seems to be copying the image data back into the existing variable. To see this in action, take a look at this UDF:
<cffunction
	name="AlterImage"
	access="public"
	returntype="any"
	output="false"
	hint="Randomly alters an image and returns it.">

	<!--- Define arguments. --->
	<cfargument
		name="Image"
		type="any"
		required="true"
		/>

	<!---
		Copy the image and overwrite the passed in argument
		value. Since ColdFusion images are passed around by
		referene, this should create a COPY of the image and
		then save that new image reference over the one that
		was passed in.
	--->
	<cfimage
		action="read"
		source="#ARGUMENTS.Image#"
		name="ARGUMENTS.Image"
		/>

	<!--- Draw a random line. --->
	<cfset ImageDrawLine(
		ARGUMENTS.Image,
		RandRange( 0, ARGUMENTS.Image.GetWidth() ),
		RandRange( 0, ARGUMENTS.Image.GetHeight() ),
		RandRange( 0, ARGUMENTS.Image.GetWidth() ),
		RandRange( 0, ARGUMENTS.Image.GetHeight() )
		) />

	<!--- Return the altered image. --->
	<cfreturn ARGUMENTS.Image />
</cffunction>
Notice that I am supposedly overwriting the passed in argument with a duplicate of it. Ok, now let's put it into action:
<!--- Read in the original image. --->
<cfimage
	action="read"
	source="./mud_monster.jpg"
	name="objImage"
	/>

<!--- Resize image. --->
<cfimage
	action="resize"
	source="#objImage#"
	width="35%"
	height="35%"
	name="objImage"
	/>


<!---
	Write the image to the browser three times. For each
	write, alter the image. Notice that we are not storing
	the AlterImage() return value anywhere.
--->
<cfimage
	action="writetobrowser"
	source="#AlterImage( objImage )#"
	/>

<cfimage
	action="writetobrowser"
	source="#AlterImage( objImage )#"
	/>

<cfimage
	action="writetobrowser"
	source="#AlterImage( objImage )#"
	/>
Notice that we are altering the image as we write it to the browser. Since we creating a copy of the image in the UDF, each outputted image should only have ONE line on it. However, when we run the above code, we get:
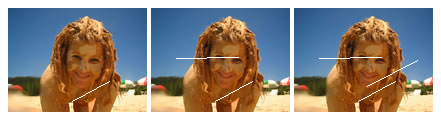
Notice that each AlterImage() call updated the original image data such that each subsequent call built on top of the previous one. Clearly, our CFImage[ action=read ] is NOT overwriting the variable, ARGUMENTS.Image. This got me thinking - is this complicated by the fact that it was a function or something? I figured I would try this without using a UDF:
<!--- Read in the existing image to a new variable name. --->
<cfimage
	action="read"
	source="#objImage#"
	name="objNewImage"
	/>

<!--- Now, add a border to the new image. --->
<cfimage
	action="border"
	source="#objNewImage#"
	thickness="2"
	color="##0000CC"
	name="objNewImage"
	/>

<!--- Now, output both the original image and the image. --->
<cfimage
	action="writetobrowser"
	source="#objImage#"
	/>

<cfimage
	action="writetobrowser"
	source="#objNewImage#"
	/>
Notice here that we are reading in the image but storing it into a new variable name (objImage vs. objNewImage). If this works the same way as the preceding example, then objImage and objNewImage should point to the same image data. Yet, when we run the above code, we get:

In this case, the two variables, objImage and objNewImage, point to independent copies of the image. We know this because, if they pointed to the same image, a border applied to one would show up in both WriteToBrowser tags.
This is very strange behavior, and it feels to me like a bug in the way CFImage handles variable names that overwrite themselves. Anyway, just be careful when reading one image into another image as it might now always do what you expect it to. And, just so you know, to make sure I wasn't crazy, I tried something similar with query-based function where the I ran a query that overwrite itself:
<cfquery name="ARGUMENTS.Query" dbtype="query">
	SELECT
		*
	FROM
		Query
</cfquery>
Notice that I am overwriting ARGUMENTS.Query by running a query of queries on ARGUMENTS.Query. This was the closest thing I could think of that would duplicate the "situation" but with a different data type. This works just as you would expect it to (creating a new copy of the query, leaving the original alone).
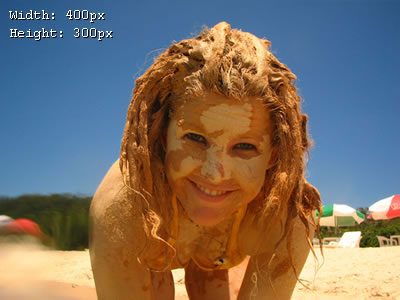
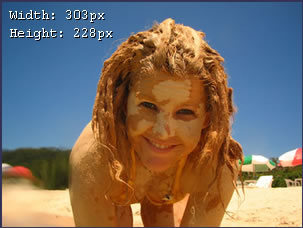
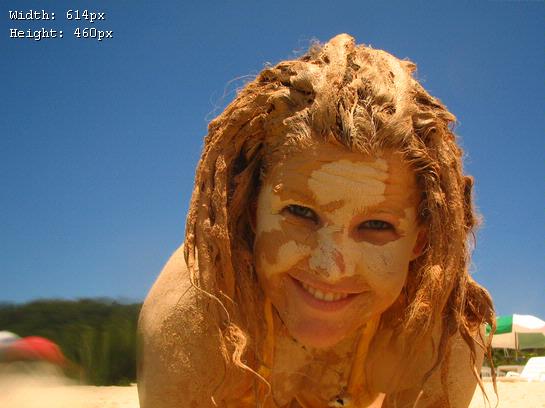
Well, sorry about the huge tangent, but I felt that that was important to cover since we are covering tag-based image manipulation. Now that we have that done with, we can actually start to explore the CFImage tag functionality. To start with, let's just read in the mud monster image and output it with its added data (notice that I will be running all images through the AddImageInfo() UDF upon output):
<!--- Read in the original image. --->
<cfimage
	action="read"
	source="./mud_monster.jpg"
	name="objOriginalImage"
	/>


<!--- Write the origianl to the browser. --->
<cfimage
	action="writetobrowser"
	source="#AddImageInfo( objOriginalImage )#"
	/>
Running the above, we get the following image:
CFImage - Add Border To Image
When using CFImage to add a border, the related attributes (in addition to the standard CFImage attributes) are:
- Color (optional)
- Thickness (optional)
The color can take a hexadecimal value or a named color. But, come on, we are developers - we don't see colors in names, we see them in HEX! Of course, if you do want to use the named colors, CFImage supports just a select few:
- Black :: ##000000
- Blue :: ##0000FF
- Red :: ##FF0000
- Gray :: ##808080
- LightGray :: ##D3D3D3
- DarkGray :: ##A9A9A9
- Green :: ##008000
- Pink :: ##FFC0CB
- Cyan :: ##00FFFF
- Magenta :: ##FF00FF
- Orange :: ##FFA500
- White :: ##FFFFFF
- Yellow :: ##FFFF00
We are using the double hash (##) in the color names because when they are used as tag attributes, ColdFusion is going to try to evaluate the stuff between hash signs. So, really what's going on here is that the double hash is just an escaped hash in the tag attribute. The border color defaults to black if you don't include it.
The thickness is the width of the border in pixels. This defaults to 1 if you don't include it.
Let see it in action:
<!---
	Take the original image and add a border (save
	it into a new image variable).
--->
<cfimage
	action="border"
	source="#objOriginalImage#"
	color="##333355"
	thickness="2"
	name="objImage"
	/>

<!--- Write the new image to the browser. --->
<cfimage
	action="writetobrowser"
	source="#AddImageInfo( objImage )#"
	/>
When we run that, we get the following image:
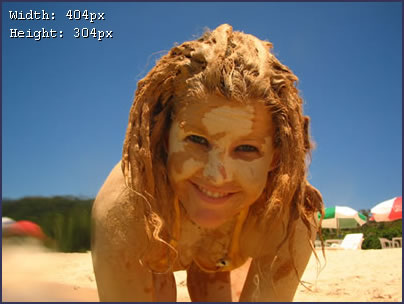
Notice that this new image is bigger in dimension to the original image. When adding a border, the border gets added to existing image, there by increasing its height and width by double the thickness of the rule.
CFImage - Resize Image
When using CFImage to resize an image, the related attributes (in addition to the standard CFImage attributes) are:
- Height
- Width
These attributes are both required and can be either in pixels (just the number) or in percentage (the number followed by the percent sign). In order for you to maintain the aspect ratio you must do your own math if you use pixels. If you want to use percentages, then just use the same percentage for each attribute (NOTE: When using the ImageResize() function, you do not need to include both values).
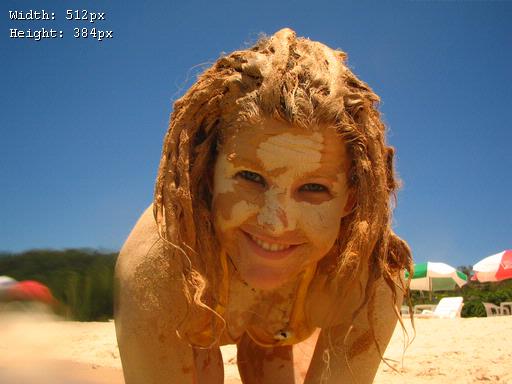
Let's see it in action:
<!---
	Take the modified image and resize it 75% of
	it's original size.
--->
<cfimage
	action="resize"
	source="#objImage#"
	height="75%"
	width="75%"
	name="objImage"
	/>

<!--- Write the new image to the browser. --->
<cfimage
	action="writetobrowser"
	source="#AddImageInfo( objImage )#"
	/>
When we run that, we get the following image:
CFImage - Rotate Image
When using CFImage to rotate an image, the related attributes (in addition to the standard CFImage attributes) are:
- Angle
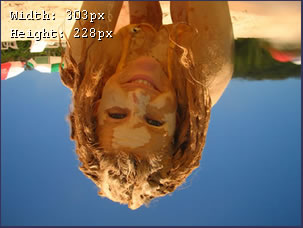
Angle is the number of degrees to rotate the image in a clockwise fashion. There are two kinds of rotational actions: 90 degree rotations and non-90 degree rotations. Let's take a look at a 90 degree rotation in action:
<!---
	Take the modified image and rotate it 180 degrees.
	This will essentially flip the image up-side-down.
--->
<cfimage
	action="rotate"
	source="#objImage#"
	angle="180"
	name="objImage"
	/>

<!--- Write the new image to the browser. --->
<cfimage
	action="writetobrowser"
	source="#AddImageInfo( objImage )#"
	/>
This rotates the image by a multiple of 90 degrees (180 degrees), which will basically flip the image up-side-down, giving us this:
When you rotate an image to something other than a multiple of 90 degrees, the problem you get is that the image no longer fits nicely on the existing canvas. In order for this to work, the canvas size has to increase to accommodate the diagonal width of the graphic. Let's give it a go:
<!---
	Take the modified image and rotate it 225 degrees. This
	will not fit into a 90 degree increment and will cause
	the canvas size to increase.
--->
<cfimage
	action="rotate"
	source="#objImage#"
	angle="225"
	name="objImage"
	/>

<!--- Write the new image to the browser. --->
<cfimage
	action="writetobrowser"
	source="#AddImageInfo( objImage )#"
	/>
Running the above code, we get the following image:
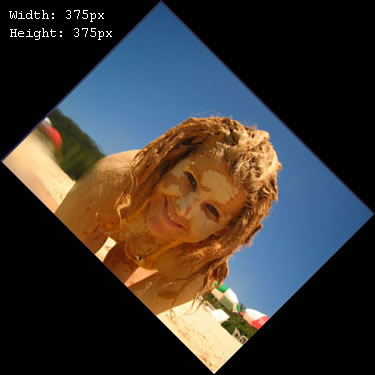
See how the image canvas size had to increase. The background fill color is black. I could not figure out how to change this fill color using any of the Image manipulation functions including ImageSetBackgroundColor() and ImageSetDrawingColor(). I am sure that this can be changed, I just couldn't figure out where to set it.
CFImage - CAPTCHA Creation
CAPTCHA stands for "Completely Automated Turing Test To Tell Computers and Humans Apart" and is great for helping to prevent spam bot form submissions. When using CFImage to create a CAPTCHA graphic, the related attributes (in addition to the standard CFImage attributes) are:
- Height
- Width
- Text
- Difficulty (optional)
- Fonts (optional)
- FontSize (optional)
The height and the width attributes are both required and must be defined in pixels. These are not just arbitrary values; larger height and width values will space the given text out differently. Also, there are minimum values for the width; for the CAPTCHA image to display properly, the width value must be greater than the FontSize times the number of characters specified in text times 1.08. Luckily, if you try to use a width that is not adequate, ColdFusion will throw a fairly useful error:
Verify your inputs. The specified width for the CAPTCHA image is not big enough to fit the text. 363
Here, ColdFusion is telling you that the width is not big enough. What is less clear, but super useful, is that number at the end, 363, is the minimum width that the CAPTCHA image can be.
The text attribute is the text that is displayed in the CAPTCHA image. The point of the CAPTCHA functionality is not to create the text, it is to make it funky. You have to supply the text. Furthermore, there is nothing inherent to the CAPTCHA tag that will submit this text value in a form submission. If you want to use this with form submissions, you have to be sure to submit the text yourself (probably in some encrypted fashion).
The difficulty, which defaults to Low, determines how crazy the CAPTCHA image is.
Fonts is a comma delimited list of fonts that will be randomly used to render characters within the CAPTCHA image. You can't just use any old font here; according to the documentation, ColdFusion supports only the system fonts that the JD can recognize. For example, TT fonts in the Windows directory are supported on Windows.
FontSize, which defaults to 24, determines the size of the characters displayed in the image.
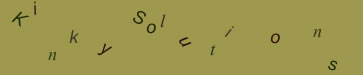
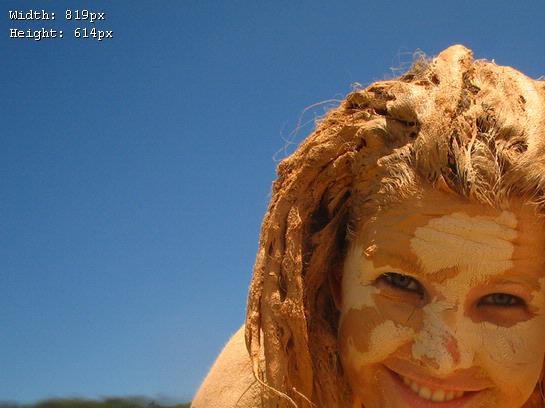
Let's take a look at it in action. I am going to loop over the different difficulty levels so you can see how they affect the way the image is rendered:
<!--- Loop over the various CAPTCHA difficulties. --->
<cfloop
	index="strDifficulty"
	list="low,medium,high"
	delimiters=",">

	<!--- Output the CAPTCHA image to the browser. --->
	<cfimage
		action="captcha"
		height="75"
		width="363"
		text="KinkySolutions"
		difficulty="#strDifficulty#"
		fonts="verdana,arial,times new roman,courier"
		fontsize="18"
		/>

	<br />

</cfloop>
Notice that we are not supplying a destination for the CFImage tag in this demo. If we leave out that attribute, ColdFusion will display the CAPTCHA image as an inline image similar to the WriteToBrowser action for other images. This will create random image names; however, if you do supply a destination, be very careful to not overwrite images that might be in use by other users in parallel requests (otherwise, their image might not correspond to the value that is required).
Running the above code, we get:

So that's basically the run down on how you can use the CFImage tag to manipulate images in ColdFusion 8.
But wait! I told you that 90% of the time, what we really want is to create thumbnails. You're damn right I did. Let's look at that a little more. Creating a thumbnail is really just a resizing of the image. And boy, does ColdFusion do a sweet job of this. It produces a higher quality resize than any other 3rd party tag / component that I have used.
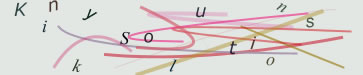
To demonstrate this, I am going to load the original Mud Monster image (1024 ox 768) into a ColdFusion image object and then loop over it 10 times, each resizing the ORIGINAL down to the given percentage:
<!--- Read in large mud monster. --->
<cfimage
	action="read"
	source="./mud_monster_large.jpg"
	name="objLargeImage"
	/>


<!---
	Loop over the original mud monster image 10 times
	for each level of percentage reduction. Notice that
	each resizing actually acts on the original image,
	not the previously resized image.
--->
<cfloop
	index="intScale"
	from="100"
	to="10"
	step="-10">

	<!--- Resize the image to the current scale. --->
	<cfimage
		action="resize"
		source="#objLargeImage#"
		width="#intScale#%"
		height="#intScale#%"
		name="objImage"
		/>

	<!---
		Here, I am addint the image info before writing it
		to the browser. I am doing this because I am going
		to crop the image and I want you to see the true
		dimensions at the time of resacling.
	--->
	<cfset objImage = AddImageInfo( objImage ) />


	<!---
		Crop the image. I am only doing this so it
		will display nicely on the page.
	--->
	<cfset ImageCrop(
		objImage,
		0,
		0,
		Min( objImage.GetWidth(), 545 ),
		Min( objImage.GetHeight(), 408 )
		) />

	<!--- Write the image to the browser. --->
	<cfimage
		action="writetobrowser"
		source="#objImage#"
		format="jpg"
		/>

	<br />

</cfloop>
Running the above code, we get the following resized thumbnail images:
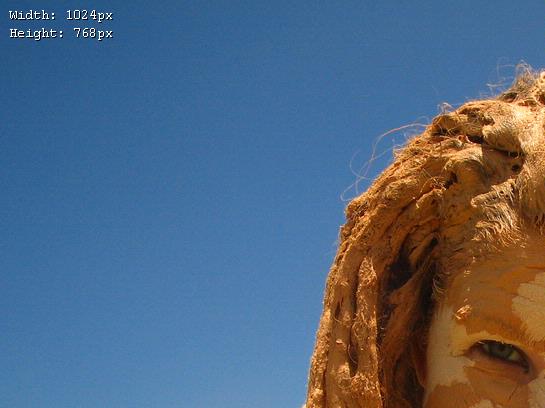
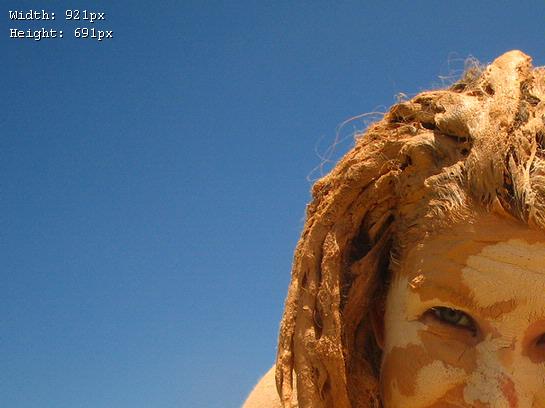


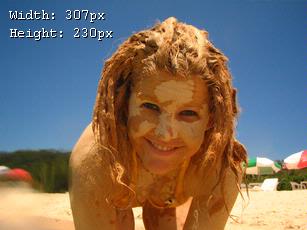

Wow! Just look at how smooth those colors are. That is top quality photo resizing if you ask me, and it was done nice and fast. This is where you can really see how beneficial the merging of Macromedia and Adobe was for us ColdFusion developers.
The ColdFusion 8 CFImage tag does some fantastic stuff. But to be honest, it only begins to scratch the surface of what ColdFusion 8 can do in terms of image manipulation. I am trying to keep a good balance here between info and deep exploration in these posts because there is just such a huge wealth of functionality to get through. I hope that seeing the quality and functionality of the CFImage tag will get you excited for more (coming soon).
Want to use code from this post? Check out the license.

Reader Comments
The drop shadow thing should be a udf by itself. Ie, a simple, "Write text X, with optional font and base color, on this image". That could be useful since it helps text stand out well.
FYI, start thinking of UDFs to submit to CFLib. I can support CF8 UDFs.
@Ray,
Good point. Actually, I originally tried to put a Chr( 13) & Chr( 10 ) in my text only to find that they were completely ignored. I was a bit irritated that it didn't like line breaks. But I guess it makes sense since there is no concept of a Line-Height in any of the draw text functions. What would be hella cool would be a UDF that take the text and a Width and will automatically wrap the text when it gets to that width :D
Of course, then you would need to take into account the character widths and all that jazz (oh my!).
But I will be thinking of some cool UDFs to make.
One of the biggest problems I have in the content management sites I write for various organisations is the image administration wizards.
Users invariably upload the strangest aspect ratio images and complain when they don't show up correctly on the site.
With a bit of imagination, I can see how I can allow users to upload any kind of image file and I should be able to slice, dice, and resize it to the various parts of their site.
This is so blood cool.
Superb tutorial, I particularly like the idea of putting the size on the image so one can see the changes. For development this facility is excellent.
Why not run one of your competitions to work out what is the coolest new feature of CF 8. I'm torn between CFIMAGE and the new Ajax tools, both offer endless new opportunities to write fun code!
Oh, by the way, I just read a previous post about you asking if you're a "senior" developer or not. You don't do yourself justice dude, your tutorials are the mark of an "Uber" developer, not just a "Senior" one :-)
-= jB
Nice work again Ben!... Gr8
Thanks guys. Glad you like this stuff. I think the CFImage / Image manipulation isn't getting enough praise. I think it so bad-ass.
I know, in my opinion cfimage is like installing warp-drive in the space shuttle. PHP and ASP and all the others seem utterly primitive and annoying by comparison. Can you imaging having to build your images tutorial using ASP or PHP? :-)
I can't even imagine writing a file-upload tutorial in ASP if it didn't have third-party extensions installed :) Ha ha ha... ASP.
The behavior of not overwriting the images in place is something we did on purpose to prevent a large number of bytes of memory getting wasted.
The work flow is expected to be:
- Read image
- Perform multiple operations on image
- Write image
Thus we take care not to make multiple copies during processing.
Hope that helps explain what is going on.
@Tom,
That makes sense. I guess I was trying to use it in a really awkward way. In fact, if you look at it, it almost doesn't even make sense. If you didn't know what I was trying to do (kill the pass-by-reference), you'd probably think I was an idiot ... "copy an image into itself - what is this fool doing?"
Thanks for clarifying that. Go Adobe!
By the way, I just fixed the captcha error messages to clearly indicate the minimum width or height.
Dude, you have to file beta bugs on this stuff!!
:-)
@Tom,
I get so timid about reporting bugs on the new stuff because I am never sure if it's a bug or if it's just stuff I don't know how to use :)
I have to say though, that error message is probably one of the most useful error messages ColdFusion has ever had. It's easy to tell someone they messed up, but I think is the first time an error message has ever given you an answer as well. Of course, a lot of the language does not function in that way, but I am glad to see the opportunity to be helpful was fully leveraged.
Ben,
You should never be shy of reporting bugs. In the worst case we will mark it as not a bug :-)
Btw, your coverage of CF8 features is awesome. Very thorough.. and thanks for all the feedbacks on the features.
Rupesh.
Ben,
Check out the Duplicate() CFML function for making a copy of an image object. That will do exactly what you wanted I think.
@Tom,
I will double-check, but I think I found that Duplicate() did the same as CFImage[ action=read ]. In fact, if you look at the comments in my code snippet, I say that Duplicate() will not work... now, of course, I was figuring this stuff out as I go, so let me try it again (I probably got confused). Let me go try it now.
@Tom,
I just ran my above demo with:
<cfimage
action="read"
source="#ARGUMENTS.Image#"
name="ARGUMENTS.Image"
/>
... and then with:
<cfset ARGUMENTS.Image = Duplicate( ARGUMENTS.Image ) />
Both do the same thing (not kill the ARGUMENTS.Image reference). I am working on the HostMySite.com CF8 Beta. Is it possible that they are using a slightly outdated Beta?
@Tom,
And just so we on the same page, the line that does work (which I swapped out in the above comments) was:
<cfset ARGUMENTS.Image = ImageCopy(
ARGUMENTS.Image,
0,
0,
ARGUMENTS.Image.GetWidth(),
ARGUMENTS.Image.GetHeight()
) />
@Rupesh,
More than happy to go through this stuff. It's gonna change the way I do my work :D
If you use a transparent PNG Image and rotate the image using imageRotate the bg will still be transparent!
<cfimage action="read" source="images/place_holder_for_text.png" name="myimage">
<cfset ImageSetAntialiasing(myimage, 'on')>
<cfset ImageSetDrawingColor(myImage,"blue")>
<!--- Set the text attributes. --->
<cfset attr = StructNew()>
<cfset attr.font = "Times New Roman">
<cfset attr.underline = "no">
<cfset attr.size = 36>
<cfset attr.style = "bolditalic">
<cfset ImageDrawText(myImage, 'Some Text',80,30,attr)>
<cfset ImageRotate(myImage, -15)>
<cfimage action = "writeToBrowser" source="#myImage#">
Remember use a transparent PNG...
Is it possible to declare a variable..
<cfset title = "kinky solutions" ..then..
using cfimage create an image out of using an inline style sheet?
@COwebmaster,
I am not sure what a Title variable and an inline style sheet have to do with each other? Can you explain further?
I need to create an image on the fly when a user posts the text in a form field. After doing some research it appears that ImageDrawText can help me out with that but still I need an existing image to draw text on plus it writes it to the browser. I want to know if cf8 can create a png, or gif image with a transparent background on the fly..creates the image using the attributes I give it (color, face, size, etc), then pushes the file to a server destination. Can that tag do all of that?
@COwebmaster,
Creating transparent images is not straightforward in the documentation, but it is really easy in the code:
www.bennadel.com/index.cfm?dax=blog:1045.view
As far as writing to file vs. writing to browser, all you need to do is do a CFImage[ action = write ] to write it to file.
wow...I used to write coldfusion 5 codes and have just started working on a project in 8. I need to resize images before ppl upload them to the website. This new cfimage is very exciting! What if you do not know the server path, can you find out where the file has to go (I mean extract the path dynamically?)or is this only suitable for dedicated servers where you actually know the structure of the server?
Hi,
Have you ever used any of these methods to change a color set within an image? For example to change all the black to red?
I'm not even sure its possible, but I'm digging through all the articles on cfimage.
Thanks
Shaun
@Ben
Re: "See how the image canvas size had to increase. The background fill color is black. I could not figure out how to change this fill color using any of the Image manipulation functions including ImageSetBackgroundColor() and ImageSetDrawingColor(). I am sure that this can be changed, I just couldn't figure out where to set it."
I have searched and tried different things but cannot get the background color of a rotated PNG image to remain transparent. It has a transparent background when I save it using SnagIt... but once I read it in and rotate it, the background goes black.
And I haven't been able to change that background color to something closer to a more blendable color.
I also couldn't get the imagenew function to take the "argb" argument... I get a coldfusion error.
I'm using ColdFusion 9. I'd appreciate any suggestions!
~ Beth
I just wish they had bought Jukka Manner's CFX_Image and used that instead of the current tag. His was light-years ahead of the CFImage in its ability to manipulate images and text. I am having to rewrite all my code to use CFImage in order to run it under Windows 2008 64-bit, and I am losing functionality in doing so. In particular the ability to set a text box by defining the upper left coordinate instead of the baseline of the top line, and the ability to insert \n newlines into the text instead of having to create multiple independent lines of text. Ach.