
Creating AngularJS-Inspired "Directive" Components In ReactJS
Last week, I took a look at "higher order components" in ReactJS. In that demo, I wrapped one component in another component that injected mouse-driven data into the inner component. This worked, but it felt kludgy. And, more than anything, it felt backwards; mouse-driven data shouldn't be injected into a component - it should be managed by the component. Higher order components made me long for the "directive glue" that AngularJS uses. So, I wanted to come at the problem again, this time creating an AngularJS-inspired "directive component" that would manage the mouse events.
Run this demo in my JavaScript Demos project on GitHub.
In AngularJS, the separation of concerns is very clear. Your controllers deal with state and state change while your directives deal with browser events that may or may not feed back into the controller. In ReactJS, things can get very muddled. Because ReactJS doesn't have this strict separation of concerns, your ReactJS components can become quite large, especially if they deal with a lot of DOM (Document Object Model) events.
But, as we saw with Higher order components, we can have multiple ReactJS components share the same rendered element. So, maybe we can borrow some of the AngularJS mindset and create "pairs" of ReactJS components that co-manage a particular view. In this approach, one of the ReactJS components can handle the state and the rendering (which is based on the state / view-model); and, the other ReactJS component can deal with the "directive glue" the binds DOM-events to the "controller" component.
To explore this approach, I'm bringing back the simple box demo in which we have a pointer follow the mouse within the bounds of the rendered box. The top-level Demo component will manage the state and the rendering and will explicitly wrap the root element in the "DemoDirective" component which will be our "mouse glue":
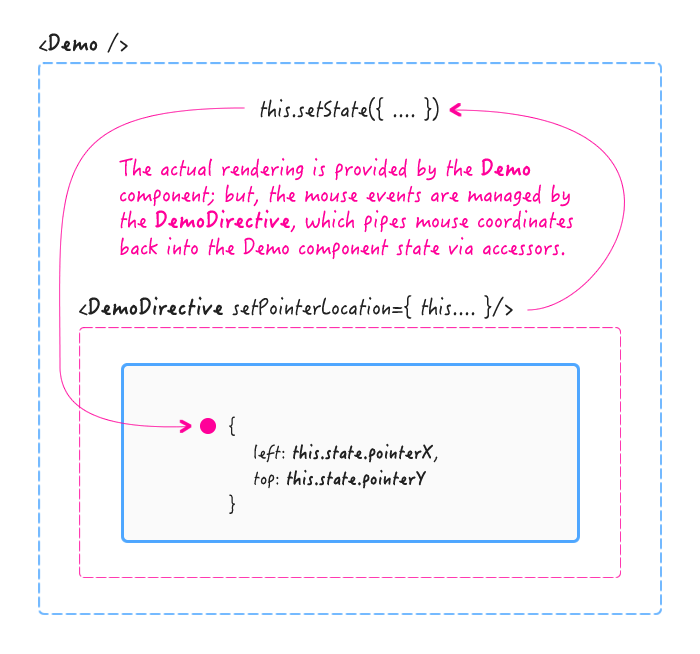
The DemoDirective doesn't contribute to the rendering at all. It just returns its children as the virtual DOM. This allows the Demo component to both manage the rendering while, at the same time, returning the DemoDirective as its root element. And, since the render() function must always return a single React Element, we must enforce a single child, in the DemoDirective, using propTypes:
children: React.PropTypes.element.isRequired
This ensures that the Demo component only define a single root node inside of the DemoDirective wrapper which, in turn, ensures that only a single React Element will be returned in the DemoDirective render() function. At this point, both the Demo and the DemoDirective components have access to the same rendered element, which allows one to handle the mouse events and one to handle the rendering.
<!doctype html>
<html>
<head>
	<meta charset="utf-8" />

	<title>
		Creating AngularJS-Inspired "Directive" Components In ReactJS
	</title>

	<link rel="stylesheet" type="text/css" href="./demo.css"></link>
</head>
<body>

	<h1>
		Creating AngularJS-Inspired "Directive" Components In ReactJS
	</h1>

	<div id="content">
		<!-- This content will be replaced with the React rendering. -->
	</div>


	<!-- Load scripts. -->
	<script src="../../vendor/reactjs/react-0.13.3.js"></script>
	<script src="../../vendor/reactjs/JSXTransformer-0.13.3.js"></script>
	<script src="../../vendor/jquery/jquery-2.1.0.min.js"></script>
	<script type="text/jsx">

		// I manage the Demo widget.
		var Demo = React.createClass({

			// I setup the initial state and instance properties.
			getInitialState: function() {

				return({
					pointerX: 50,
					pointerY: 100
				});

			},


			// ---
			// PUBLIC METHODS.
			// ---


			// I render the component based on the current state.
			render: function() {

				// When displaying the pointer, we don't want it to be directly under the
				// mouse; as such, we'll offset it a bit so that it is more visible.
				var pointerStyle = {
					left: ( this.state.pointerX - 10 ),
					top: ( this.state.pointerY - 10 )
				};

				// NOTE: The DemoDirective is the AngularJS-inspired "directive glue"
				// that binds the JavaScript events to this controller view. This allows
				// the component to concentrate on managing state and rendering based on
				// state and defers user's mouse-interaction to the "directive".
				// --
				// Since the directive doesn't actually render anything directly, we have
				// to provide it with a single [root] child node.
				return(
					<DemoDirective setPointerLocation={ this.setPointerLocation }>

						<p className="box">

							Pointer At: { this.state.pointerX } x { this.state.pointerY }

							<span className="pointer" style={ pointerStyle }>
								<br />
							</span>

						</p>

					</DemoDirective>
				);

			},


			// I update the location of the pointer with the given local coordinates.
			setPointerLocation: function( x, y ) {

				this.setState({
					pointerX: x,
					pointerY: y
				});

			}

		});


		// --------------------------------------------------------------------------- //
		// --------------------------------------------------------------------------- //


		// I am the AngularJS-inspired "directive" component for the Demo controller
		// view. This maybe can be thought of as the ReactJS equivalent to the linking
		// function. I pipe the user's mouse events into the controller's view-model
		// (via the passed-in accessor methods).
		// --
		// CAUTION: This "directive" component assumes that the top-level element
		// reference does not change once it is rendered (as the mouse event bindings
		// do not change dynamically).
		var DemoDirective = React.createClass({

			// Incoming property validation.
			// --
			// NOTE: The "element" type enforces a single child structure.
			propTypes: {
				children: React.PropTypes.element.isRequired,
				setPointerLocation: React.PropTypes.func.isRequired
			},


			// I setup the initial state and instance properties.
			getInitialState: function() {

				// I will be the cached DOM element reference.
				this.element = null;

				// I will be the cached offset from the document node.
				this.offset = null;

				return( null );

			},


			// ---
			// PUBLIC METHODS.
			// ---


			// I get called once, on the client-side, when the component has been
			// mounted in the DOM (Document Object Model). At this point, the rendered
			// element has a physical dimension and can be referenced. This gives us a
			// chance to bind the DOM-event handlers.
			componentDidMount: function() {

				// Cache the element reference.
				this.element = $( React.findDOMNode( this ) )
					.on( "mousemove", this.handleMousemove )
				;

				// Cache the offset (for global-to-local translation).
				// --
				// CAUTION: For this demo, I'm assuming that the offset never changes
				// and therefore doesn't have to be recalculated.
				this.offset = this.element.offset();

				// Now that the rendered component has dimensions, we can calculate the
				// initial pointer location, based on the mid-point of the element.
				this.props.setPointerLocation(
					Math.floor( this.element.outerWidth() / 2 ),
					Math.floor( this.element.outerHeight() / 2 )
				);

			},


			// I clean up DOM bindings right before the component is unmounted.
			componentWillUnmount: function() {

				this.element
					.off( "mousemove", this.handleMousemove )
				;

			},


			// I pipe the mouse movement events into the state of the controller view.
			handleMousemove: function( event ) {

				// When piping the mouse events into the controller view, let's convert
				// the page-global coordinates to element-local coordinates.
				this.props.setPointerLocation(
					Math.floor( event.pageX - this.offset.left ),
					Math.floor( event.pageY - this.offset.top )
				);

			},


			// I render the component based on the current state.
			render: function() {

				// Because this "directive" component requires the children to be a
				// single child node, using the "element" PropType, we can be assured
				// that it is safe to return the children "collection" when rendering,
				// which requires a single root node in ReactJS.
				return( this.props.children );

			}

		});


		// --------------------------------------------------------------------------- //
		// --------------------------------------------------------------------------- //


		// Render the root Demo and mount it inside the given element.
		React.render( <Demo />, document.getElementById( "content" ) );

	</script>

</body>
</html>
To me, this code feels much easier to reason about. Maybe that's because it looks more like AngularJS code? Not sure. But, I really like the way that one of the ReactJS components is basically just a state machine and knows nothing about the browser while the other component is the one that knows about the browser and how to glue it back into the accessors exposed by the state machine.
Want to use code from this post? Check out the license.

Reader Comments