
Experimenting With Higher-Order Components In ReactJS
CAUTION: This post is more exploration than it is explanation. Take it with a grain of tasty pink himalayan salt.
In ReactJS, there is this emerging concept of "Higher-Order Components." These are components that wrap around other components and provide additional behavior and data input (through properties). A higher-order component is created through the use of a factory function that takes the composed component and returns the "wrapping" component. Your code then renders the wrapping component which, in turn, renders the composed component. This is all terribly new to me, so I wanted to just give it a go. This post is my first look at this type of functionality, so don't read too heavily into it.
Run this demo in my JavaScript Demos project on GitHub.
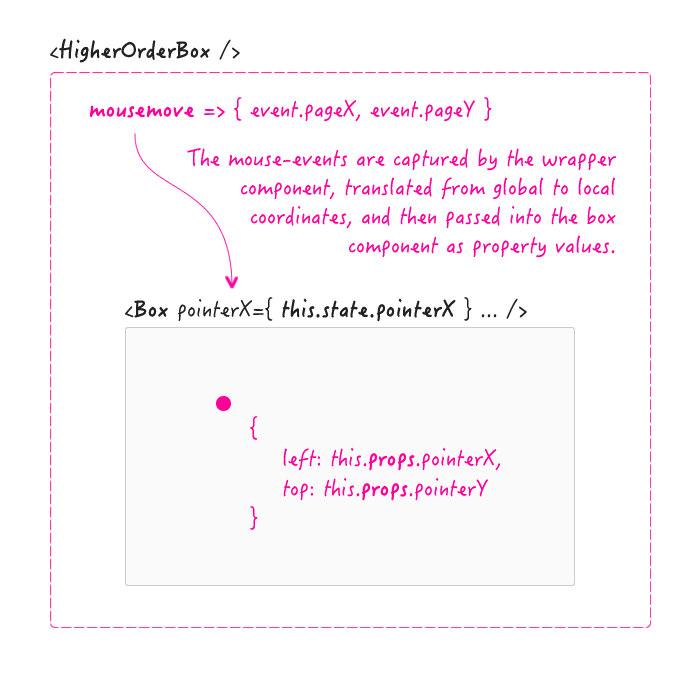
For this exploration, I wanted to create a box that would render a dot near the user's mouse cursor. The box component won't deal with the mouse-events directly - it will simply accept some {x/y} coordinates and render the dot accordingly. The "higher-order component" will take care of providing the mouse-event bindings and translating those page-events into the box-local {x/y} coordinates that will be passed into the box component.
Thinking about composing ReactJS elements in such a way poses some interesting problems. The biggest of which, in my opinion, is the fact that the composed element may completely change its rendering at any moment. This complicates the tracking of the mouse-movement. If I bind a mousemove event and then the DOM element - on which the event is bound - is swapped out, I essentially stop tracking the movement. To deal with this, the higher-order component has to keep track of which element is currently rendered by the composed component. And, if that element changes, the mouse-event bindings also have to be changed (ie, moved over to the newly rendered element).
NOTE: You could get around this by having the higher-order component render a static container element that, in turn, houses the composed element. But, at that point, we're altering the DOM just to provide a mouse-event behavior, which feels icky.
To cope with the black-box nature of the composed element, I'm using the componentDidUpdate() method, in the higher-order component, to check which element is currently rendered. And, if the rendered element changes, I unbind the existing mousemove event handler and re-bind it to the newly rendered element.
In the following code, notice that I am not rendering the Demo component directly. Instead, I'm passing it off to a factory function that is returning the higher-order component. This returned component is the one being mounted on the existing DOM:
<!doctype html>
<html>
<head>
	<meta charset="utf-8" />

	<title>
		Experimenting With Higher-Order Components In ReactJS
	</title>

	<link rel="stylesheet" type="text/css" href="./demo.css"></link>
</head>
<body>

	<h1>
		Experimenting With Higher-Order Components In ReactJS
	</h1>

	<div id="content">
		<!-- This content will be replaced with the React rendering. -->
	</div>


	<!-- Load scripts. -->
	<script src="../../vendor/reactjs/react-0.13.3.js"></script>
	<script src="../../vendor/reactjs/JSXTransformer-0.13.3.js"></script>
	<script src="../../vendor/jquery/jquery-2.1.0.min.js"></script>
	<script type="text/jsx">

		// I manage the Demo widget.
		var Demo = React.createClass({

			// I define the expected shape of the injected properties.
			// --
			// NOTE: Unless the .isRequired flag is used, these properties can be null.
			propTypes: {
				pointerX: React.PropTypes.number,
				pointerY: React.PropTypes.number
			},


			// I setup the initial state of the component, including instance properties.
			getInitialState: function() {

				// The "movingInDirection" property will keep track of which direction
				// the pointer is moving in.
				return({
					movingInDirection: null
				});

			},


			// ---
			// PUBLIC METHODS.
			// ---


			// I update the state based on the change in properties.
			componentWillReceiveProps: function( newProps ) {

				// If the pointer isn't available yet, we can't calculate any movement
				// delta - just keep existing state.
				if ( this.props.pointerX === null ) {

					return;

				}

				// The mouse directive is injecting pointer coordinates into this
				// component. Since we know where the pointer was previously, we can use
				// the delta-X to figure out which direction the pointer is moving in.
				if ( newProps.pointerX < this.props.pointerX ) {

					this.setState({
						movingInDirection: "left"
					});

				} else if ( newProps.pointerX > this.props.pointerX ) {

					this.setState({
						movingInDirection: "right"
					});

				}

			},


			// I render the component based on the current state.
			render: function() {

				// The pointer props are "optional" and may not be provided to the Demo
				// component yet (they won't be passed-in until the modules have a
				// physical dimension on the page). If the pointer has not yet been
				// provided, then we'll render the box without the pointer elements.
				if (
					( this.props.pointerX === null ) ||
					( this.props.pointerY === null )
					) {

					// NOTE: I am using a DIV here and P tag below. I am doing this on
					// purpose because I don't want ReactJS to be able to simply augment
					// the existing DOM node later on. I want the top-level DOM element
					// to have to be physically swapped out. This will make for a more
					// interesting exploration of the interaction between elements.
					return(
						<div ref="element" className="box">
							<br />
						</div>
					);

				}


				// NOTE: If we made it this far, we have pointer properties.


				// When displaying the pointer, we don't want it to be directly under the
				// mouse; as such, we'll offset it a bit so that it is more visible.
				var pointerStyle = {
					left: ( this.props.pointerX - 10 ),
					top: ( this.props.pointerY - 10 )
				};

				var classes = "box";

				// Apply additional classes based on pointer movement.
				if ( this.state.movingInDirection === "left" ) {

					classes += " moving-left";

				} else if ( this.state.movingInDirection === "right" ) {

					classes += " moving-right";

				}

				// NOTE: I am including ref="element" as an alternate means to reference
				// the current node (via this.refs.element.getDOMNode()).
				return(
					<p ref="element" className={ classes }>

						Pointer At: { this.props.pointerX } x { this.props.pointerY }

						<span className="pointer" style={ pointerStyle}>
							<br />
						</span>

					</p>
				);

			}

		});


		// --------------------------------------------------------------------------- //
		// --------------------------------------------------------------------------- //


		// I add mouse-event handlers to the given Demo component. The mouse coordinates
		// are captured and translated into "local" coordinates, which are injected into
		// the wrapped component as { pointerX } and { pointerY }.
		// --
		// NOTE: One of the key take-aways here is that the wrapper component and the
		// composed component deal with the ** same root-level DOM element **.
		function DemoMouseDirective( Component ) {

			// Define the wrapper class.
			var composed = React.createClass({

				// I setup the initial state of the component, including the instance
				// properties.
				getInitialState: function() {

					// I keep track of the offset of the container on the page. We will
					// need this in order to translate the global mouse coordinates to
					// a set of local pointer coordinates on the element.
					this.offset = {
						left: 0,
						top: 0
					};

					// I keep track of the currently rendered element so that we can
					// update mouse-bindings if the top-level rendering changes.
					this.element = null;

					// Since we want to center the pointer at first, we can't have valid
					// pointer data until the component is mounted and has physical
					// dimensions.
					return({
						pointerX: null,
						pointerY: null
					});

				},


				// ---
				// PUBLIC METHODS.
				// ---


				// I get called once, on the client-side, when the component has been
				// mounted in the DOM (Document Object Model). At this point, the rendered
				// element has a physical dimension and can be referenced.
				componentDidMount: function() {

					// When the component mounts, start tracking mouse events on the
					// element.
					this.element = $( this.refs.element.getDOMNode() )
						.on( "mousemove", this.handleMousemove )
					;

					// Cache the offset of the container so we don't have to recalculate
					// it during every mouse move event.
					// --
					// NOTE: I am making a calculated trade-off here between caching
					// performance and the possibility that the offset will actually
					// change due to content outside of this element. I am trying to
					// keep the exploration simple.
					this.offset = this.element.offset();

					// Set the initial pointer coordinates to the mid-point of the element.
					this.setState({
						pointerX: Math.floor( this.element.outerWidth() / 2 ),
						pointerY: Math.floor( this.element.outerHeight() / 2 )
					});

					console.info( "Rending root level tag:", this.element[ 0 ].tagName );

				},


				// I get called when the view-model updates are flushed to the DOM. At
				// this point, we can see if the top-level element has been switched;
				// and, if so, update the mouse bindings to point at the current element.
				componentDidUpdate: function() {

					var activeElement = this.refs.element.getDOMNode();

					// If the element is the same, there is nothing to do.
					if ( this.element.is( activeElement ) ) {

						return;

					}

					// If we've made it this far, the top-level element of the rendered
					// DOM-tree has changed. As such, we have unbind the previous mouse
					// events and re-bind them to the new element.
					console.warn( "Top-level element has changed." );
					console.info( "Rending root level tag:", activeElement.tagName );

					// Unbind the existing handler.
					this.element.off( "mousemove", this.handleMousemove );

					// Rebind the mouse handler and cache the element reference.
					this.element = $( activeElement )
						.on( "mousemove", this.handleMousemove )
					;

					// Recalculate and cache the offset of the element.
					this.offset = this.element.offset();

				},


				// I clean up DOM bindings right before the component is unmounted.
				componentWillUnmount: function() {

					$( this.refs.element.getDOMNode() )
						.off( "mousemove", this.handleMousemove )
					;

				},


				// I handle the mouse movement on the composed element.
				handleMousemove: function( event ) {

					// Convert the mouse event coordinates to local coordinates on the
					// composed element.
					this.setState({
						pointerX: Math.floor( event.pageX - this.offset.left ),
						pointerY: Math.floor( event.pageY - this.offset.top )
					});

				},


				// I render the component based on the current state.
				render: function() {

					// When rendering the mouse directive, we are going to actually
					// render the wrapped Component (passed in above). This will let the
					// mouse directive and the Component use the same top-level element
					// reference. I am also injecting the mouse directive's state as
					// properties on the Component. In this particular context, these
					// two expressions are functionally equivalent:
					// --
					// { ...this.state }
					// -- and --
					// pointerX={ this.state.pointerX } pointerY={ this.state.pointerY }
					// --
					// NOTE: I am including ref="element" as an alternate means to
					// reference the current node (via this.refs.element.getDOMNode()).
					return(
						<Component
							ref="element"
							{ ...this.state }>
						</Component>
					);

				}

			});

			return( composed );

		}


		// --------------------------------------------------------------------------- //
		// --------------------------------------------------------------------------- //


		// Before we render the Demo, we are going to wrap it in another component that
		// will capture mouse events and the pipe them into the Demo component, translated
		// as local pointer coordinates.
		var MouseEnabledDemo = DemoMouseDirective( Demo );

		// Render the root Demo and mount it inside the given element.
		React.render( <MouseEnabledDemo />, document.getElementById( "content" ) );

	</script>

</body>
</html>
When the higher-order component renders the composed component, you'll see that I am using the spread-operator to transfer the pointerX and pointerY state values into the composed component property values. I could have just as easily provided both pointerX and pointerY as explicit attributes; but, this was just one more JSX feature that I wanted to experiment with.
The idea of high-order components is very interesting. But, it will take me a while to truly wrap my head around it (no pun intended). That said, in retrospect, I don't think that mouse-events are really a good fit for this kind of approach. Thinking about the mouse as a data-provider requires a little too much "squinting." As a follow-up, I'd like to experiment with another form of class composition that I think might be more appropriate for mouse-events.
Want to use code from this post? Check out the license.

Reader Comments
Hi,
I had mental problem with High Ordered Components (HOC), but then I discover ES6 decorators. With that HOC became less bothering.
My last usage was with handling click outside of component. I found package which do that, but is only implemented as mixin. So i change that into decorator and there is simple usage for inspiration https://gist.github.com/schovi/e3780466f550877c9c16
@David,
That's interesting stuff. Though, I have to admit I know next to nothing about ES6 :( From looking at your code, it looks like the `@clickOutside` notation is doing a similar thing to the HOC factory method (in so much as it appears to take the base component and then ?returns? the HOC component)? I'm only guessing at that point because I really know much about the ES6 syntax.
The one thing that I didn't like about this approach (mine, not yours) was that it felt very "inverted." Meaning, the mouse-events were living *outside* the component, rather than inside them. Something about that just feels like I am trying to shoe-horn the props-based approach into an architecture that doesn't lend well to that model.
Anyway, after this, I tried to invert the approach and gave the base component the job of wrapping the content:
www.bennadel.com/blog/2890-creating-angularjs-inspired-directive-components-in-reactjs.htm
This way, the base component is the one that truly determines the behavior of the widgetry, which feels much more natural to me. At least, from an AngularJS background, this feels more in alignment with my AngularJS directives.
@Ben,
I found one limitation with decorator solution. That is when you apply it to component, you can never use that component itself. It is good for "one time used" components like "PaymentCartSelect", but not "GenericSelect." For second one you have to make copy of that component with decorator, or HOC :)