
How I Got Node.js Running On A Linux Micro Instance Using Amazon EC2
In the past, I've dabbled with Node.js (a server-side JavaScript runtime environment) on my local MacBook Pro. If you know JavaScript, it's not too hard to get something up and running on your local machine. Putting Node.js out into the wild, however, is whole other beast. Not only am I mediocre at managing web servers in general, I happen to know almost nothing about Amazon EC2 (Elastic Compute Cloud), Linux / Unix, Git, SSH, ports, routing, processes, and just about everything else that goes into managing a Node.js deployment. After a couple of hours, some online tutorials, and a bit of trial and error, I finally got something working! I managed to keep a Node.js process running on a Linux Micro instance on Amazon EC2! For those who are interested, I thought I would share my experience.
DISCLAIMER: I could not do any of this without the knowledgable guidance of many other blogs. Please take whatever I say in this post with a grain of salt. I am likely going to mangle terminology and provide misinformation (accidentally, of course).
I wanted to see if I could get Node.js up and running using manual labor. If you are interested in a managed Node.js platform as a service (PaaS), you might want to check out Nodejitsu. They provide a command-line tool that makes hosting and deploying Node.js application much more of a black-box experience.
For the following screenshots, please click on the smaller versions to view larger (1024 x 768) versions.
In order to deploy Node.js on an Amazon EC2 instance, the first thing you need to do is get yourself an EC2 (Elastic Compute Cloud) instance. Log into Amazon Web Services (AWS) and select the EC2 tab. On the EC2 landing page, you'll want to select "Key Pairs". Theoretically, you can do this as part of the Launch workflow; however, I found that I could not get past Step 1 without doing this beforehand.
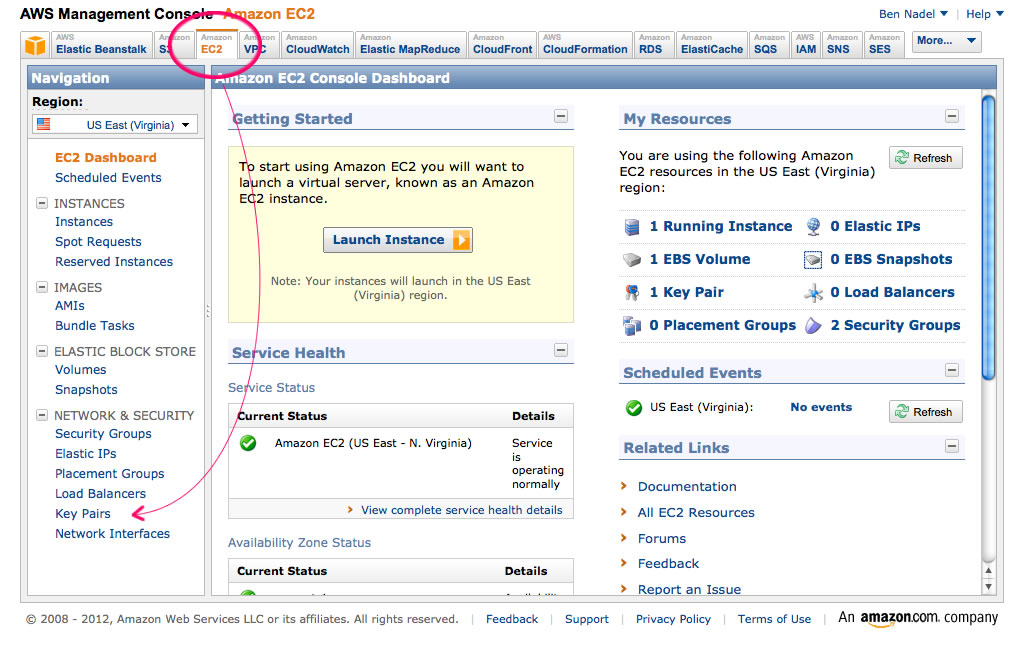
I don't fully understand what a Key Pair is; but, from what I can gather, it's a way to establish a trusted, authenticated connection between your computer (the client) and the server during an SSH operation. From the Key Pairs screen, create a new key pair:

Enter the name of your key pair.

Once you've created the Key Pair, Amazon should prompt you to save the private key. Make sure you know where the file gets saved on your local machine as you'll need to use it in subsequent step.
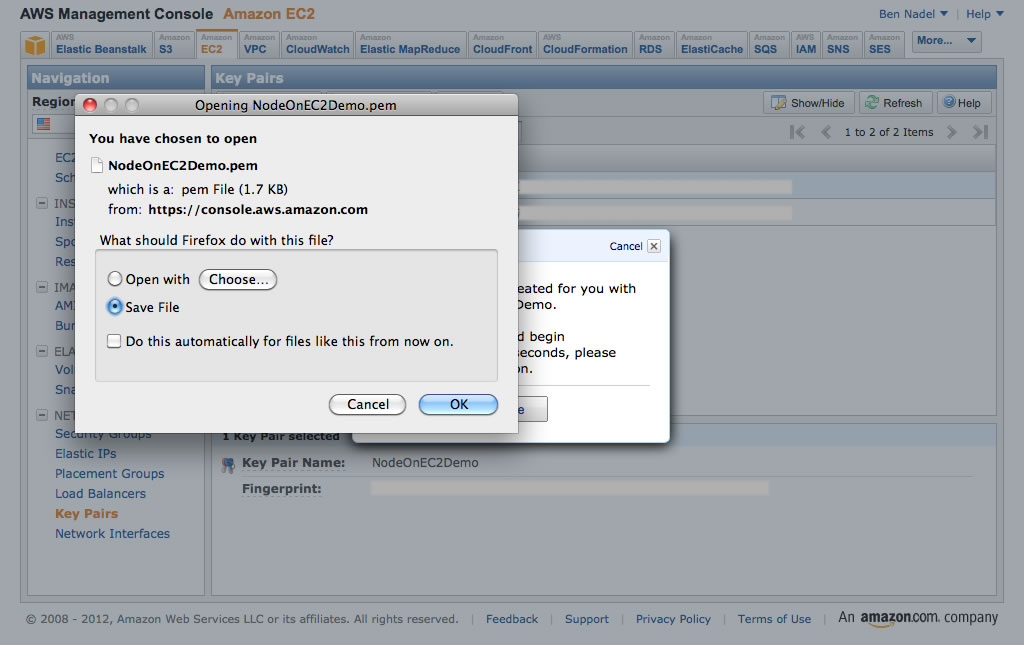
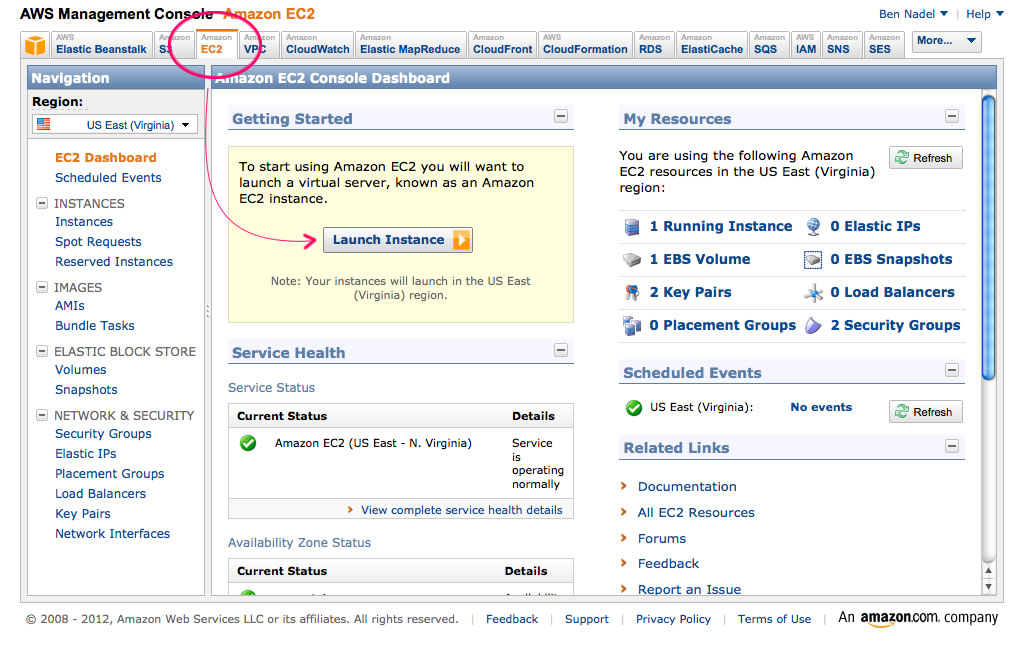
Once you've downloaded the PEM file (private key), return to the EC2 landing page and click the Launch Instance button.
This should take you into the launch wizard. Here, you can name your instance and select the Key Pair that we just created. I picked the Amazon Linux Quicklaunch option because that's what Kostas Mavropalias recommended on this blog. Apparently, the 64-bit version works well with Node.js.
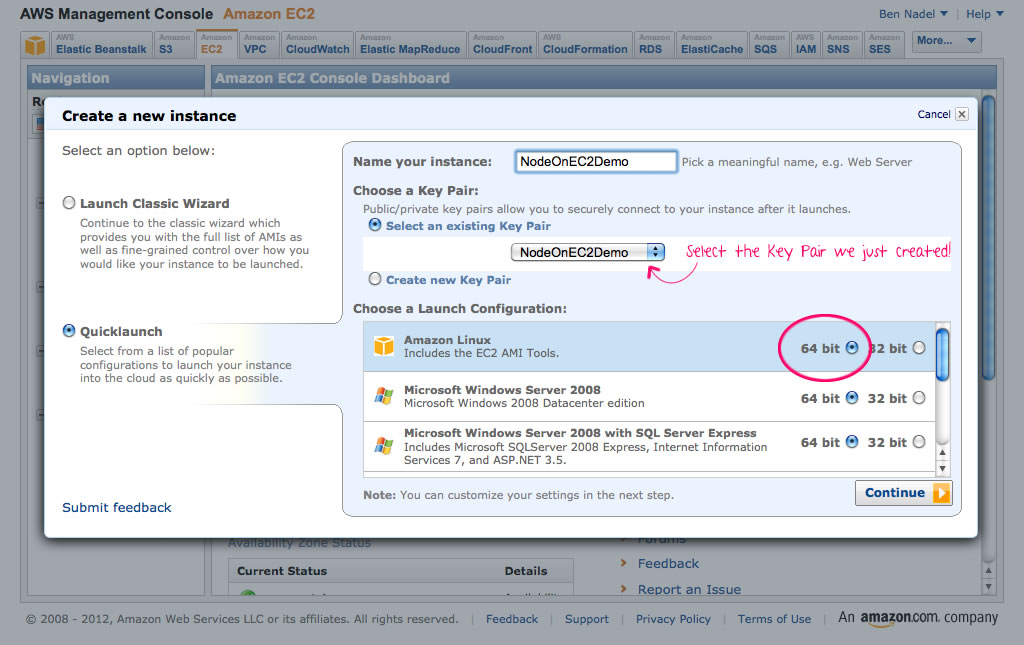
Once you've named and selected your instance, click Continue. This will take you to a confirmation page. On this page, take note of which security group is assigned to this instance. We will need to make some edits to this group to allow HTTP and TCP access.
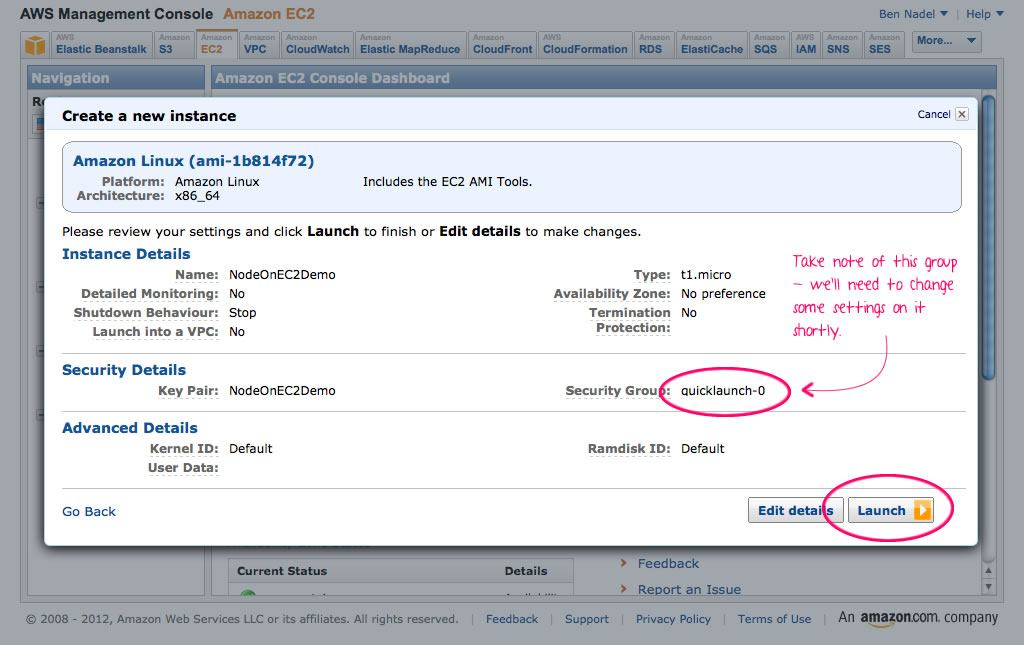
Now click Launch. This will immediately create and launch your new Linux micro instance. Once the instance starts, you will begin using billable processing time. But, don't worry! It's mad cheap - a free period followed by $.02 / hour! Booya, grandma!
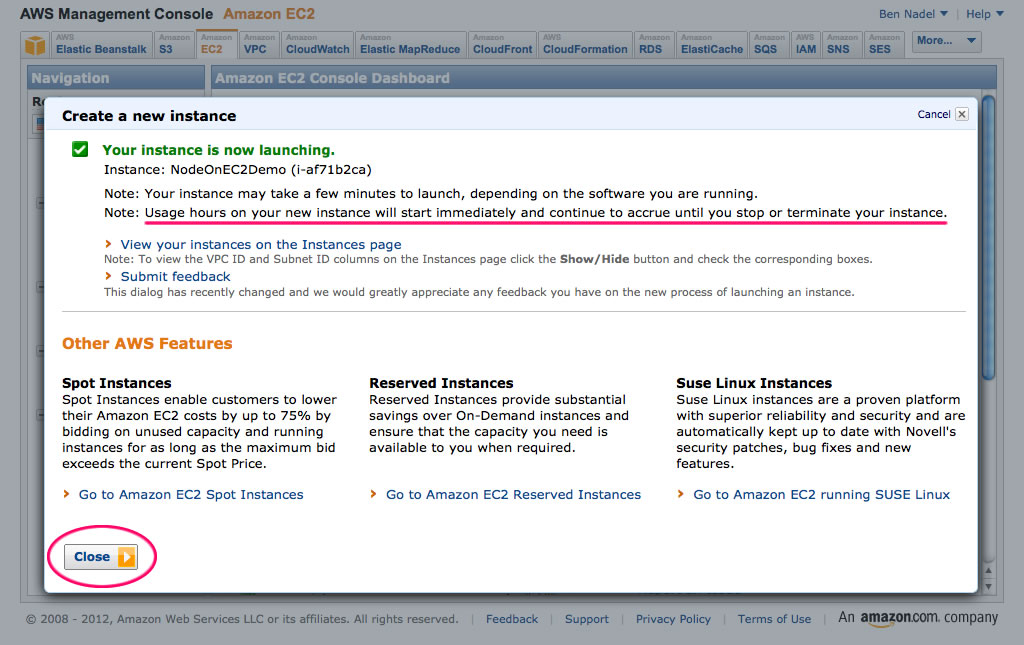
Click Close to return to the EC2 landing page.
Now, we need to go into the Security Groups to edit the public access permissions for this machine.

Once on the Security Groups page, select the security group associated with our instance and then select the Inbound tab to see which ports are open.
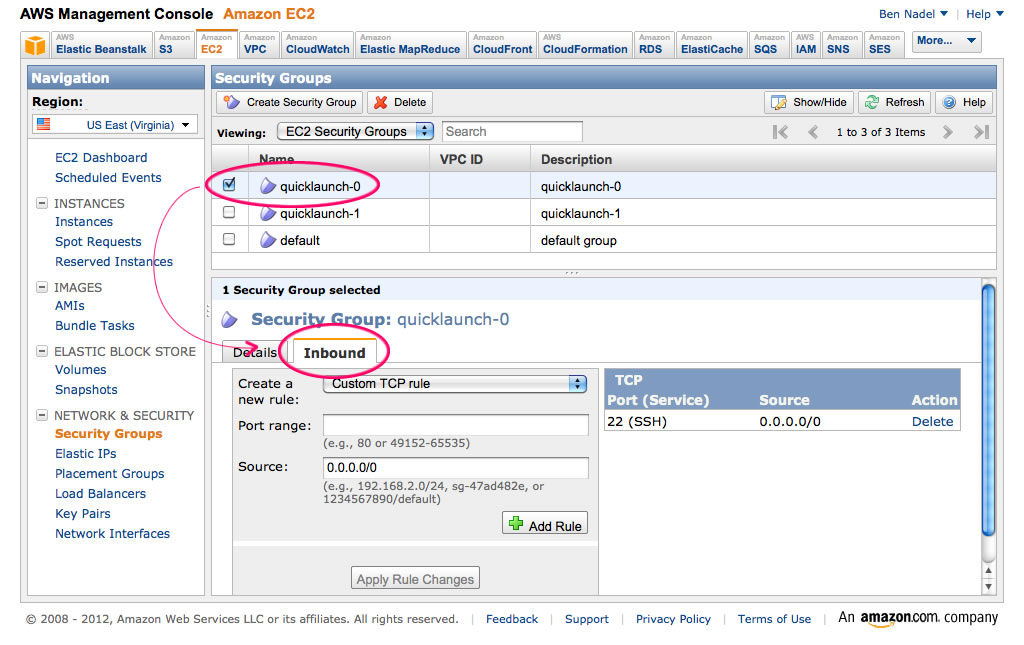
You should see that the SSH port (22) is open by default. That will allow us to remotely connect to the EC2 instance; however, in order to allow access from the web, we want to enable HTTP port 80 and a high-numbered TPC port for Node.js testing (before we pipe it into port 80).
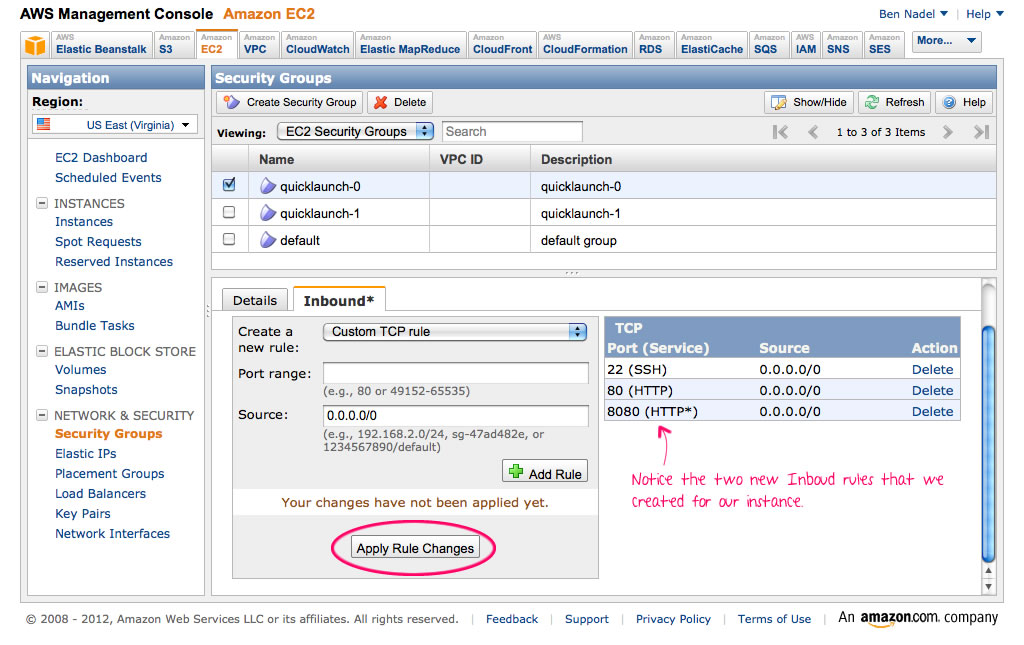
Once the rules have been defined, the changes need to be applied.
After the Security Groups have been updated, select Instances from the left-hand navigation. This should bring you to the list of running instances, where you'll want to select the newly created instance. This will bring up the details for the instance that includes the public DNS.
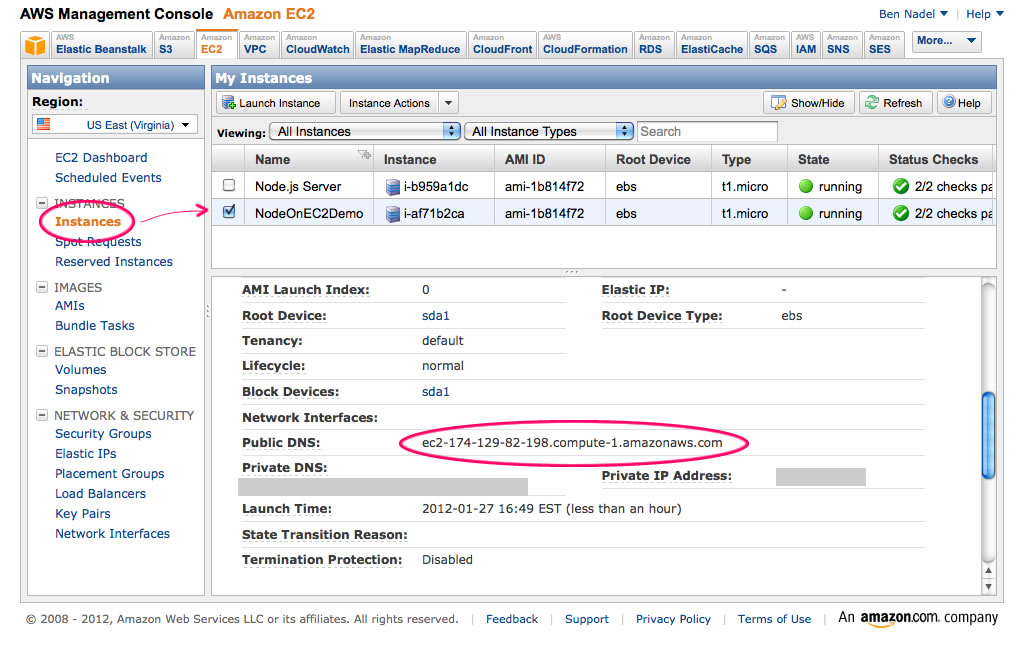
Copy the public DNS value as we'll need it to SSH into the machine.
Our Amazon EC2 Linux micro instance is now up and running. It's time to install and configure Node.js! Go to the directory where you saved your PEM (key pair) private key. Create a text file called, "connect." This will be a Bash script that makes opening the SSH connection easier.
In the new "connect" file, define the SSH command using our PEM file and the public DNS value:
connect - Our SSH Connect Bash Script
#!/bin/bash

## Connect to our EC2 instance using SSH. To do this, we have to
## supply the PEM file using -i (Identity File) during connection.
## For the user, we can use "ec2-user" and the public DNS value.
ssh \
	-i ./NodeOnEC2Demo.pem \
	ec2-user@ec2-174-129-82-198.compute-1.amazonaws.com
Notice that we are using "ec2-user" as the SSH user and our EC2 instance public DNS as the domain.
Save and close this file. Then, update the permissions so that it can be executed:
chmod +x ./connect
Once you've done this, you need to tighten the permissions on the PEM file. If too many people can access the PEM file, the SSH connection will be denied. Let's remove Read, Write, and Execute permissions for everyone but the current user (you):
chmod go-rwx ./NodeOnEC2Demo.pem
Once you've done this, you can connect to the EC2 instance by invoking the connect executable:
./connect
Once you do this, the SSH connection will be opened. At this point, you'll probably be prompted to allow the untrusted connection:
The authenticity of host 'ec2-174-129-82-198.compute-1.amazonaws.com (x.x.x.x)' can't be established. RSA key fingerprint is x:x:x:x:x:x:x:x:x:x:x:x:x:.
Are you sure you want to continue connecting (yes/no)?
To be honest, I have no idea what this actually means. Just type "yes" and continue.
At this point, you'll be connected to the ec2-user's home directory. Now, we can update the machine software and install Node.js.
THANKS TO: Instructions for updating the computer and installing Node.js, Git, and NPM (Node Package Manager) were all taken from this post by Kostas Mavropalias. I'm simply re-creating part of it here. This part of the demo should probably take like 20 minutes to download and compile everything.
Update Your EC2 Linux Box
sudo yum update
Install The GCC Compiler And Git
sudo yum install gcc-c++ make
sudo yum install openssl-devel
sudo yum install git
git clone git://github.com/joyent/node.git
cd node
git checkout v0.6.8
./configure
make
sudo make install
Add User's Directory To BIN Paths
sudo su
nano /etc/sudoers
Once inside the Nano editor, scroll to where you see the line:
Defaults secure_path = /sbin:/bin:/usr/sbin:/usr/bin
Append the following value, ":/usr/local/bin", to the end of that line. Save the file and exit the Nano editor.
Install NPM - The Node Package Manager
git clone https://github.com/isaacs/npm.git
cd npm
sudo make install
Now that we have all of our core components installed, go back to the home directory of the machine and create a directory for our Node.js site:
cd ~/
mkdir site
cd site
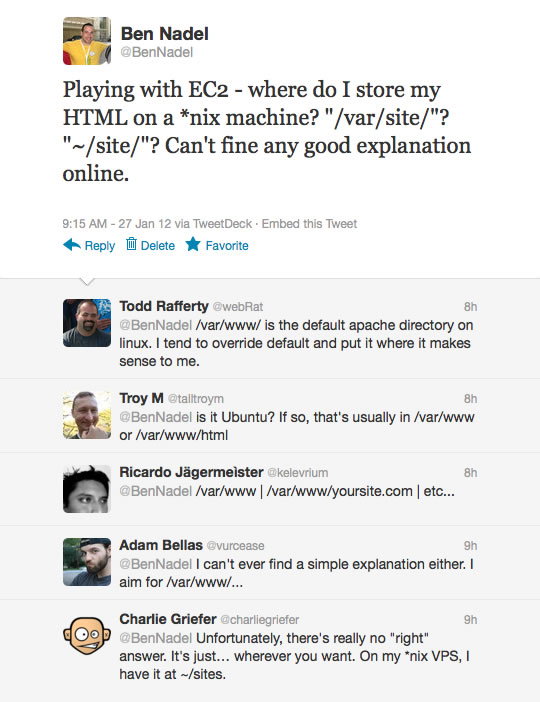
I'm putting it in the home directory; but, from the feedback I got on Twitter, a lot of people would put this in the "/var/" directory somewhere.
Once you're in the "site" directory, create the hello world file for our Node.js application. This will listen for requests coming in on port 8080 and return a static response:
server.js - Our Node.js Server File
// Load the necessary servers.
var sys = require( "sys" );
var http = require( "http" );

// Create our HTTP server.
var server = http.createServer(
	function( request, response ){


		// Create a SUPER SIMPLE response.
		response.writeHead( 200, {"content-type": "text/plain"} );
		response.write( "Hellow world from AWS!\n" );
		response.end();


	}
);

// Point the HTTP server to port 8080.
server.listen( 8080 );

// For logging....
sys.puts( "Server is running on 8080" );
You'll notice that our Node.js server is set to listen to port 8080. For security reasons, we're not supposed to allow non-core services to listen to port numbers below 1024. In order to allow requests on the standard HTTP port, 80, to be handled by our Node.js server on port 8080, we need to add some port forwarding.
Thanks to this blog post by Steve Kemp, setting up port forward is rather trivial with the use of the machine's IP Tables. Simply type this in the console:
iptables -t nat -A PREROUTING -p tcp --dport 80 -j REDIRECT --to 8080
This seamlessly redirects port 80 to port 8080.
Ok, so now we have Node.js installed and able to listen to the standard HTTP port. Now, we need a way to keep our Node.js application running even after we logout of our EC2 instance. For this, we'll use the Forever module by Nodejitsu. Let's install Forever using our Node Package Manager (NPM):
sudo npm install forever
This should download a whole bunch of stuff into our "site" directory. Once it's done, we can use Forever to launch our Node.js server. However, since the command for Forever is somewhat complex, I am going to turn it into a Bash command file:
start - The Bash Script To Invoke Forever (And Start Node.js)
#!/bin/bash

# Invoke the Forever module (to START our Node.js server).
./node_modules/forever/bin/forever \
	start \
	-al forever.log \
	-ao out.log \
	-ae err.log \
	server.js
This command defines a number of log files that can be used to log the output and errors of our Node.js site as it runs. I'd like to put those log files in a sub-directory; however, I could not figure out how to define the file paths in such a way that actually worked.
As before, we need to add execute permissions to this file in order to be able to run it:
chmod +x ./start
Before we actually invoke Forever, however, let's create a Bash script that allows us to stop our script, should we need to:
stop - The Bash Script To Invoke Forever (And Stop Node.js)
#!/bin/bash

# Invoke the Forever module (to STOP our Node.js server).
./node_modules/forever/bin/forever stop server.js
And apply the right permissions:
chmod +x ./stop
And now, we're ready to rock!!! Let's kick the tires and light the fires. Execute our Start Bash script:
./start
This will invoke the Forever module and start our Node.js server (server.js). It should output something like:
info: Forever processing file: server.js
You'll notice that calling Forever puts you back into the command-line. At any time, you can invoke the Stop command to end the Node.js server:
./stop
Or, you can simply logout of your EC2 server and let the Node.js server run.
But, does it actually work? Try testing your public DNS in your web browser to see if it works. In this demo, that would be:
http://ec2-174-129-82-198.compute-1.amazonaws.com
Hopefully, if everything went smoothly, you should get the following page output:
Hellow world from AWS!
NOTE: Yes, I see the extra "w"... I'm way too tired to fix it at this point.
Well, that's about all that I understand at this point. You can try to ask me questions; but, it is unlikely that I'll really be able to answer them. Like I said, I just got this to work for the first time. I definitely need to learn more about Unix servers and commands - I'm mostly feeling around in the dark.

Reader Comments
Nice post!
And from there,it would be nice to have an nginx proxy to redirect incoming requests to your local instances (in case you want to use serveral domains app1.mydomain.com, app2.mydomain.com redirected to local apps: localhost:8081, localhost:8082)
And also, in case the server restarts, you may need to add proper application initialization scripts to /etc/init.d to start them as a service.
@ben, my new favorite node server for screwing around is actually the beaglebone. Been pretty fun to actually use node to integrate with real world physical devices.
http://beagleboard.org/bone
http://www.youtube.com/watch?v=9JBYDbSpGfo
Wow this was really helpful!
Only thing I would add is you need to update your .bash_profile after you edit the secure_path. This is what I did:
$ . ~/.bash_profile
Otherwise, NPM won't be found.
Is there a reasy why you didn't use the yum package?
sudo yum localinstall --nogpgcheck http://nodejs.tchol.org/repocfg/fedora/nodejs-stable-release.noarch.rpm
sudo yum install nodejs
@Ivan,
I've seen people mention nginx, though I don't really know much about it. I'll have to look more into it. And thanks for the init.d pointer; I'm super new to any kind of Unix-style system management, so that kind of stuff really escapes me.
@Anthony,
Very interesting looking stuff. I love all this plug-n-play kinds of real-world technology that is coming out! It's like the next generation of "lego mind-storm."
@Matt,
I had some issues with the "su" command. I think that launched a completely new terminal session. Once I exited *out* of that one, I was able to find NPM and NODE in the bin directories.
That sort of stuff is out of my understanding of use Unix sessions really work, though.
@Curious,
I don't know much about Yum. When I was reading up on how to do this, Yum was only used for the system update, not Git. We have a case here of "monkey see, monkey do." It wasn't an educated choice on my part.
Awesome tutorial to start with node.js+EC2!!!!.
Anyway it surprises me a lot how difficult is using node.js with EC2, specially when you compare doing the same with some PaaS such as Heroku or Cloud Foundry.
Hi,
Thanks for the info, it exactly what i was looking for, very well explained for people who are not good at server side programming (includes me). i am however stuck .
i am creating a connect script file like you said but when i type this for the next step:
it says no such file or directory, so i saved it as .txt file connect.txt
goes through without anyproblem
however again when i do ./connect it says no such file or directory , and now if i do
it throws :
Please help
thanks.
hi,
i did everything as u have written upto the point of creating the start bash script file. However,
gives Operation Not Permitted.
what to do?
The chicken or the egg?
I've been trying to figure out if one installs npm with node or node with npm? This website seems to say you install node and it comes with npm: http://www.theatreinla.com/tictop.php. And the blog here on bennadel seems to be telling me that NPM installs Node. So I was wondering if someone could clear this up for me please?
-Nic
after running this command:
iptables -t nat -A PREROUTING -p tcp --dport 80 -j REDIRECT --to 8080
I am unable to access the server via browser, it says unable to connect.
what do i need to do?
please help
Hi,
1. I have installed slackware14.0 (64bit) in my local machine.
2. I have created the 10 gb image space in slackware machine using below command.?(dd if=/dev/zero of=slack14.img bs=1M count=10075). and mount the image in slack14.img.?mount -o loop slack14.img /mnt/slack1464.
3. I have format the image (slack14.img)
4. I have installed the custom package through ruby script. The custom package for?installed without any error.
After that While login the mounting image (/mnt/slack1464). and I have installed the package
I have bundle the image with this aki(aki-427d952b) and upload to amazon.
I am unable to login the server, I am getting below error
6535502.145187] ip_tables: (C) 2000-2006 Netfilter Core Team
[6535502.145235] TCP cubic registered
[6535502.145244] NET: Registered protocol family 17
[6535502.245110] XENBUS: Device with no driver: device/console/0
[6535502.247428] EXT3-fs: barriers not enabled
[6535502.257460] EXT3-fs (xvda1): mounted filesystem with writeback data mode
[6535502.257484] VFS: Mounted root (ext3 filesystem) readonly on device 202:1.
[6535502.257779] Freeing unused kernel memory: 484k freed
[6535502.257953] kjournald starting. Commit interval 5 seconds
[6535502.471724] mount used greatest stack depth: 4296 bytes left
[6535512.662690] touch used greatest stack depth: 4120 bytes left
[6535576.762574] xenbus_dev_shutdown: device/console/0: Initialising != Connected, skipping
[6535577.114477] Restarting system.
earlier I have created the .img image in (slackware13.1 & 13.37) without any error.
But I am getting the error in Slackware14.0 64bit and 32bit only.
Thanks for advance.
BY?
David
Hi there, thanks for this great article really helpful. I have a follow up question. What if i want to run a node on some other port say 3001 and without touching port 80 as it will be delivering the website. I tried node with other port but its not working for me. Any help would be great thanks.
@Ron,
I had the same problem just do
iptables -t nat -D PREROUTING -p tcp --dport 80 -j REDIRECT --to 8080.
Your website will start working.
I appreciate the post. My app is hosted on Nodejitsu right now, but I think I might eventually want to move it over to Amazon so I can have some more flexibility. For example, I'd like to use R within my app, but I don't think Nodejitsu supports it. Of course, with increased flexibility, comes increased complexity. It's going to take me a while to wrap my head around this.
@Anthony Webb: I actually use node.js and EC2 to spawn system builds *from* my BeagleBone. The BeagleBone is underpowered to rebuild the kernel or distro, so I spawn it off with scripts. [1]
While the description above on getting node.js running on EC2 is quite useful, I find the scripting method far easier, especially to document and preserve/repeat.
[1] https://github.com/jadonk/validation-scripts/tree/master/ec2-build
@Jason Krinder, that is pretty neat. Thanks for sharing! BTW, whats a guy got to do to get a hold of one of those new bones? :)
@ben nadal
i just wanted to thank you for this great article. it really helped me out..
An excellent how-to. Thanks!
Sincerely
Rodrigo
Nice Post !
I am using amazon's ec2 instance, through cygwin on my windows 7.
I was also looking to keep my "node web.js" alive, even after I close my cygwin window.
I could do it using the screen command. (ofcourse you have to install it explicitly before you use it.).
Regards,
Ashish
Nice Work!
Really appreciate it
It is very informative blog... now i got the how to manage web servers and services. You informative blog help in the effective management of Amazon EC2.
Its really a nice post . Time saver for many people.
sorry i just wanted to share knowledge of the UNIX operating system,,, sorry if I was presumptuous,,, please stop by, yes sir
http://linuxdistro12.wordpress.com
sorry i just wanted to share knowledge of the UNIX operating system,,, sorry if I was presumptuous,,, please stop by, yes sir
http://linuxdistro12.wordpress.com
Thanks for the EC2 help.
Instead of making a script to connect to the server, you should be making an SSH config file and specifying all the necessary params there (such as the IdenityFile). See this http://nerderati.com/2011/03/simplify-your-life-with-an-ssh-config-file/ or use Shuttle to manage SSH settings http://fitztrev.github.io/shuttle/.
Perfect tutorial, thank you very much. You just walked a windows guy through this maze without one hiccup. Thanks again
Thanks! This was exactly what I was looking. It worked seamlessly outside of some permission issues. I still have to do sudo ./start, but I'll figure that out later. :)
Thanks a lot! Really useful.
FYI,
on AWS Red Hat images you must run the firewall config to setup the port forwarding.
Run the following from shell and config
sudo system-config-firewall-tui
This added configuration info to the end of my /etc/sysconf/iptables file
# Firewall configuration written by system-config-firewall
# Manual customization of this file is not recommended.
*nat
:PREROUTING ACCEPT [0:0]
:OUTPUT ACCEPT [0:0]
:POSTROUTING ACCEPT [0:0]
-A POSTROUTING -o eth+ -j MASQUERADE
-A PREROUTING -i eth0 -p tcp --dport 80 -j DNAT --to-destination xxx.xxx.xxx.xxx:8080
COMMIT
where "xxx.xxx.xxx.xxx" was the server address.
I did not have to reboot. This allowed me to browse my node.js server running in forever.
Thanks for this article! It is an excellent starting point for an AWS noob like myself. Using this blog (along with the USCLUG MEAN stack deployment video on youtube and a few other EC2 + node related blogs) I was able to setup a full MEAN stack on EC2 and create a simple persistent SPA. Now for the real work of using this great stack to its fullest! Kudos again!
Thank you SO much for writing this. I can't imagine how long this would have taken me without your guide.
Thank you, really helped me to ramp up with my first cloud service :)
Thanks for posting! .. I was able to get up and running in no time at all.
hello
thank you for the very helpful document you provided,
i have done everything as recommended,
i only have a problem with forever
# ./start
module.js:340
throw err;
Error: Cannot find module './daemon.v0.10.30'
am sure its a problem with path, i have deleted forever installed - reinstall it many times but the problem persists .. can any one who has passed through this give me a hand ... much appreciated
many thanks
cheers
You cannot access phpMyAdmin if you do this ?
Please let me know how to that.
Thanks
@Migz,
try this,
vim script.sh
: set fileformat=unix
:wq